Database setup for EQuIS Geotech involves updating existing databases with the Geotech Schema and ensuring that all pertinent files are installed. This article covers:
•Configuring Formats for Enterprise EDP
•Loading Graphics and Templates to DT_FILE
•Miscellaneous Database Configuration
Initial Database Setup
1.(Optional Step) Create Database – Create a new EQuIS database following the instructions listed in the Create New EQuIS Database article. Skip this step if EQuIS Geotech will be applied to an EQuIS existing database.
2.Apply Geotech Schema – Open EQuIS Professional and apply the following Schemas: Standard EQuIS Schema, Collect Schema, and Geotech Schema. Follow the instructions provided here to apply the Schemas to an EQuIS database.
Note: An invalid column name 'depth unit' error can happen when applying the Geotech Schema if the Professional Schema has not been updated to the same build prior to applying the Geotech Schema. |
|---|

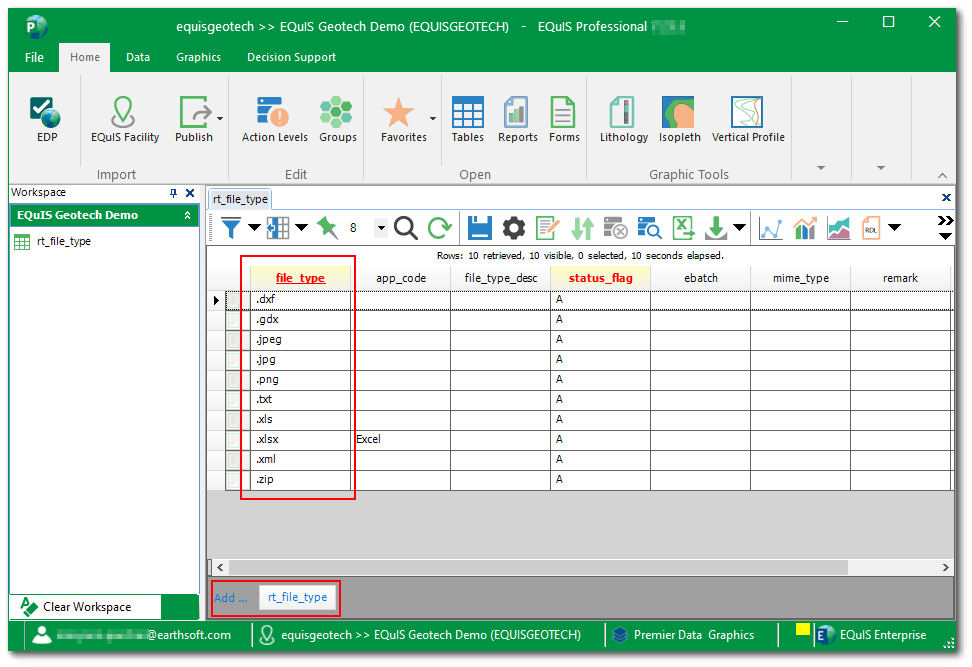
3.Set RT_FILE_TYPE Options – For the standard reports and dashboard widgets to run properly, the necessary file types must be set as reference values in the database. In Professional, select the Tables option from the Open group of the Home ribbon. Select the Reference Tables options and open the RT_FILE_TYPE table.

Once the RT_FILE_TYPE table opens, add the following values by selecting the table name (RT_FILE_TYPE) to the right of the "Add ..." button at the bottom of the window. A new blank record is displayed at the bottom of the data table. Enter the values listed below as individual records. Click Save after adding the new records.
.dxf |
|---|
.gdx |
.jpeg |
.jpg |
.png |
.txt |
.xls |
.xml |
.zip |
Publishing Reports
EQuIS base reports and user reports can be published to the database. Database publishing allows use of the report in Enterprise, provided that report dependencies are in the Enterprise \bin folder. Users without the Report Library (or selected report files) installed are also able to use a published report, provided their permissions allow it. The published report will then be the version used for all users of the database, unless a user has a newer version installed on their system.
Reports are saved to the database using the Report Publisher in Professional. This creates entries in the ST_MODULE, ST_REPORT, and ST_REPORT_PARAMETER tables. If choosing to store the report assembly in the database, the assembly will be present as a Binary Large Object (BLOB) in ST_MODULE.ASSEMBLY, appearing as “System.Byte[]” within the table.
EQuIS Geotech includes numerous standard reports that are Dynamic Link Library (DLL) files that need to be published to the database. Publish the EQuIS Geotech reports to the database with the following steps:
1.Gather the EQuIS Geotech report DLL files. Information on where these DLL files can be found is provided below.
a.EarthSoft.Reports.Library.d13047.dll (Geotechnical Collect Report) – This DLL can be found in the EQuIS_Collect package found on the ECC. It is located in the reports folder.
b.EarthSoft.Reports.Library.149680.dll (Collect Reports) – This DLL can be found in the EQuIS_Collect package found on the ECC. It is located in the reports folder.
c.EarthSoft.Reports.Library.176839.dll (Geotechnical Sample Reports) – This DLL can be found in the EQuIS_Geotech package found on the ECC. It is located in the Reports folder.
d.EarthSoft.Reports.Library.d26526.dll (Geotechnical Field Reports) – This DLL can be found in the EQuIS_Geotech package found on the ECC. It is located in the Reports folder.
e.EarthSoft.Reports.Library.d30147.dll (Geotechnical Widget Data Revisions) – This DLL can be found in the EQuIS_Geotech package found on the ECC. It is located in the Reports folder.
f.EarthSoft.Reports.Library.d30189.dll (Geotechnical Results) – This DLL can be found in the EQuIS_Geotech package found on the ECC. It is located in the Reports folder.
g.EarthSoft.Reports.Library.d31073.dll (Geotechnical Export - AGS 4) – This DLL can be found in the EQuIS_Geotech package found on the ECC. It is located in the Reports folder.
h.EarthSoft.Reports.Library.EnviroInsite.dll (EnviroInsite Reports) – This DLL can be found in the Professional installation package.
i.EarthSoft.Interface.gINT.dll (publish gINT Export) – This DLL can be found in the Professional installation package.
2.Open Professional. Select the Publish > Publish Reports button on the Home ribbon to open the Report Publisher.
3.Publish each of the EQuIS Geotech Report DLL files listed in Step 1 using the Report Publisher. Each report file must be published separately. For detailed instructions on how to load and publish the reports, see the Quick Start Guide and full Report Publisher articles.
4.Close Professional and navigate to the folder where Professional is installed. Copy the EarthSoft.Reports.Library.176839.dll file from the EQuIS_Geotech package and paste it in the EQuIS folder (the default location is C:\Program Files\EarthSoft\EQuIS or, for per-user installation, %localappdata%\Programs\EarthSoft\EQuIS\). The EarthSoft.Reports.Library.176839.dll file is a referenced assembly for the EarthSoft.Reports.Library.d26526.dll file and must be present in the directory.
Configuring Formats for Enterprise EDP
EQuIS Geotech uses Enterprise EDP on the standard dashboards to load data from the Web Forms widgets or upload instrumentation data files. Thus, the EQuIS formats used in the EQuIS Geotech workflow and on the dashboards must be uploaded to the database and appropriately configured in the ST_CONFIG table. Enterprise EDP format registration consists of a set of records in the ST_CONFIG table for each Registered Format Name. Detailed instructions are provided in the EQuIS Format Definition Configuration article.
In addition to standard EQuIS formats, the EQuIS Geotech workflow uses EQuIS Link Mapping Project Templates as "virtual" formats to upload instrumentation data and project lab fee information to EQuIS via the Enterprise EDP EDD Upload widget. These Link files must also be uploaded to the database and configured.
Note: Roles or Users will need Viewer Permission on the file itself or the Files object type through the Permissions Grid to have access to the format in the EDP EDD Upload Widget. |
|---|
Follow the steps below to upload and configure the EQuIS formats associated with the EQuIS Geotech workflow. Additional information is available in the Add or Modify Enterprise EDP Formats article.
Note: EQuIS formats are packaged in a zipped archive. The formats (and Link files) must be zipped before uploading to the DT_FILE table. |
|---|
1.Gather the following Formats. Information on where these Formats can be found is provided below.
a.Geotechnical_v2.zip – This format can be found in the EQuIS Geotech package downloaded from the ECC. The ZIP file is located in the Formats folder.
b.Geo_Lab_Fees.zip – This format can be found in the EQuIS Geotech package downloaded from the ECC. The ZIP file is located in the Formats folder.
c.Geotech_Refvals.zip – This format can be found in the EQuIS Geotech package downloaded from the ECC. The ZIP file is located in the Formats folder.
d.refvals.zip – This format can be found in the Professional package. The ZIP file is located in the \Formats\EarthSoft folder.
e.Facility.zip – This format can be found in the Professional package. The ZIP file is located in the \Formats\EarthSoft folder.
f.EQuIS Link Files (8 files) – The Link zipped files can be found in the EQuIS Geotech package downloaded from the ECC. The zipped files are located in the \Configuration Files\Link Files folder. The eight files are:
•CPT_DIS_Geotech_AB.zip
•CPT_DIS_Hogentogler.zip
•CPT_Geotech_AB.zip
•CPT_Hogentogler.zip
•DMT_EarthSoft.zip
•Project_LabTestFees.zip
•UC_Sigma1.zip
•UU_Sigma1.zip
2.Upload the formats and Link files gathered in Step 1 to the DT_FILE table. Each file will have a FILE_ID in the DT_FILE table after upload. Note the FILE_ID of each file as this information will be needed during the configuration step. There are two options to upload the zipped (*.zip) files:
•Docs and Photos Form in Professional – Upload the files to the database folder. Do not upload these files to a specific Facility. The FILE_ID is obtained from DT_FILE.FILE_ID.
•Explorer Widget in Enterprise – The Facility Chooser must be empty when uploading a new file through the Explorer Widget. The FILE_ID can be obtained by hovering the cursor over the file name. This displays the download link in the bottom left corner of the browser. The FILE_ID is the number at the end of the link.
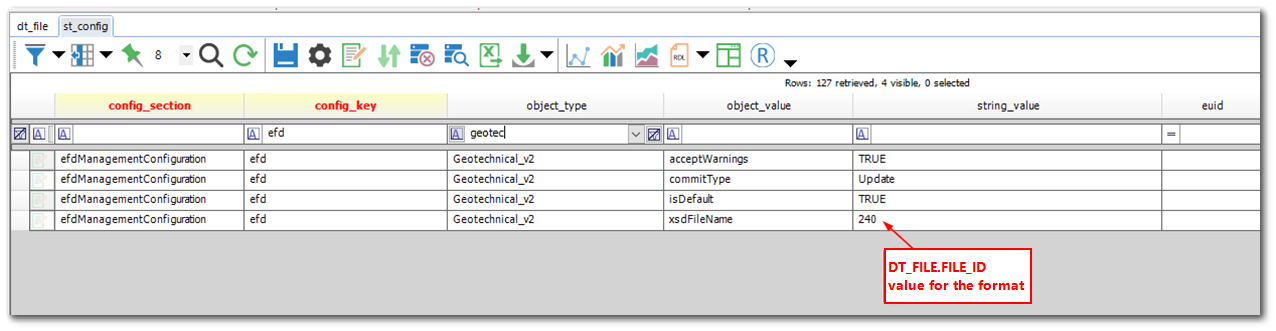
3.Configure the Geotechnical_v2, Geo_Lab_Fees, and Facility formats uploaded in Step 2 in the ST_CONFIG table. Each format has associated records in the ST_CONFIG table that define the format, commit type, and whether it accepts warnings. The STRING_VALUE associated with the xsdFileName will need to be populated with the DT_FILE.FILE_ID value for the format. Follow the steps below to enter the records directly in the ST_CONFIG table for the Geotechnical_v2 format and then repeat the steps (except for Step e) for the Geo_Lab_Fees and Facility formats.
a.In Professional, select the Tables option from the Open section of the Home ribbon. Select the System Tables options and open the ST_CONFIG table.
b.Add a row and input the following details:
CONFIG_SECTION = efdManagementConfiguration
CONFIG_KEY = efd
OBJECT_TYPE = [format name] (e.g., Geotechnical_v2)
OBJECT_VALUE = xsdFileName
STRING_VALUE = [DT_FILE.FILE_ID]
c.Add another row with the same CONFIG_SECTION, CONFIG_KEY, OBJECT_TYPE and:
OBJECT_VALUE = commitType
STRING_VALUE = Update. See EQuIS Format Definition Configuration for descriptions of the possible commitTypes.
d.Add another row with the same CONFIG_SECTION, CONFIG_KEY, OBJECT_TYPE and:
OBJECT_VALUE = acceptWarnings
STRING_VALUE = True
e.Optional setting for only the Geotechnical_v2 format. This record is not necessary for the other formats. The default format for the Enterprise instance should have a fourth row, with the same CONFIG_SECTION, CONFIG_KEY, OBJECT_TYPE and:
OBJECT_VALUE = isDefault
STRING_VALUE = True
f.Click Save.
4.Configure the "virtual" formats for the Link files uploaded in Step 2 in the ST_CONFIG table. The Enterprise workflow service can process files that do not conform to a specific EQuIS format (e.g., CPT instrument data) by running the files through EQuIS Link, which will generate valid EDDs for an EQuIS format specified in the ST_CONFIG table. For the Link files, the STRING_VALUE associated with the xsdFileName will need to be populated with the DT_FILE.FILE_ID value for the EQuIS format to which the link file maps—not the DT_FILE.FILE_ID value for the Link file.
To configure the EQuIS Geotech Link files as formats, two additional records will need to be added in the ST_CONFIG table where the
•OBJECT_VALUE = LinkProjectFileID – This will be the DT_FILE.FILE_ID value for the Link file.
•OBJECT_VALUE = LinkSourceFileType – This will be defined by the type of source data used in the Link file.
Use the information in the tables below to configure each of the EQuIS Link files.
Note: The Project_LabTestFees Link file maps to the Geo_Lab_Fees format to upload data. The other EQuIS Geotech Link files map to the Geotechnical_v2 format. |
|---|
CPT_DIS_Geotech_AB.zip
CONFIG_SECTION |
CONFIG_KEY |
OBJECT_TYPE |
OBJECT_VALUE |
STRING_VALUE |
|---|---|---|---|---|
efdManagementConfiguration |
efd |
CPT_DIS_Geotech_AB |
xsdFileName |
[DT_FILE.FILE_ID for the Geotechnical_v2 format] |
efdManagementConfiguration |
efd |
CPT_DIS_Geotech_AB |
commitType |
Update |
efdManagementConfiguration |
efd |
CPT_DIS_Geotech_AB |
acceptWarnings |
True |
efdManagementConfiguration |
efd |
CPT_DIS_Geotech_AB |
LinkProjectFileID |
[DT_FILE.FILE_ID] |
efdManagementConfiguration |
efd |
CPT_DIS_Geotech_AB |
LinkSourceFileType |
AB_CPT |
CPT_Geotech_AB.zip
CONFIG_SECTION |
CONFIG_KEY |
OBJECT_TYPE |
OBJECT_VALUE |
STRING_VALUE |
|---|---|---|---|---|
efdManagementConfiguration |
efd |
CPT_Geotech_AB |
xsdFileName |
[DT_FILE.FILE_ID for the Geotechnical_v2 format] |
efdManagementConfiguration |
efd |
CPT_Geotech_AB |
commitType |
Update |
efdManagementConfiguration |
efd |
CPT_Geotech_AB |
acceptWarnings |
True |
efdManagementConfiguration |
efd |
CPT_Geotech_AB |
LinkProjectFileID |
[DT_FILE.FILE_ID] |
efdManagementConfiguration |
efd |
CPT_Geotech_AB |
LinkSourceFileType |
AB_CPT |
CPT_DIS_Hogentogler.zip
CONFIG_SECTION |
CONFIG_KEY |
OBJECT_TYPE |
OBJECT_VALUE |
STRING_VALUE |
|---|---|---|---|---|
efdManagementConfiguration |
efd |
CPT_DIS_Hogentogler |
xsdFileName |
[DT_FILE.FILE_ID for the Geotechnical_v2 format] |
efdManagementConfiguration |
efd |
CPT_DIS_Hogentogler |
commitType |
Update |
efdManagementConfiguration |
efd |
CPT_DIS_Hogentogler |
acceptWarnings |
True |
efdManagementConfiguration |
efd |
CPT_DIS_Hogentogler |
LinkProjectFileID |
[DT_FILE.FILE_ID] |
efdManagementConfiguration |
efd |
CPT_DIS_Hogentogler |
LinkSourceFileType |
HT_CPT |
CPT_Hogentogler.zip
CONFIG_SECTION |
CONFIG_KEY |
OBJECT_TYPE |
OBJECT_VALUE |
STRING_VALUE |
|---|---|---|---|---|
efdManagementConfiguration |
efd |
CPT_Hogentogler |
xsdFileName |
[DT_FILE.FILE_ID for the Geotechnical_v2 format] |
efdManagementConfiguration |
efd |
CPT_Hogentogler |
commitType |
Update |
efdManagementConfiguration |
efd |
CPT_Hogentogler |
acceptWarnings |
True |
efdManagementConfiguration |
efd |
CPT_Hogentogler |
LinkProjectFileID |
[DT_FILE.FILE_ID] |
efdManagementConfiguration |
efd |
CPT_Hogentogler |
LinkSourceFileType |
HT_CPT |
DMT_EarthSoft.zip
CONFIG_SECTION |
CONFIG_KEY |
OBJECT_TYPE |
OBJECT_VALUE |
STRING_VALUE |
|---|---|---|---|---|
efdManagementConfiguration |
efd |
DMT_EarthSoft |
xsdFileName |
[DT_FILE.FILE_ID for the Geotechnical_v2 format] |
efdManagementConfiguration |
efd |
DMT_EarthSoft |
commitType |
Update |
efdManagementConfiguration |
efd |
DMT_EarthSoft |
acceptWarnings |
True |
efdManagementConfiguration |
efd |
DMT_EarthSoft |
LinkProjectFileID |
[DT_FILE.FILE_ID] |
efdManagementConfiguration |
efd |
DMT_EarthSoft |
LinkSourceFileType |
Excel |
UC_Sigma1.zip
CONFIG_SECTION |
CONFIG_KEY |
OBJECT_TYPE |
OBJECT_VALUE |
STRING_VALUE |
|---|---|---|---|---|
efdManagementConfiguration |
efd |
UC_Sigma1 |
xsdFileName |
[DT_FILE.FILE_ID for the Geotechnical_v2 format] |
efdManagementConfiguration |
efd |
UC_Sigma1 |
commitType |
Update |
efdManagementConfiguration |
efd |
UC_Sigma1 |
acceptWarnings |
True |
efdManagementConfiguration |
efd |
UC_Sigma1 |
LinkProjectFileID |
[DT_FILE.FILE_ID] |
efdManagementConfiguration |
efd |
UC_Sigma1 |
LinkSourceFileType |
UU_UC |
UU_Sigma1.zip
CONFIG_SECTION |
CONFIG_KEY |
OBJECT_TYPE |
OBJECT_VALUE |
STRING_VALUE |
|---|---|---|---|---|
efdManagementConfiguration |
efd |
UU_Sigma1 |
xsdFileName |
[DT_FILE.FILE_ID for the Geotechnical_v2 format] |
efdManagementConfiguration |
efd |
UU_Sigma1 |
commitType |
Update |
efdManagementConfiguration |
efd |
UU_Sigma1 |
acceptWarnings |
True |
efdManagementConfiguration |
efd |
UU_Sigma1 |
LinkProjectFileID |
[DT_FILE.FILE_ID] |
efdManagementConfiguration |
efd |
UU_Sigma1 |
LinkSourceFileType |
UU_UC |
Project_LabTestFees.zip
CONFIG_SECTION |
CONFIG_KEY |
OBJECT_TYPE |
OBJECT_VALUE |
STRING_VALUE |
|---|---|---|---|---|
efdManagementConfiguration |
efd |
Project_LabTestFees |
xsdFileName |
[DT_FILE.FILE_ID for the Geo_Lab_Fees format] |
efdManagementConfiguration |
efd |
Project_LabTestFees |
commitType |
Update |
efdManagementConfiguration |
efd |
Project_LabTestFees |
acceptWarnings |
True |
efdManagementConfiguration |
efd |
Project_LabTestFees |
LinkProjectFileID |
[DT_FILE.FILE_ID] |
efdManagementConfiguration |
efd |
Project_LabTestFees |
LinkSourceFileType |
Excel |
Reference Values
Since EQuIS Geotech is designed to use standard "out-of-the-box" reports and Enterprise dashboards, standard reference values must be present in the EQuIS database for EQuIS Geotech to operate correctly. The Geotech_refvals Format contains an EDD section for each of the reference value tables applicable to the EQuIS Geotech Schema. The Geotech_Refvals_EDD.xlsx file provided in the EQuIS Geotech package (in the Formats folder) can be used with the Geotech_refvals Format to upload EQuIS Geotech reference values to the correct EQuIS reference tables.
Follow the steps below to upload the EQuIS Geotech reference values EDD:
1.Open Professional EDP.
2.Click the Format button (located in the Open group on the Home ribbon).
3.Select the Geotech_Refvals format file and click Open.
4.Click the EDD button (located in the Open group of the Home ribbon) and open the Geotech_Refvals_EDD.xlsx file. This EDD is provided in the EQuIS Geotech package (in the Formats folder).
5.Select the Professional tab.
6.Create a package and Commit the package using the "Insert and Update" commit type. See the Professional EDP Package article for more information. Note that the Geotech_Refvals format has a refresh issue with the RT_REMAP_DETAIL table. Therefore, complete Step 7 to load data for the RT_REMAP_DETAIL table.
7.Once the data in Step 6 have been submitted, restart Professional EDP by exiting and reopening it. The Geotech_Refvals format should reload. Repeat Steps 4 through 6.
Create EQuIS Geotech Demo Facility
EarthSoft HIGHLY recommends loading the reference values and data associated with EQuIS Geotech Demo facility. This facility can be used when configuring the EQuIS Collect templates. In addition, the EQuIS Geotech Demo facility can be used for training. The EDD files to setup the EQuIS Geotech Demo facility are provided with the EQuIS Geotech download package in the \Configuration Files\EQuIS Geotech Demo EDDs folder.
Note: The ReferenceValueEDD_EQuISGeotechDemo_Refvals.xlsx file loads data to the AT_MATERIAL, RT_COMPANY_TYPE, RT_COMPANY, RT_COORD_TYPE, RT_EQUIPMENT_PARAM,TYPE, RT_EQUIPMENT_TYPE, RT_FILE_TYPE, RT_GEOLOGIC_UNIT, RT_GROUP, RT_GROUP_MEMBER, RT_LOCATION_TYPE, RT_MATERIAL, RT_MATRIX, RT_SAMPLE_METHOD, RT_SAMPLE_TYPE, RT_STATE, RT_UNIT, and RT_WELL_SEGMENT_TYPE tables. |
|---|
Follow the steps below to create the EQuIS Geotech Demo facility and upload reference values and data EDDs:
1.Open Professional.
2.Using the Facility Form, create a new facility called 'EQUISGEOTECH'. Save.
3.Open the ST_GROUP_TYPE table and add a new record where GROUP_TYPE = ‘sieve_set’ as discussed in the Sieve Set Configuration section.
4.Close and re-open Professional, connected to the EQUISGEOTECH facility.
5.Open Professional EDP.
6.Click the Format button (located in the Open group on the Home ribbon).
7.Select the standard EQuIS refvals format file and click Open.
8.Click the EDD button (located in the Open group of the Home ribbon) and open the ReferenceValueEDD_EQuISGeotechDemo_Refvals.xlsx file.
9.Select the Professional tab.
10.Create a package and Commit the package using the "Insert and Update" commit type.
11.Click the Format button.
12.Select the Geotechnical_v2 format file and click Open.
13.Click the EDD button (located in the Open group of the Home ribbon) and open the EQuISGeotechDemo Project_EDDExample_Geotechnical_v2.xlsx file.
14.Select the Professional tab.
15.Create a package and Commit the package using the "Insert and Update" commit type.
Values Referenced in EQuIS Geotech Field and Lab Reports
•The CPT and DMT functions and reports require the PARAM_VALUE = ‘E’ or ‘M’ for DT_TASK_PARAMETER.PARAM_CODE = ‘cpt_output_units’.
•The PARAM_VALUE = ‘Default’ for DT_TASK_PARAMETER.PARAM_CODE = ‘logo’ in order for reports to use the office logo. If a different logo should be used for a project, then the DT_TASK_PARAMETER.PARAM_CODE = ‘alternative_logo’ should be populated with the appropriate office name. There must be a file in the DT_FILE table with DT_FILE.PLACE_TYPE = ‘Office Logo’ and DT_FILE.PLACE_CODE = ‘Default’ or the office name.
•The Geotechnical Unconfined Compression and Geotechnical Unconsolidated Undrained reports use the following units:
•PSI – Pounds per square inch
•TSF – Tons per square foot
•PSF – Pounds per square foot
Loading Graphics and Templates to DT_FILE
EnviroInsite Material Graphics
Standard material graphics to use in EnviroInsite boring logs and subsurface profiles are provided with EQuIS Geotech. The material graphic files need to be uploaded to the DT_FILE table and appropriately configured before they can be used with EnviroInsite. Follow the steps below.
1.The material graphics are included in the EQuIS Geotech package downloaded from the ECC. The files are in the EQuIS Geotech EnviroInsite Graphics.zip file. Unzip the file. The material graphic files are in the \Configuration Files\EQuIS Geotech EnviroInsite Graphics\Hatch Patterns folder.
2.Upload the EnviroInsite material graphic files unzipped in Step 1 to the DT_FILE table. There are two options to upload the files:
•Docs and Photos Form in Professional – Upload the files to the database folder. Do not upload these files to a specific Facility.
•Explorer Widget in Enterprise – The Facility Chooser must be empty when uploading a new file through the Explorer Widget.
3.Some additional setup is required to use the material graphic files uploaded in Step 2 in EnviroInsite. Each material graphic file must be associated with the appropriate PATTERN field in the RT_MATERIAL table. To link RT_MATERIAL and DT_FILE, the RT_MATERIAL.PATTERN should be populated with the appropriate DT_FILE.FILE_ID. This can be done through an SQL script (recommended) or manually.
a.SQL Script – Users can execute the following script in SQL Server Management Studio to automatically update RT_MATERIAL.PATTERN with the appropriate DT_FILE.FILE_ID if DT_FILE.FILE_NAME = RT_MATERIAL.MATERIAL_NAME. The appropriate FILE_ID is found based on DT_FILE.FILE_NAME matching RT_MATERIAL.MATERIAL_NAME, so users may have to correct or manually add some entries.
update
rt_material
set
pattern=f.file_id
from rt_material m
inner join dt_file f on m.material_name =left(f.file_name,len(f.file_name) - charindex('.', Reverse(f.file_name)))
b.Manual Association – Users can view the relationship between RT_MATERIAL.MATERIAL_NAME and DT_FILE.FILE_NAME by running this query in the EQuIS SQL Form in Professional.
select m.material_name,f.file_name,m.pattern,f.file_id from rt_material m
inner join dt_file f on m.material_name =left(f.file_name,len(f.file_name) - charindex('.', Reverse(f.file_name)))
order by m.material_name
Note: Material Graphics containing SILT have limitations in EnviroInsite. |
|---|
Upload Graphic Files and Report Templates
The EQuIS Geotech package downloaded from the ECC contains numerous Microsoft Excel template files and other graphic files to use with the standard EQuIS Geotech reports and dashboards. These files need to be uploaded to the DT_FILE table and appropriately configured in the database (assign values to DT_FILE.PLACE_TYPE and DT_FILE.PLACE_CODE) to work correctly when running the reports.
To assist with this configuration, the EQuIS Geotech DT_FILE_EDD_EQEDD_v2.zip file is an EDD designed to load the files using the EQEDD_v2 format and contains the appropriate DT_FILE.PLACE_TYPE and DT_FILE.PLACE_CODE values for each file where needed. Refer to the EQuIS Geotech Files on the ECC description for more information on what this EDD file contains.
To use this EDD file, follow the steps below. To manually upload each file and enter the correct DT_FILE.PLACE_TYPE and DT_FILE.PLACE_CODE values, see the Manually Load Files article.
1.Open Professional EDP.
2.Click the Format button (located in the Open group on the Home ribbon).
3.Select the EQEDD_v2 format file and click Open.
4.Click the EDD button (located in the Open group of the Home ribbon) and open the EQuIS Geotech DT_FILE_EDD_EQEDD_v2.zip file. This EDD is provided in the EQuIS Geotech package (in the Configuration Files folder). The Files_v2 section of the format will populate with contents of the EDD.
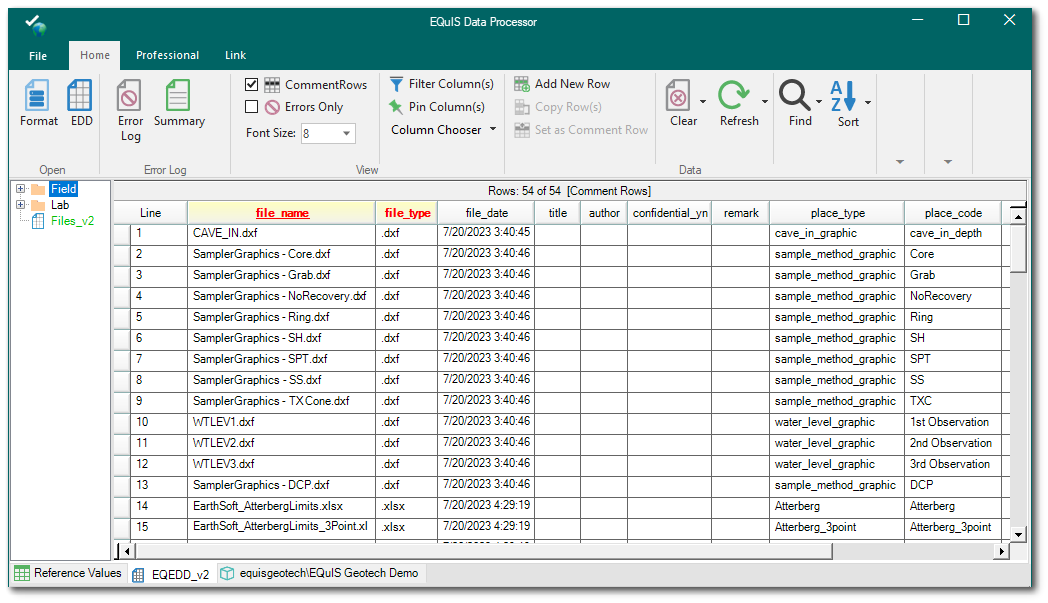
5.Select the Professional tab.
6.Create a package and Commit the package using the "Insert and Update" commit type.
7.After the data have loaded, open Professional.
8.Select the Tables option from the Open group of the Home ribbon. Select the Data Tables options and open the DT_FILE table.
9.Filter EBATCH for the ebatch that was just loaded. Remove the FACILITY_ID value for the files uploaded.
10.Test the EQuIS Geotech EnviroInsite and Report Templates by running the reports in Professional.
Miscellaneous Database Configuration
The Miscellaneous Database Configuration article provides additional information to understand the EQuIS Geotech workflow and how data are connected in the database.