•Configuring via EQuIS Enterprise
•Configuring via EQuIS Professional
oUpdate Enterprise to Use Format Files
EQuIS Enterprise supports multiple EDP formats. This article explains how to add formats to the EDP EDD Upload Widget via EQuIS Enterprise or EQuIS Professional. If the user has appropriate permissions to the server and the database, setting up EDP formats for use is a two-step process:
1. Add EQuIS Format File to the Server or Database.
2. Update Enterprise to Use Format Files.
Configuring via EQuIS Enterprise
Add Format File:
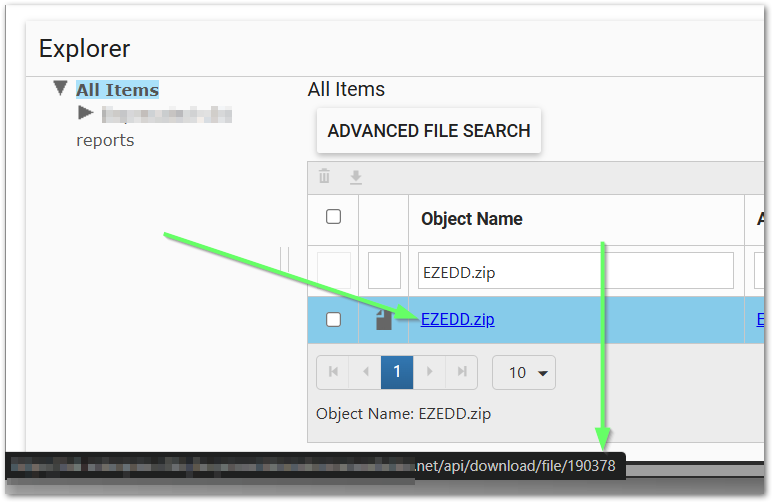
The zipped (*.zip) format file can be uploaded to the database (DT_FILE table) using the Explorer Widget in EQuIS Enterprise (recommended). The FILE_ID is obtained by hovering the cursor over the file name, which displays the download link in the bottom left corner of the browser – the FILE_ID is the number at the end of the link.
The zipped (*.zip) format file can also be uploaded to the server (see Add Format Files to Server for more information).
Update Existing Format File:
If the format file already exists in the database but the format needs to be updated, this can be done using the File Editor window in the Explorer widget.
Update Enterprise to use Format File:
Administrator users may modify, update, or add new format file configuration directly in the EDP Format Definitions tab of the Workflow widget in EQuIS Enterprise. It is recommended to update or add new format configuration using the Workflow widget.
When the Schema is created, by default, EQuIS Enterprise is configured with three sets of records in the ST_CONFIG table for three standard EQuIS formats - EFWEDD, EQEDD, and EQEDD_v2. These format configurations should be reviewed and modified to meet user needs. The default commit type is Insert and Update.
Notes: •It is recommended that the EDP format build matches the Enterprise site/database build. When upgrading the Enterprise site and database, review the format configuration to meet the users’ need and update accordingly. If stored in DT_FILE, formats can be updated following these instructions. •The “Unique format name” in the Workflow Widget cannot include the period character "." •The 'XSD File Name Path or File ID' in the Workflow Widget varies based on where the format is stored: oIf the format is stored in the database, it is the FILE_ID which can be obtained from the Explorer Widget or from DT_FILE.FILE_ID in Professional. In the Explorer Widget, hover over the file name to see the file path; the FILE_ID is the number at the end of the file path. oIf the format is stored on the server, it is the full path of the format file directory on the server (e.g., D:/home/Formats/EarthSoft/EZEDD.zip). |
Configuring via EQuIS Professional
Add Format File:
The zipped (*.zip) format file can be uploaded to the database (DT_FILE table) using the Docs & Photos Form in EQuIS Professional. The FILE_ID is obtained from DT_FILE.FILE_ID.
The zipped (*.zip) format file can also be uploaded to the server (see Add Format Files to Server for more information).
Update Existing Format File:
If the format file already exists in the database but the format needs to be updated, this can be done using the Blobber Form in EQuIS Professional – select the Update button and the FILE_ID obtained from DT_FILE.FILE_ID to overwrite the existing format file.
Note: Roles or Users will need Viewer Permission on the file itself or the Files object type through the Permission Grid in order to have access to the format in the EDP EDD Upload Widget. |
Update Enterprise to Use Format Files
Permission Prerequisites: •Database Access - The ability to add or edit records in the ST_CONFIG table. |
|---|
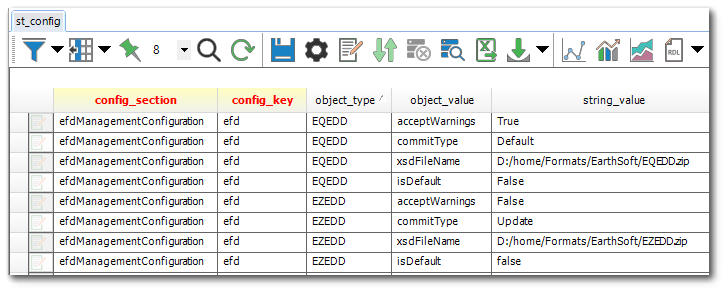
Administrator users may follow the steps below to manually configure formats directly in the ST_CONFIG table in EQuIS Professional (see example format configuration in the screenshot below):
1.Login to EQuIS Professional and open the ST_CONFIG table.
2.Add a row and input the following details:
CONFIG_SECTION = efdManagementConfiguration
CONFIG_KEY = efd
OBJECT_TYPE = [format name] (e.g., EFWEDD, EQEDD, or EQEDD_v2). The name of the format in OBJECT_TYPE cannot include (.) periods.
OBJECT_VALUE = xsdFileName
STRING_VALUE =
a.If the format has been added to the Server, STRING_VALUE = the directory where it was loaded (e.g., D:/home/Formats/EarthSoft/EZEDD.zip).
b.If the format has been added to the database, STRING_VALUE = [DT_FILE.FILE_ID] (e.g., 156478) .
3.Add another row with the same CONFIG_SECTION, CONFIG_KEY, OBJECT_TYPE and:
OBJECT_VALUE = commitType
STRING_VALUE = [commitType]. See EQuIS Format Definition Configuration for descriptions of the possible commitTypes.
4.Add another row with the same CONFIG_SECTION, CONFIG_KEY, OBJECT_TYPE and:
OBJECT_VALUE = acceptWarnings
STRING_VALUE = True or False
5.Optional setting. This record is not necessary for the other formats. The default format for the Enterprise instance should have a fourth row, with the same CONFIG_SECTION, CONFIG_KEY, OBJECT_TYPE and:
OBJECT_VALUE = isDefault
STRING_VALUE = True
6.Click Save. Click Refresh and see if new entries were added.
See the EQuIS Format Definition Management chapter and associated articles for more details on the ST_CONFIG table settings.
Warning: Do not make any changes to records in the ST_CONFIG table other than the intended records for modifying the EDP formats. |
|---|
Permission Prerequisites: •Server Access - The ability to upload the format files to the Enterprise 7 folder or alter folder permissions. |
For standard installations, the server administrator can upload the format files within the Enterprise 7 directory by adding a folder called Formats, if it does not already exist (e.g., C:\Program Files\EarthSoft\Enterprise7\Formats\EarthSoft). Using this structure will allow the application pool identity to have the same access to the formats folder as it does to the Enterprise 7 directory.
If another directory is chosen, the folder permissions will need to be updated on the Format folder so that the IIS Application Pool Identity account (or Web App) has proper access to read and execute as well as list directory contents permissions on that folder.