•Widget Properties: EDP Format Definitions, Add New Agent
•Workflow Agents General Properties: Batch Scheduler, Email Delivery, Email Retrieval, File Monitor, File Process, File Validate, Follow Up Task, FTP Retrieve, Hook Process, Report Generate, Scheduled Workflow Agent
•Restarting Workflow for Enterprise
Overview
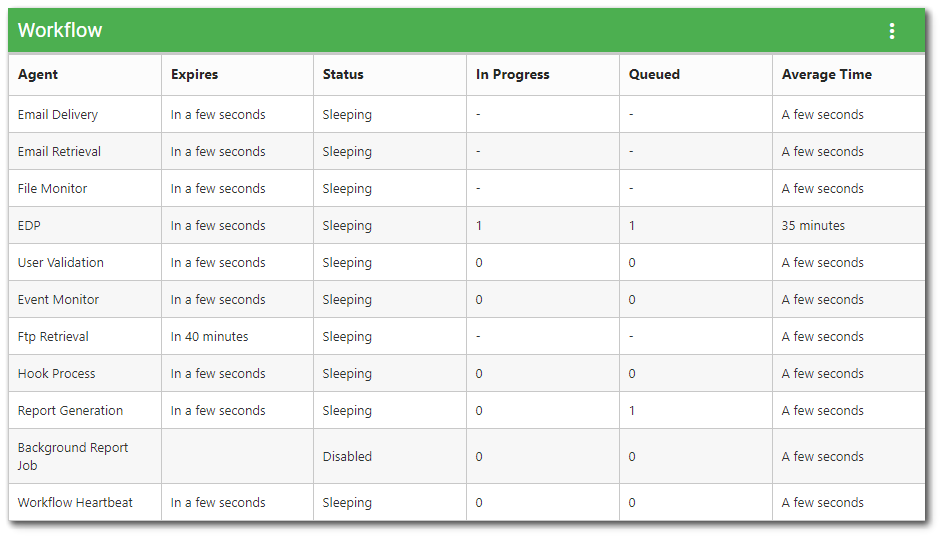
Administrators may use the Workflow widget to view Enterprise workflow service status and configure the workflow service agents. This widget is only available to administrators. Even if a non-administrator is granted permission to use this widget, the widget will be empty/blank for non-administrators.
The Workflow widget displays the agent (service name), its expiry, its status, and next lease properties of the various Enterprise workflow services.
Note: Limit placement of the Workflow widget to dashboards without reporting capabilities. |
Status
•Active – Agent is actively executing a task.
•Sleeping – Agent is sleeping, waiting for a task to be queued.
•Disabled – Agent is disabled by the administrator.
•Error, needs review – Agent needs review. A fatal error prevents the agent from running. Enable logging and restart to determine the problem.
•Overdue – Agent is overdue and has not renewed its reservation. The agent may be busy or it may be crashed from an unhandled exception. For example, a large EDD load can result in the reservation not being updated for long periods of time.
Widget Properties
To change the properties of the Workflow widget, open the Widget Editor by selecting the More Options ![]() icon in the upper right corner of the widget to display the drop-down menu and then select the Edit menu option.
icon in the upper right corner of the widget to display the drop-down menu and then select the Edit menu option.
•Widget Title – By default, the widget title is Workflow. The title can be modified.
•Widget Description – The description field provides a caption of the widget content for screen readers. This field improves accessibility by allowing visual elements such as charts to be given accessible text descriptions. It also displays a tooltip when hovering on the widget header. Default text (of the widget type's description) is provided but can be edited by users for additional context. This field has a 250-character limit.
•Widget Color – The color of the widget can be changed using the Widget Theme![]() icon to the left of the widget title.
icon to the left of the widget title.
•Widget Object Editor – To set various appearance properties of the widget, select the Object Editor ![]() icon in the widget header to open the Widget Object Editor. See the Widget Editor article for more details.
icon in the widget header to open the Widget Object Editor. See the Widget Editor article for more details.
•Help – The Help ![]() icon connects to the online documentation related to the specific widget.
icon connects to the online documentation related to the specific widget.
•Copy Settings – Select the Copy Settings ![]() icon to copy the settings from another widget of the same type. See the Copy Widget Settings article for more information.
icon to copy the settings from another widget of the same type. See the Copy Widget Settings article for more information.
•Cancel – Select the Close without Saving ![]() icon to exit the Widget Editor without saving changes.
icon to exit the Widget Editor without saving changes.
•Save – Changes will be applied to the widget by clicking on the Save ![]() icon. The Widget Editor screen will close after the save operation is complete.
icon. The Widget Editor screen will close after the save operation is complete.
Tabs in the Widget Editor allow the administrative user to add and configure a new EDP format file as well as to add and configure workflow service agents.
EDP Format Definitions
Select the ADD NEW FORMAT DEFINITION button to add a new EDP Format for use in Enterprise EDP.
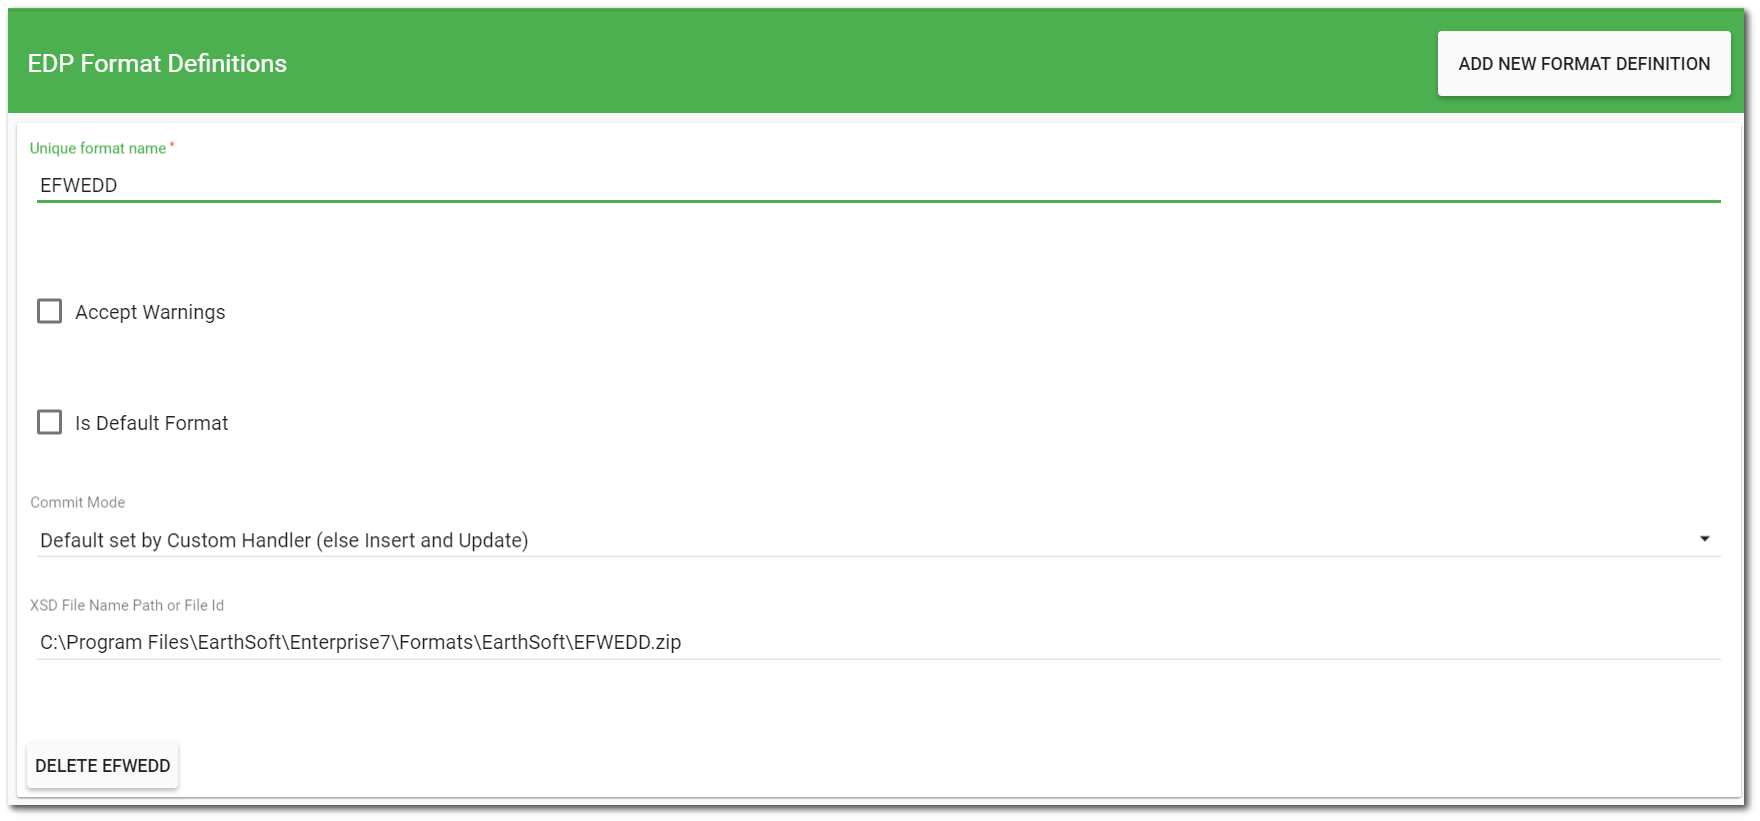
Unique Format name – The name of the EDP Format file (e.g., EFWEDD or EQEDD). This will be the name of the format used in the .zip package when submitting EDDs via Enterprise EDP. The format name cannot include (.) periods.
Accept Warnings – Select to accept EDDs that contain warnings (but not errors). Leave unselected to reject EDDs that contain warnings.
Is Default Format – Select only if this is the Default format.
Commit Mode – The EDP Commit Type that will be used to commit the data to the database. Choose from the following values (see Commit Types for more information):
•Default set by Custom Handler (else Insert and Update)
•Insert Only
•Insert and Replace
•Insert and Merge
•Insert and Update
•Update Only
•Merge Only
•Replace Only
XSD File Name Path or File ID – The full path of the EDP Format file on the server or DT_FILE.FILE_ID. FILE_ID can also be obtained directly from the Explorer Widget by hovering the cursor over the file name. This displays the download link in the bottom left corner of your browser. The FILE_ID is the number at the end of the link.
Add Virtual Link Format – If the format is meant to be a Link Virtual Format that maps to the EDP format defined in the "XSD File Name Path or File ID" parameter, click this button to expose additional properties:
•Link File Name Path or File ID – The full server path or the DT_FILE.FILE_ID of the Link project. The FILE_ID can be obtained directly from the Explorer Widget by hovering the cursor over the file name. This displays the download URL in the bottom left corner of the browser. The FILE_ID is the number at the end of the URL.
•Link Source File Type – The file type of the Link source files allowed for the Virtual Link Format.
Link File Name Path or File ID – The full path of the Link File on the server or DT_FILE.FILE_ID can also be obtained directly from the Explorer Widget by hovering the cursor over the file name. This displays the download URL in the bottom left corner of the browser. The FILE_ID is the number at the end of the URL.
Link Source File Type – The file type of the Link source files allowed for the Virtual Link Format.
Delete – Option to delete the format from Enterprise EDP.
Notes: •Both Link File Name Path or File ID and Link Source Files Type must be populated for the Link Virtual Format to save to the database. •If the EQuIS Format Definition is an assembly (*.dll), it can only be uploaded if it has been strongly named and approved in ST_CONFIG. •Formats can be cached for performance purposes on application startup. The application will check if a format has been set to be cacheable. The "isCacheable" property can be set to True in the ST_CONFIG table (see EQuIS Format Definition Configuration article). Format cache can be refreshed by appending query string action=reloadformats to the site URL by an administrator user. |
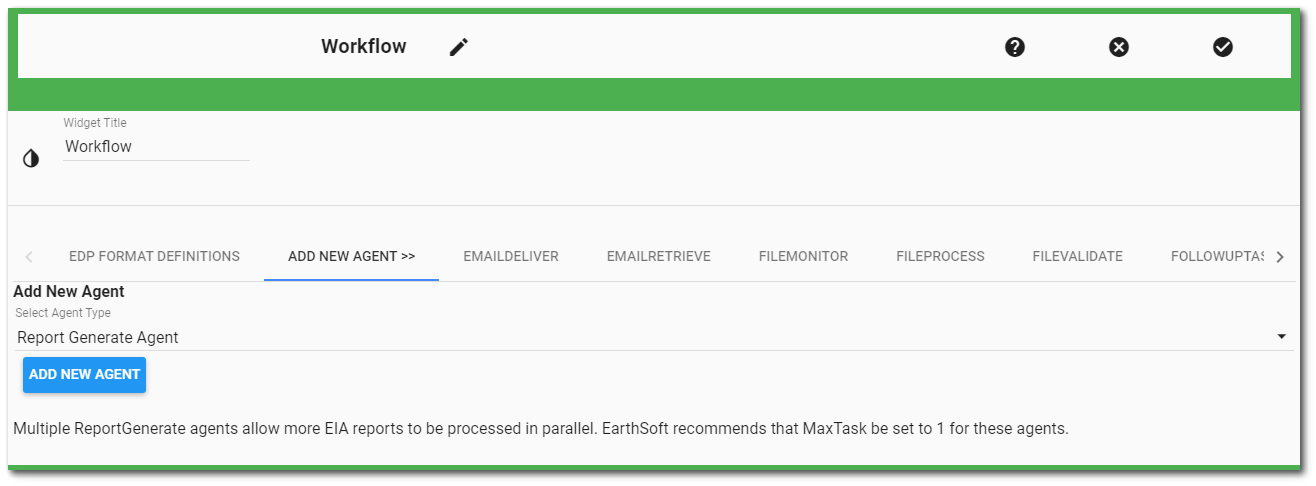
Add New Agent
There are three additional agents that can be configured in Enterprise 7.
1.Report Generate Agent – Multiple ReportGenerate agents allow more EIA reports to be processed in parallel. EarthSoft recommends that MaxTask be set to 10 for these agents.
2.Email Retrieve Agent – Multiple EmailRetrieval agents may exist to retrieve EDD files from different remote servers. It is assumed that no two agents share the same login credentials and server. Failure to observe this restriction may result in unpredictable behavior.
3.FTP Retrieve Agent – Multiple FtpRetrieval agents may exist to retrieve EDD files from different remote servers. It is assumed that no two agents share the same server, and path settings. Failure to observe this restriction may result in unpredictable behavior.
Choose the new Agent Type from the drop-down menu. Select the Add New Agent button to add the new agent. Note that the newly added agent will contain a number after the agent name (e.g., EMAILRETRIEVE.1, EMAILRETRIEVE.2)
Notes: 1.The additional agents can be deleted if desired (e.g, EMAILRETRIEVE.1, REPORTGENERATE.2, etc.). The original agents cannot be removed. 2.Do not configure two (or more) EMAILRETRIEVE agents to point to the same mailbox. 3.Do not configure two (or more) FTPRETRIEVE agents with the same path settings and server information. |
|---|
Workflow Agents General Properties
Each tab contains the following general properties. Tab-specific properties are explained in individual sections below.
•Agent Description – The field will populate by default. This can be modified as desired.
•Agent Administrator – The user to notify if the agent generates a notice.
Note: The options in the drop-down list are the users assigned to the "Admin" role in the Role Manager widget. As such, the Admin role in the Role Manager widget should not be renamed. |
•Status – Options are Active, Active (Sleeping), Disabled.
Active – Always running.
Active (sleeping) – Agent is active but will sleep during the specified sleep seconds (recommended setting).
Disabled – Agent is disabled.
•Sleep Seconds – Sets the number of seconds the service will sleep before looking for more work to do. For example, if in the File Monitor tab a Sleep Seconds value of 300 is used in conjunction with a Max Tasks value of 1, the File Monitor service will process at most 1 (Max Tasks = 1) EDD every 5 minutes (Sleep Seconds = 300). This is a cooperative multi-tasking feature that ensures that no one agent caused the workflow service to become CPU bound. Setting this value too low will put unproductive load on the server and DBMS system; setting it too high will cause unnecessary delays in processing workflow tasks. Tune this value by comparing ST_TASK.RESERVE_DATE + max (ST_SERVICE_RESERVATION.SLEEP_SECONDS,900) to ST_TASK.COMPLETED_DATE while grouping by ST_TASK.TASK_TYPE. The difference represents the time it took to process that specific task. Ideally, this value will always be less than SLEEP_SECONDS.
•Max Tasks – Sets the maximum number of tasks that the service thread will process before sleeping. For example, suppose there were 100 outgoing notifications waiting to be sent with Max Tasks set to 30 and Sleep Seconds set to 300. Email Delivery agent will send up to 30 messages at a time with a five minute pause between each burst. This prevents mail servers on the network from flagging EQuIS as a spam source.
•Reservation Seconds – The maximum amount of time that the service needs to process the tasks. For example, there are 100 outgoing notifications waiting to be sent with Max Tasks set to 30, reservation seconds set to 900 and Sleep Seconds set to 300. Email Delivery agent will send up to 30 messages at a time with a five minute pause between each burst and will try for up to 900 seconds before the agent will retry. This field is important because if the time period has elapsed and the task(s) did not finish, when the reservation time expires, agent specific tasks (such as those for File Validate, File Process, Report Generate, Follow up tasks, etc.) are eligible to be picked up by another agent and retried if there is another agent of the same type.
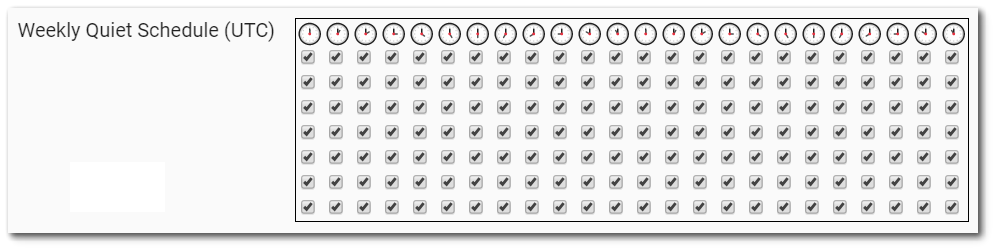
•Weekly Quiet Schedule – The calendar view of the Workflow Schedule can be used to designate periods of work and periods of no work done by each Workflow service. Time is displayed in UTC and provides the option of turning on each service for every hour of the day. A check mark (On) indicates a period of work, while a blank cell (Off) indicates a period of no work. For example, you may choose to turn the schedule off during database backup periods or periods of other server/database maintenance.
Note that the first row below the clocks row indicates Sunday. The next indicates Monday, followed by each day of the week ending in Saturday on the last row.
The Batch Scheduler tab allows the user to view/edit the properties of the Batch Schedule service. If configured and enabled, the Batch Schedule Agent will monitor the ST_TASK table for BatchScheduler tasks used to schedule or unschedule tasks for the provided PLANNED_TASK_CODES via the Scheduler Page in SPM Enterprise. There are no properties specific to the Batch Scheduler tab. Please refer to the General Properties section of this article.
Default sleep seconds (recommended): 12, max tasks: 1, reservation seconds: 900
Email Delivery Tab
The Email Delivery tab (EmailDeliver) allows the user to view/edit the properties of the Email Delivery service. If configured and enabled, Enterprise can deliver notifications and reports to users via email (e.g., Push Report (EIA) notifications, user account creation, etc.).
The Email Delivery Agent Configuration tab properties are as follows:
•Host – The FQDN or IP address of the email server from which email notifications are sent (e.g., smtp.domain.com or 192.168.0.1).
•Port – The port of the email server from which email notifications are sent (e.g., 23).
•Enable_SSL – Valid values are True to enable Secure Sockets Layer (SSL) security protocol or False.
•Username – The username of the email account from which email notifications are sent (e.g., username or username@domain.com).
•Password – The password of the email account from which email notifications are sent. This value may be the plain-text password (stored as-is, not encrypted) for the mailbox as defined by the mail server. If using Microsoft Office 365 for SMTP (outgoing email), this value may be an OAuth token identifier obtained through the process described in OAuth Authentication for Microsoft 365 Email.
•From_Address – The email address with which to populate the Reply-To field in email notifications sent (e.g., email2@domain.com).
•Compressed_File_Extension – The file extension to append to large attachments (e.g., zip, piz or zzz). Some files sent by EQuIS Enterprise to users can be large (such as EDD error logs and some automated reports). By default, the application will send these files as zipped attachments (*.zip). Some mail systems will not allow zipped attachments. Choose to use a different extension (such as piz or zzz) or leave this blank to send the attachments without compression.
•Compression Threshold – The setting that is required for using the Compressed File Extension setting, that designates the maximum number of bytes for a message attachment before the attachment is compressed inside a ZIP archive. A value of 0, or no setting, results in no compression being performed.
Default sleep seconds (recommended): 300, max tasks: 30, reservation seconds: 900
Note: Sleep seconds, max tasks and reservation seconds are recommended settings and should be adjusted according to your workflow, performance, latency, mail server load, etc. |
|---|
Email Retrieval Tab
The Email Retrieval tab (EmailRetrieve) allows the user to view/edit the properties of the Email Retrieval service. This agent should only be enabled if retrieving EDDs from an email box. If configured and enabled, Enterprise can retrieve EDDs sent via email to either a POP or IMAP mailbox. Only message attachments are processed, all other message content is discarded. See Email EDD Submittals for configuration details.
The Email Retrieval tab properties are as follows:
•Protocol – Enter POP or IMAP to specify the email protocol used for the Enterprise EDD retrieval inbox.
•Host – The FQDN or IP address of the email server from which EDDs are retrieved (e.g., email.domain.com or 192.168.0.1).
•Port – The port of the email server from which EDDs are retrieved (e.g., 143).
•Security – The security protocol of the email server from which EDDs are retrieved. The available values are SSL (Secure Sockets Layer), TLS (Transport Layer Security), ExplicitOptional, and None.
•Username – The username of the email account from which EDDs are retrieved (e.g., username or username@domain.com).
•Password – The password of the email account from which EDDs are retrieved. This value may be the plain-text password (stored as-is, not encrypted) for the mailbox as defined by the mail server. If using Microsoft Office 365 for IMAP (incoming mail), this value may be an OAuth token identifier obtained through the process described here.
•Compressed_File_Extension – The file extension to append to large attachments (e.g., zip, piz, or zzz). Some files sent by Enterprise to users can be large (such as EDD error logs and some automated reports). By default, the application will send these files as zipped attachments (*.zip). Some mail systems will not allow zipped attachments. Choose to use a different extension (such as piz or zzz) or leave this blank to send the attachments without compression.
•Compression Threshold – The setting that is required for using the Compressed File Extension setting, that designates the maximum number of bytes for a message attachment before the attachment is compressed inside a ZIP archive. A value of 0, or no setting, results in no compression being performed.
•Enable_SSL – Valid values are True to enable Secure Sockets Layer (SSL) security protocol or False.
•From_Address – The email address with which to populate the Reply-To field in email notifications sent (e.g., email2@domain.com).
Default sleep seconds (recommended): 300, max tasks: 30, reservation seconds: 900
File Monitor Tab
The File Monitor tab allows the user to view/edit the properties of the File Monitor service. If enabled, Enterprise will check for new EDDs in the Work Folders that have been received from Web upload, email, or FTP retrieval. Files conforming to the EDD File Name convention as defined by the EDP Client Assembly property, are registered in the EQuIS Database for processing. Files not matching the naming convention are moved to the \archive\ folder and ignored.
The File Monitor channels can be modified from within the properties:
•Workflowstep_id – A task is created as complete for the FileMonitor agent and a new task is created for the agent identified by <workflowstep_id>.
•Input Channel Definitions – EML, FTP, WEB or other custom channels. Used by EmailRetrieve (EML), FTPRetrieve (FTP), EDP EDD Upload Widget (WEB) and EDP Sign and Submit (WEB).
•Inbound File Type – FileProcess, FileValidate. Specify the client assembly (DLL) used for FileProcess and FileValidate agents.
•Other Settings – Workfolder file path.
Default sleep seconds (recommended): 300, max tasks: 1, reservation seconds: 900
File Process Tab
The File Process tab allows the user to view/edit the properties of Enterprise EDP. If configured and enabled, Enterprise EDP will check EDDs for correctness and either commit the data to the database if no data errors are found, or reject the EDD while notifying the submitter of any data errors. There are no properties specific to the File Process tab. Please refer to the General Properties section of this article.
Default sleep seconds (recommended): 300, max tasks: 1, reservation seconds: 900
File Validate Tab
The File Validate tab allows the user to view/edit the properties of the User Validation service. If enabled, EQuIS Enterprise will check incoming EDDs to verify that they are properly formatted, that the user certificate is valid, that the user is assigned the 'User' role, and that the user is subscribed to the facility to which the EDD is being submitted. For more information on properly formatted EDDs, refer to the help article EDD Package Naming Convention. There are no properties specific to the File Validate tab. Please refer to the General Properties section of this article.
Default sleep seconds (recommended): 300, max tasks: 1, reservation seconds: 900
Follow Up Task Tab
The Follow Up Task tab allows the user to view/edit the properties of the Event Monitor service. This is the 'Agent' for EQuIS Information Agents (EIAs). If enabled, Enterprise will check to see if there are other tasks to perform after an EDD is processed or a report completes. If so, Enterprise will schedule reports to run. In EQuIS 6, Follow Up Task would determine if a ReportGenerate task needed to be created for every data load and trigger. In EQuIS 7, Follow Up Task is only responsible for creating a Report Generate task upon data load. There are no properties specific to the Follow Up Task tab. Please refer to the General Properties section of this article.
Default sleep seconds (recommended): 300, max tasks: 5, reservation seconds: 900
FTP Retrieve Tab
The FTP Retrieve tab allows the user to view/edit the properties of the FTP Retrieval service. If configured and enabled, EQuIS Enterprise can retrieve EDDs from a remote FTP server.
The FTP Retrieval tab properties are as follows:
•Host – The FQDN or IP address of the FTP server from which EDDs are retrieved (e.g., ftp.domain.com or 192.168.0.1).
•Port – The port of the FTP server from which EDDs are retrieved (e.g., 21).
•Username – The username of the FTP account from which EDDs are retrieved (e.g., username).
•Password – The password of the FTP account from which EDDs are retrieved.
•Remote Folder – The folder on the FTP server from which EDDs are retrieved (e.g., EDDDirectory to specify a directory of ftp.domain.com\EDDDirectory). Leave this blank if EDDs will be dropped to and retrieved from the root of the FTP server.
Default sleep seconds (recommended): 300, max tasks: 30, reservation seconds: 900
Hook Process Tab
The Hook Process agent performs HTTP/HTTPS requests to external servers, pushing EQuIS information to those servers. The information may be from either a specialized hook report or the output of an EQuIS Information Agent (EIA). This feature was partially implemented in the EQuIS Enterprise 7.20.2, 7.20.3, and 7.20.4 Builds. Stopping the HookAgent will prevent these requests from being performed.
Default sleep seconds (recommended): 60, max tasks: 10, reservation seconds: 900
Report Generate Tab
The Report Generate tab allows the user to view/edit the properties of the Report Generation service. If enabled, EQuIS Enterprise will generate reports triggered by the Follow Up Task service or by the Workflow Heartbeat service. Report Generate now runs the trigger reports. Therefore, if a trigger report is taking a while to process, it will not prevent other agents from processing. It is isolated to one agent and it's sleep cycle. It is recommended to only set the max tasks to 10 for report generate; however, multiple Report Generate agents can be created. There are no properties specific to the Report Generate tab. Please refer to the General Properties section of this article.
Default sleep seconds (recommended): 300, max tasks: 10, reservation seconds: 900
Scheduled Workflow Agent Tab
The Scheduled Workflow Agent tab allows the user to view/edit the properties of the Workflow Heartbeat service. If enabled, EQuIS Enterprise will schedule EIA reports and custom workflow schedules. It monitors ST_SCHEDULE to determine if there are any recurring events that should have occurred and creates a task for each event (e.g., weekly, monthly, daily EIAs). There are no properties specific to the Workflow Heartbeat tab. Please refer to the General Properties section of this article.
Default sleep seconds (recommended): 60, max tasks: 30, reservation seconds: 900
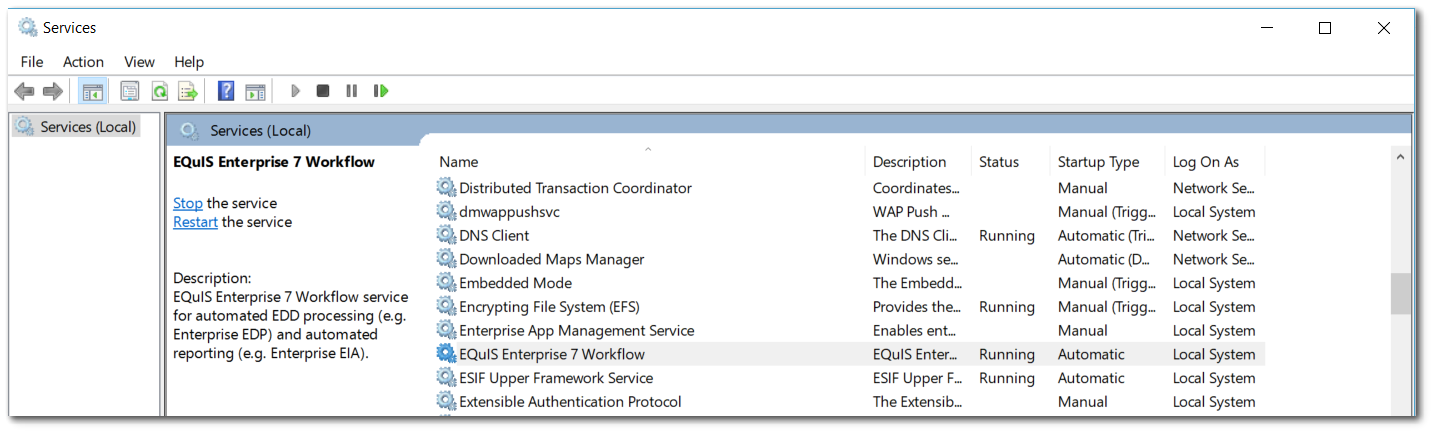
Restarting Workflow for Enterprise
To restart the workflow service for Enterprise:
1.Open the Services console by typing "Services" in the Windows search bar.
2.Find the Enterprise service, usually named 'EQuIS Enterprise 7 Workflow'.
3.Right-click and select Restart or click Restart at the top-left corner.