•Checking The Public Key Token Of A Signed Assembly
EQuIS Professional requires that assemblies are strongly named and approved. For securing formats, see Securing EDD Formats.
To use custom assemblies, they must be signed with a strong name and the key approved. Additional information on how to do this is provided below and demonstrated in this Office Hour video.
For DLL files created and managed by EarthSoft, contact EarthSoft Support to schedule a recompile of these DLL files by EarthSoft. EarthSoft developers will sign the DLL file with EarthSoft’s .SNK file and recompile the DLL file.
Signing With A Strong Name
To sign with a strong name in Visual Studio, please refer to the Microsoft documentation How to: Sign an assembly with a strong name.
If a user does not have access to Microsoft Visual Studio, see the steps below.
Requirements:
• .NET Framework 4.7.2 or higher (installed via Windows Features or Server Features)
C:\Windows\Microsoft.NET\Framework\v4.0.30319
• .NET Framework Developer Pack for the appropriate .NET Framework build
C:\Program Files (x86)\Microsoft SDKs\Windows\v10.0A\bin\NETFX 4.8 Tools
or similar, e.g., NETFX 4.7.2 Tools
•Windows administrator privileges
To sign the assembly with a strong name, follow these steps, replacing the highlighted text in the commands.
1.Open a command prompt as an administrator by right clicking on the Command Prompt application and selecting "Run as administrator".
2.Navigate to the directory with the latest version of the .NET Framework Developer Pack by typing 'cd' followed by the file path, for example:
cd C:\Program Files (x86)\Microsoft SDKs\Windows\v10.0A\bin\NETFX 4.8 Tools
3.Generate the keypair file via "sn.exe" by running the command below, where [filepath] is the directory where the DLL is stored. The keypair file will be a signature for the DLL. Once this file is generated, users can reuse this file to sign other assemblies and do not need to generate other keypair files.
sn -k "filepath\keyname.snk"
For example:
sn -k "C:\Keys\keyPair.snk"
4.Decompress the DLL into an IL file by running the command below:
ildasm "filepath\fileName.dll" /out="filepath\fileName.il"
For example, with a standard EQuIS installation:
ildasm "C:\Program Files\EarthSoft\EQuIS\My.Reports.Water.dll" /out="C:\Program Files\EarthSoft\EQuIS\My.Reports.Water.il"
With a per-user EQuIS installation:
ildasm "%localappdata\Programs\EarthSoft\EQuIS\My.Reports.Water.dll" /out="%localappdata\Programs\EarthSoft\EQuIS\My.Reports.Water.il"
5.Rename the original DLL to prevent overwriting using the following command:
ren "filepath\fileName.dll" fileName.dll.origin
6.In the Command Prompt, navigate to the directory of the .NET Framework, for example:
cd C:\Windows\Microsoft.NET\Framework\v4.0.30319
7.Recompile the IL file from step 4 with the signature from Step 3 by running the command below:
ilasm "filepath\fileName.il" /dll /key="filepath\keyPair.snk" /out="filepath\fileName.dll"
For example:
ilasm "C:\Program Files\EarthSoft\EQuIS\My.Reports.Water.il" /dll /key="C:\Keys\keyPair.snk" /out="C:\Program Files\EarthSoft\EQuIS\My.Reports.Water.dll"
The strongly named DLL file will be output to the designated [filepath].
The DLL file is now signed. Set up EQuIS to recognize and use the DLL in the next step.
8.Find the public key token in one of the following ways. A public key token only needs to be approved once.
a.Checking The Public Key Token Of A Signed Assembly
or
b.Attempt to publish the report in EQuIS Professional. An error will ensue. Scroll to the bottom of the equisdebug.log file, then copy the public key token from that error message, as shown in the highlighted and bolded text below:
ERROR EarthSoft.Common.Message [(null)] - $The assembly public key token (0xx0x00xxx0x0000) of the [reportname].dll is not approved.
9.Approve the Public Key Token (or have an EQuIS administrator do so) in the ST_CONFIG table.
Approving Public Key Tokens
Files signed with custom public key tokens need those public key tokens approved in the ST_CONFIG table to allow use of those files with the EQuIS database. This requirement does not apply when not connected to an EQuIS database, such as in EQuIS products like EDP Standalone or EDGE. For more information on handling custom formats, see Securing EDD Formats.
To approve a public key token in EQuIS Professional:
1.Connect to the database where the custom report, form or other assembly(s) need approval.
2.Create an ST_CONFIG table record for each approved public key token with the values as detailed below.
ST_CONFIG |
Value |
|---|---|
CONFIG_SECTION |
AssemblyTokens |
CONFIG_KEY |
Token |
OBJECT_TYPE |
PublicKey |
OBJECT_VALUE |
<Public Key Token> |
3.Save changes and restart EQuIS Professional.
Provided that only one .SNK file is created for the client organization, there need only be one addition to the ST_CONFIG table for that file, listing its Public Key Token.
Note: Assemblies with a null PublicKeyToken will not be approved. An invalid assembly error will appear in the EQuIS log. |
Checking The Public Key Token Of A Signed Assembly
Windows PowerShell
In Windows PowerShell, run the command below without the outside quotes and replacing <Fully Qualified File Name> with the Fully Qualified File Name (path to the assembly and the filename).
([system.reflection.assembly]::loadfile("<Fully Qualified File Name>")).FullName
For example:

Command Prompt
To check if a custom DLL file is strongly named, use the "sn.exe" command within the .NET Framework Developer Pack matching the latest .NET Framework version in use. This file will be located in a directory such as:
C:\Program Files (x86)\Microsoft SDKs\Windows\v10.0A\bin\NETFX 4.7.2 Tools
In a Command Prompt (run as administrator), follow these steps:
1.Navigate to the directory where the latest version of the Microsoft file "sn.exe" is located by typing 'cd' followed by the sn.exe's file path. Example:
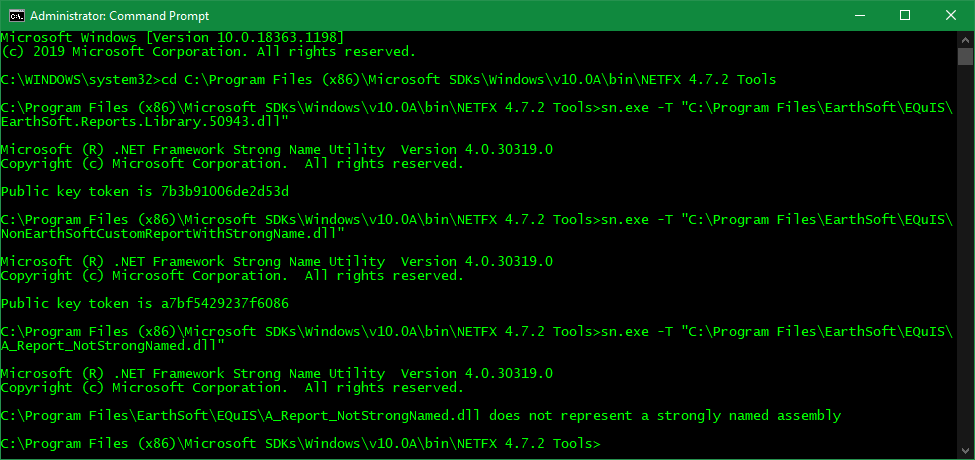
cd C:\Program Files (x86)\Microsoft SDKs\Windows\v10.0A\bin\NETFX 4.7.2 Tools
2.Type the following, where the string in quotes is the full path and filename of the DLL to be checked:
sn.exe -T "C:\Program Files\EarthSoft\EQuIS\EarthSoft.Reports.Library.123456.dll"
A message will be returned indicating either the public key token for the DLL or that the report does not represent a strongly named assembly.
The screenshot below shows the outcome with the tool run for three different DLLs:
1.A standard EarthSoft report – In recent builds, these will always be strongly named (EarthSoft.Reports.Library.50943.dll).
2.A custom report strongly named by an entity other than EarthSoft (NonEarthSoftCustomReportWithStrongName.dll).
3.A custom report without strong naming (A_Report_NotStrongNamed.dll).