Once data are collected and analyzed, the EQuIS Data Processor (EDP) is the EQuIS workflow component used to check and process the data. EDP sets the standard for simplicity in data quality management while supporting a host of features and capabilities that allow users the utmost in data checking flexibility. Data are checked and submitted into the EQuIS database via EDP using an Electronic Data Deliverable (EDD)—an electronic tabular format for sharing, manipulating and using data.
There are three desktop modes for using the EQuIS Data Processor:
1.EDP Standalone – Used primarily by data providers such as laboratories or field staff to check data quality prior to data submittal. EDP Standalone is not directly connected to an EQuIS database but uses reference values from the target database.
2.Professional EDP – Part of EQuIS Professional and linked directly to the EQuIS Database. Typically used by power users to check data quality, and then load the data into the database.
3.EDP Express – Can be used in Professional or Standalone mode to allow for data checking and loading of large data files.
To begin using Professional EDP, click the EDP ![]() icon in the upper left-hand corner of EQuIS Professional.
icon in the upper left-hand corner of EQuIS Professional.
The EDP main screen will open. An EDD is created by following the steps listed below.
1.Load an EQuIS Format – The EQuIS format file is the essence of data checking in EDP and EQuIS. Structured in XML, the EQuIS format file set contains the definitions and restrictions for each individual field in available data tables. The format files control data checks, such as range checking, reference values, formatting and enumerations. Data providers may submit data to EQuIS using one of the standard format files (e.g., EFWEDD, EQEDD, EZEDD, etc.) or a custom format file.
2.Request Workstation Licenses (if applicable) - all formats require either an EDP license or custom format license. The link to the registration webpage is hyperlinked within the Registration Screen in the Workstation Licenses tab.
3.Load an EDD – EDDs contain data to map to fields in the loaded EQuIS format file and are typically Microsoft Excel spreadsheets or tab-delimited text files.
4.Resolve errors – Problematic EDDs are rejected and flagged for specific errors. EDD tables with errors are denoted in red, and individual fields within the EDD tables that have errors are highlighted with different colors, which signify the error type and facilitates correcting errors. All errors must be resolved prior to uploading the data to EQuIS. When errors in data files must be resolved by someone other than the person checking the data, the error log is a useful tool to communicate the errors occurring in the file.
5.Create the Package – The package is the EDD data that have been converted into the EQuIS data structure (tables and fields) before they are committed to EQuIS.
6.Correct any errors found during package creation – During the Create process, data are compared to the rules of the EQuIS database and each record in the newly created package is assigned an EBATCH number. Resolve any additional errors, if needed.
7.Commit – The process in which created data are compared to data already in EQuIS via the primary keys. Depending on which commit type is selected, the commit process will determine how the data is imported into EQuIS.
8.Fix any errors during the commit and recommit, if needed.
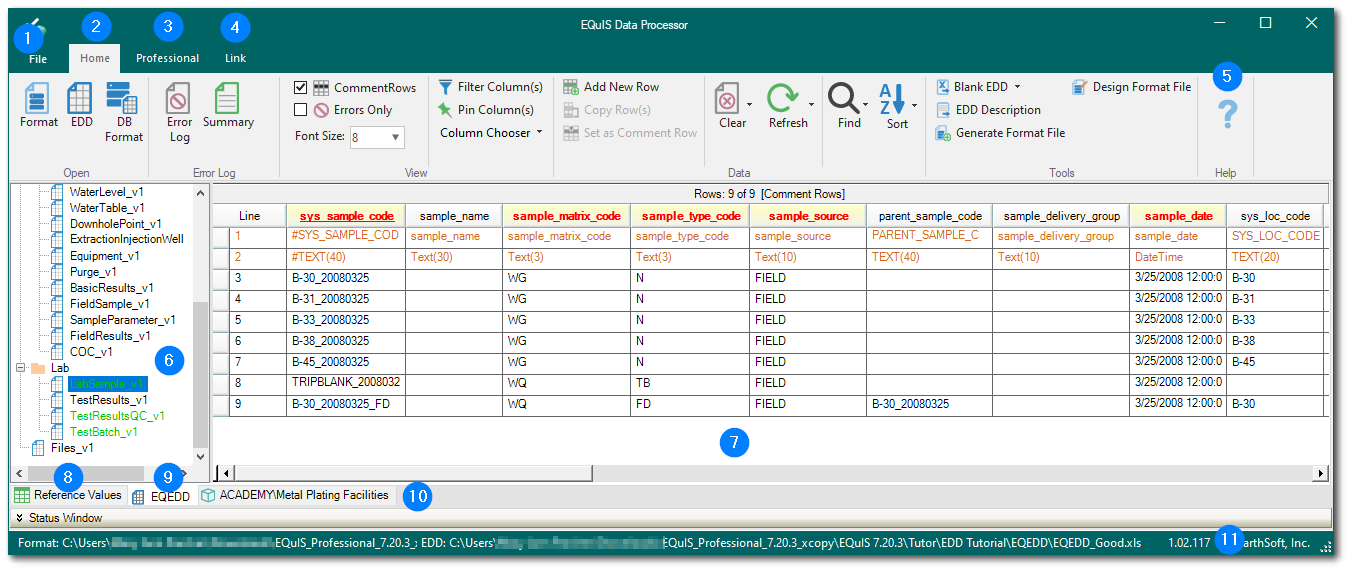
EDP Main User Interface
The user interface varies slightly between Professional EDP and EDP Standalone. The Professional and Link ribbons are not available with standard licensing of EDP Standalone.
Feature |
Description |
|---|---|
Application Menu – The application menu is accessed by clicking the File tab or the EDP icon. It contains application functionality for opening EDDs and EQuIS formats, saving EDDs and reference values (Professional), accessing the Sign and Submit feature, registering license keys, setting application options, and linking to the online documentation. |
|
Home Ribbon – The EDP Home ribbon provides single button access for opening EDDs and formats, error summaries and logs, data viewing options, and tools for EDDs and formats. |
|
Professional Ribbon – The Professional EDP ribbon is available when launching EDP through EQuIS Professional and provides some analysis tools, tools for importing the data package into the EQuIS database, and export options (for formats with an EDD export file). |
|
Link Ribbon – The EQuIS Link ribbon is available with the Professional Premier Data licensing and/or the Geotechnical Module. Link is a powerful data mapping tool that can easily and repeatedly migrate a wide variety of input data sources to standard EQuIS EDDs. |
|
Help – The Help Button ('?') will open up context sensitive help from within EDP to the EarthSoft online documentation. |
|
The different sections of an EQuIS format are displayed in the left pane of the EDP workspace. |
|
The main EDP workspace displays the columns of the format sections and the EDD values in the data grid. This section also displays any data errors in the EDD. |
|
Reference Values Tab – Displays the reference values used in the format. For Professional EDP, these values come from the database directly. For EDP Standalone, these values are read from the reference value file. |
|
Format Tab – The middle tab at the bottom of the EDP workspace displays the name of the currently opened format. Clicking this tab displays the sections of the format file as well as the data being checked. |
|
Database/Facility Preview Tab – The third tab at the bottom of the EDP workspace displays the database name and the facility to which the user is currently connected. This tab is only available for Professional EDP users. |
|
Information Bar – The EDP information bar displays the current EQuIS format file path, format file name, version, and author. If applicable, the file path and name for the currently loaded EDD file is also displayed. This section also displays the format version, which is important information to pass along to EarthSoft Support in troubleshooting EDP behavior. |
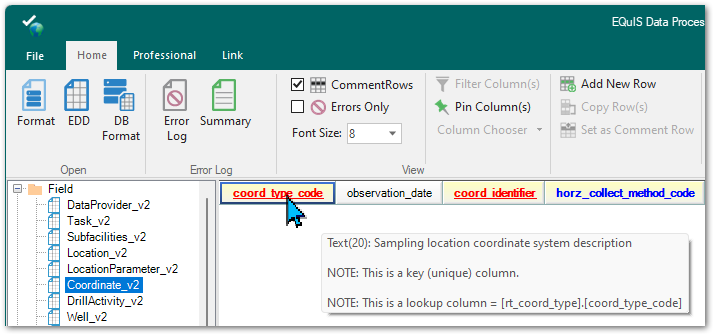
Within the Format tab, hover the mouse over a column header for a Tooltip to display information about that field, including the datatype, whether it is part of a primary key, or is a lookup column: