•Create Reference Value File and Other EDD Specification Files
Overview
This article explains how to upload an EDD to Enterprise EDP using the EDP EDD Upload widget. The widget can be viewed on the standard EDP dashboard or can be added to a user dashboard.
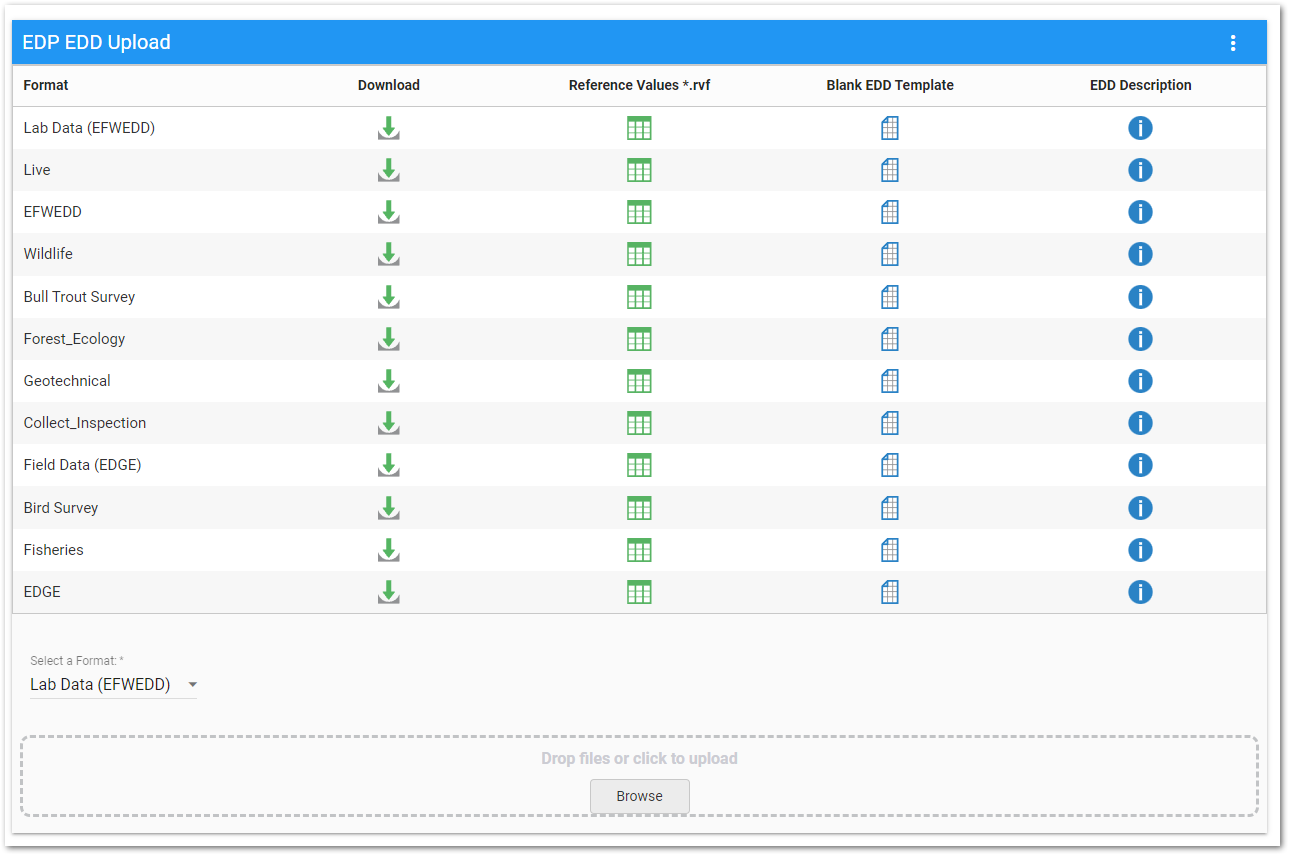
Any registered format files will be displayed in the EDP EDD Upload widget. Enterprise EDP format registration consists of a set of records in the ST_CONFIG table for each registered format name (see efdManagementConfiguration.EFD for more details). Formats can be registered and managed using the Workflow widget or via EQuIS Professional by adding entries to ST_CONFIG, see Add or Modify Enterprise EDP Formats for steps. The EDP EDD Upload widget also provides for download of format files, reference value files (.rvf), blank EDD files, and EDD description files for all registered formats by clicking on the icons or the format file name.
If the user does not have creator permissions on the EDD Object Type and editor permission to at least one facility, the message "You do not have permission to upload data. Please contact your administrator" will appear under the list of formats.
Note: Formats can be cached for performance purposes on application startup. The application will check if a format has been set to be cacheable. The "isCacheable" property can be set to True in the ST_CONFIG table (see EQuIS Format Definition Configuration). Format cache can be refreshed by appending query string action=reloadformats to the site URL by an administrator user.
Example URL with query string appended: https://example.equisonline.com/Default.aspx?action=reloadformats |
EDD Upload
To upload an EDD for processing, the user must have the following permissions:
•Creator permission on the EDD object type.
•Editor permission on the target facility.
•If the Format is stored in DT_FILE, Viewer Permission on the Files object type or the file itself within Files object type.
To upload an EDD through the EDP EDD Upload widget, follow these steps:
1.Select the target Facility in the Facility Chooser at the top of the dashboard (cannot be a facility group). An EDD can still be uploaded if the session facility is cleared, but the EDD file name MUST contain the facility code to upload correctly.
Note: If the EDD is uploaded without selecting a facility, the file name does not need to contain the format as the upload will consume the format selected in the Format drop-down. Thus, the naming convention could be <uniqueId>.<facility_code>.zip or the standard naming convention. |
2.Select a Format from the Format drop-down menu at the bottom of the widget.
3.Select a File Encoding from the File Encoding drop-down menu (beside the Select a Format drop-down) to determine how text characters will be processed in the EDD. Two options exist: UTF-8 (default) and Windows-1252. The default value of UTF-8 will be used for EDDs processed via email and FTP sites. The selected value only applies to text files that do not contain a BOM (byte order mark), as it is currently for Professional EDP. Make sure the File Encoding chosen is the same File Encoding for all EDD files inside the .zip file.
4.Select the EDD to upload by browsing to the file or by dragging and dropping it. Special characters in the file name can cause errors and prevent the EDD from loading. See Special Characters in the EQuIS Database for additional information.
Notes: •A .ZIP file containing multiple data files, of the same data source type, can be uploaded to Enterprise EDP using a Link "virtual" format. •For a successful upload, the EDD should be error free. There is no error "check and correct" available via Enterprise EDP. •If the EDD file size is too large, upon attempting to load the EDD "An error was encountered while submitting an EDD" message will appear. The default file size for the Web app is 10 MB. •The maxRequestLength can be modified as instructed in Maximum Upload Limits. The maximum limit for the EDP Upload widget is approximately 31 MB. •If the EDD file name matches another format's xsdFileName exactly, the EDD will be loaded with the other matching format regardless of the selected format. |
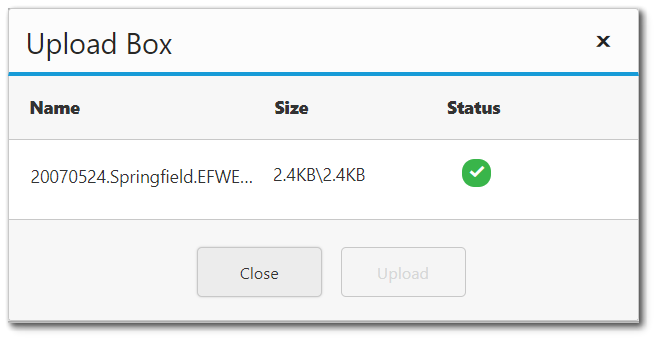
5.An Upload Box will appear. This box displays the name, size and status of the file being uploaded. Click the Upload button.
6.If the file is successfully uploaded, the Upload Box will display a white check mark within a green circle under the Status column. Select the Close button to exit this box.
7.If multiple EDDs are being uploaded, each EDD will have a loading indicator showing its status.

Note: The EDP EDD Upload widget will throw an error if an EDD fails the duplicate file check. The file name must be changed if the same EDD is to be uploaded again. While all EDDs are turned into .zip files by the EDP EDD Upload Widget, EDDs that are originally uploaded as text or Excel files are handled differently in regards to the duplicate file check. See the chart below for further information:
Concerns about duplicate data submittals may be addressed by a format's commit type. For further information, see EQuIS Format Definition Configuration commitType. |
The EDP EDD Upload widget no longer requires EDDs to be packaged in a .zip archive (although zipped EDDs may still be uploaded). The EDP EDD Upload widget will package Excel or flat text files with a user certificate and name them according to the naming convention outlined in the EDD Package Naming Convention article. The final EDD name needs to use the naming convention of <unique ID>.<facility code>.<format name>.zip for it to pass the file validation process. If the file name does not contain the facility code, format name, or user certificate, they will automatically be added when uploading through the EDP EDD Upload widget. If the facility code is missing from the file name, the format name must also be missing for the facility code to be added.
The format has to have the settings in the ST_CONFIG table for the EDP format and work folder to be accessible through this widget. Optionally, the commit type and whether or not warnings are accepted can be set. By default, warnings are not accepted, and the default commit type is Update (meaning Insert and Update).
Note: The EDD will be encrypted using HTTPS if EQuIS Enterprise is configured to use HTTPS, which is highly recommended. All EQuIS Online (EOL) sites use HTTPS with TLS 1.2. |
If a format contains a Files section (e.g., Files_v1 Section in the EQEDD format), the file(s) can be uploaded via Enterprise EDP. The files in the EDD must match the RT_FILE_TYPE.FILE_TYPE records with STATUS_FLAG = A (e.g., pdf, jpeg, png) to upload.
Create Reference Value File and Other EDD Specification Files
The reference value file, the blank EDD template file, and the EDD description file provide the necessary EQuIS database specifications to ensure proper upload of data for a specific format.
To download a file from the EDP Upload widget, the user must have the following permissions:
•Creator permission on the EDD object type.
•Viewer permission on the target facility.
•If the format is stored in DT_FILE, Viewer Permission on the Files object type or the file itself within Files object type.
Reference Value File
EDDs should always be created and uploaded using the most recent reference values.
Complete the following steps to download a reference value file.
1.From the EDD Formats listed on the EDP EDD Upload widget, find the desired format and click on the ![]() icon under the Reference Values (*.rvf) column in that row.
icon under the Reference Values (*.rvf) column in that row.
2.Save the prompted file to download the reference values associated with the selected format.
Note: This Enterprise option enables access for non-Professional users. The RVF downloaded from the EDP EDD Upload widget is generated live from the database reference values. |
Blank EDD File
The blank EDD tool creates an empty Microsoft Excel template that follows the format file’s specific layout for data entry. The Excel file contains the format columns and field types, along with the color-coding as displayed in EDP to indicate required fields, primary keys, and look-up values. Separate worksheets are named for each section of the format file.
Complete the following steps to download a blank EDD file.
1.From the EDD formats listed on the EDP EDD Upload widget, find the desired format and and click on the ![]() icon under Blank EDD Template column in that row. This can be configured in ST_CONFIG to be blank, OR to contain either (or both) of the following:
icon under Blank EDD Template column in that row. This can be configured in ST_CONFIG to be blank, OR to contain either (or both) of the following:
a.Valid values in a drop down list
b.Parent values in a drop down list
2.Select the desired file folder and name the file as desired. By default, the blank EDD file will be named after the EDD format (e.g., EQEDD.xls).
3.Save the prompted file to download the blank EDD Excel file.
EDD Description File
The EDD Description tool defines the specifications of the format. Information about the selected format file is exported to a Microsoft Excel spreadsheet, including whether a field is a primary key (i.e., required), data type, related look-up tables, and EQuIS Schema mapping. The description file includes a separate worksheet detailing each section of the EDD format file.
Complete the following steps to download an EDD description file.
1.From the EDD formats listed on the EDP EDD Upload widget, find the desired format and and click on the ![]() icon under EDD Description column in that row.
icon under EDD Description column in that row.
2.Select the desired file folder and name the file as desired. By default, the EDD description file will be named after the EDD format (e.g., EQEDD.xls), similar to the blank EDD template file. Change the file name of the EDD description to avoid saving over the blank EDD template file.
3.Save the prompted file to download the EDD description Excel file.
Note: The EDD Description file will populate the Data Mappings columns only if the user downloading the EDD Description File has the Administrator (Admin) role. These columns will not be populated for non-Admin users. |
Widget Properties
The EDP EDD Upload widget has no specific properties. To change the title or color of this widget, open the Widget Editor by selecting the More Options ![]() icon in the upper right corner of the widget to display the drop-down menu and then select the Edit menu option.
icon in the upper right corner of the widget to display the drop-down menu and then select the Edit menu option.
Widget Title – By default, the widget title is EDP EDD Upload. The title can be modified.
Widget Description – The description field provides a caption of the widget content for screen readers. This field improves accessibility by allowing visual elements such as charts to be given accessible text descriptions. It also displays a tooltip when hovering on the widget header. Default text (of the widget type's description) is provided but can be edited by users for additional context. This field has a 250-character limit.
Widget Color – The color of the widget can be changed using the Widget Theme![]() icon to the left of the widget title.
icon to the left of the widget title.
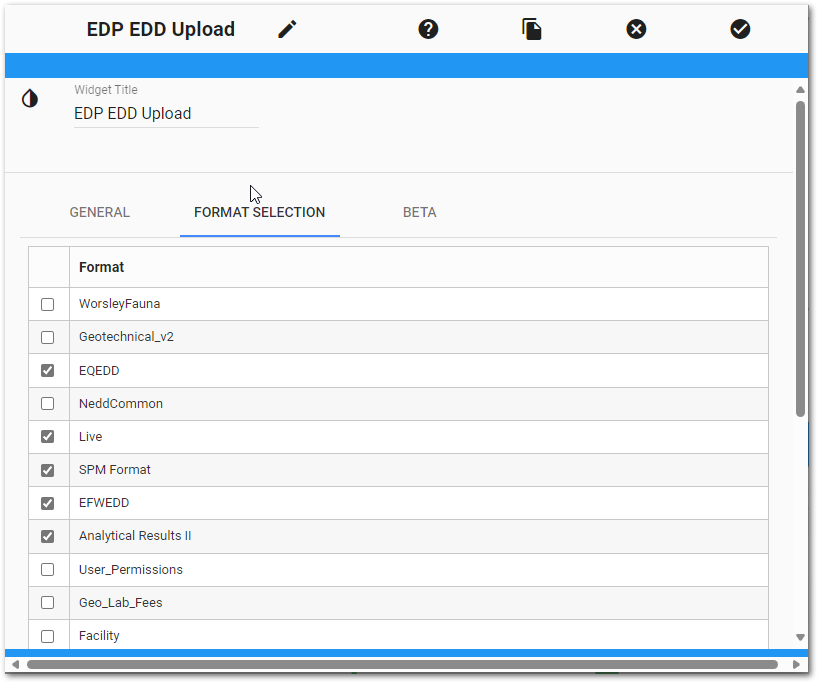
General – Users with the Admin role in Enterprise will see the General tab. This tab contains an Acknowledgment Text area where the admin can enter a message to be displayed on the widget surface. This message is limited to 1,000 characters and will be displayed as a check box label. This check box must be clicked to enable the Format selection drop-down. If no text is entered, the check box will not be displayed. Non-admin users with permission to the widget will not see the General tab.
Format Selection – Users with the Admin role in Enterprise will see the Format Selection tab. This tab contains a list of formats available in the selected facility that can be selected (checked) or unselected. Non-admin users with permission to the widget will not see the Format Selection tab and will only see the selected formats when they access the EDP EDD Upload Widget.
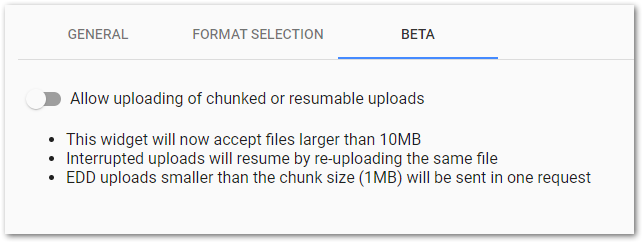
BETA – Toggle that allows uploading of chunked or resumable uploads.
Widget Object Editor – To set various appearance properties of the widget, select the Object Editor ![]() icon in the widget header to open the Widget Object Editor. See the Widget Editor article for more details.
icon in the widget header to open the Widget Object Editor. See the Widget Editor article for more details.
Help – The Help ![]() icon connects to the online documentation related to the specific widget.
icon connects to the online documentation related to the specific widget.
Copy Settings – Select the Copy Settings ![]() icon to to copy the settings from another widget of the same type. See the Copy Widget Settings article for more information.
icon to to copy the settings from another widget of the same type. See the Copy Widget Settings article for more information.
Cancel – Select the Close without Saving ![]() icon to exit the Widget Editor without saving changes.
icon to exit the Widget Editor without saving changes.
Save – Changes will be applied to the widget by clicking on the Save ![]() icon. The Widget Editor screen will close after the save operation is complete.
icon. The Widget Editor screen will close after the save operation is complete.