Many EQuIS modules include a module-specific Schema that must be added to a database to use that module. The Schemas may include new tables, new fields in existing tables, or modifications (such as changes in field length, default values, or foreign key references) to existing fields. EQuIS applies these Schemas using encrypted XML files (*.xme) in the \db subfolder.
To apply a custom Schema to an already existing database (which only needs to be done once per database), follow the steps below. For applying custom Schemas to a new database as it is being created, see Create New EQuIS Database.
Note: Prior to updating the schema, back up the database. A backup on the same day is required to update an EQuIS database. Database updates cannot be reversed or undone, so it is essential to have a current backup before performing an update. |
1.Follow the preparation steps where applicable (backing up the database, determining what to apply, downloading and unblocking modules/schema files).
2.Place the schema.<custom_schema_name>.xme file in the db directory of the EQuIS Professional installation, typically C:\Program Files\EarthSoft\EQuIS\db or, for per-user installation, %localappdata%\Programs\EarthSoft\EQuIS\db. The sources for EarthSoft program and module Schemas are listed on the Database Schema page.
3.From the same machine, log in to EQuIS Professional and connect to a database server in the Backstage view. If you are already connected to a facility, access the Backstage from the File button on the EQuIS ribbon.
4.On the Connect tab, right-click on a database in the database list on the left.

4.Select Update by clicking from the context menu. The Update Database(s) window opens and lists the databases for which updates are available.
5.Right-click anywhere in the Update Database(s) form and hover the mouse over Module(s). This will display all of the schema update files that are present in the db directory of the EQuIS Professional installation, usually C:\Program Files\EarthSoft\EQuIS\db or, for per-user installation, %localappdata%\Programs\EarthSoft\EQuIS\db. The standard EQuIS Professional schemas are listed as "Professional" and "StandardReports".
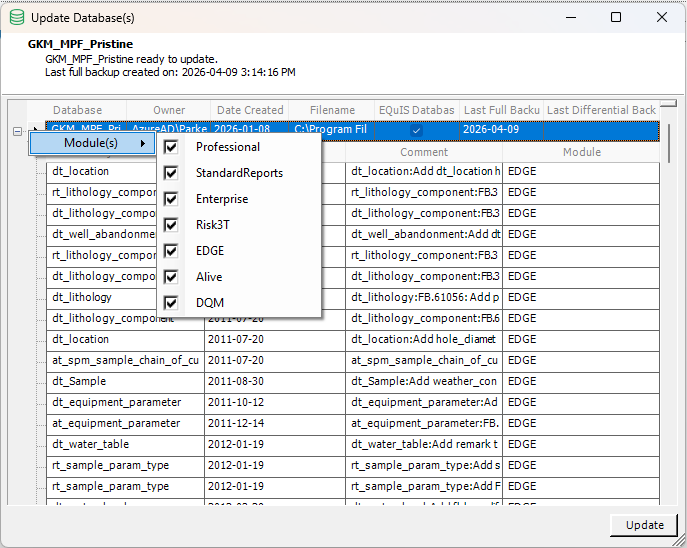
6.Uncheck any schemas that are not desired in the current update process, and make sure that the desired schema is present and checked. The Update function will only process those schema files with check marks in the corresponding check box.
7.Expand the node next to the database record to review the changes that will be made by adding the custom schema.
8.Select the database to be updated (it will be highlighted when selected), and then click the Update button.
If the update is not successful, see Update EQuIS Database for more information.