Logging into EQuIS Professional requires the following:
•Name of the server where the EQuIS Professional Database is located.
•Valid user name and password. For password requirements, see the Change Password section.
To obtain this information, contact an EQuIS Database Administrator. Users can login to EQuIS Professional using one or more of the following methods, depending on the database configuration:
•Enterprise Application Level Security (ALS) login – Requires an Enterprise license role and a single ALS role assigned
•Windows authentication
•Using an established (SQL Server) user name and password
Note: When using network licensing, one EQuIS Professional Standard license will automatically be consumed on successful login. |
Watch the Getting Started with EQuIS Professional Office Hours recording for information on connecting to a database and facility or facility group.
Launch EQuIS Professional
1.Click Windows > Start.
2.Expand EarthSoft under the Programs list.
3.Select EQuIS Professional.
4.EQuIS Professional will open to the backstage view.
EQuIS Professional Login Screen
These are the available login types:
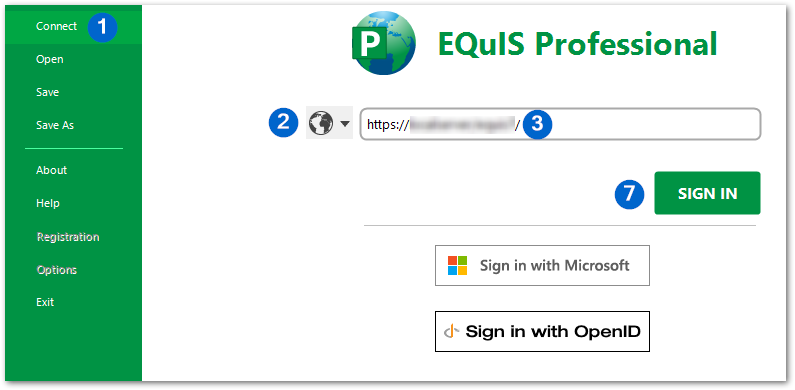
Enterprise ALS Login with Username
|
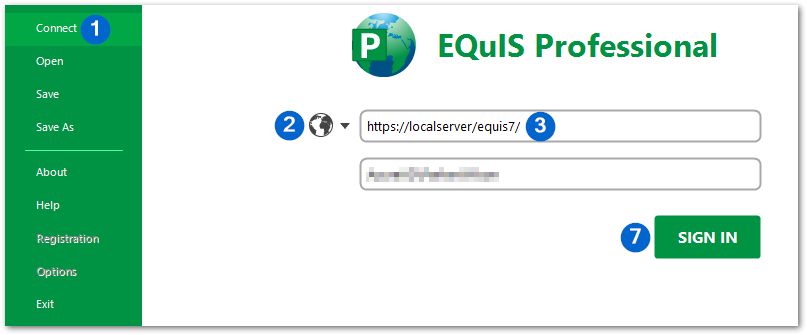
Enterprise Login with Windows User (Lightweight Directory Access Protocol [LDAP])
|
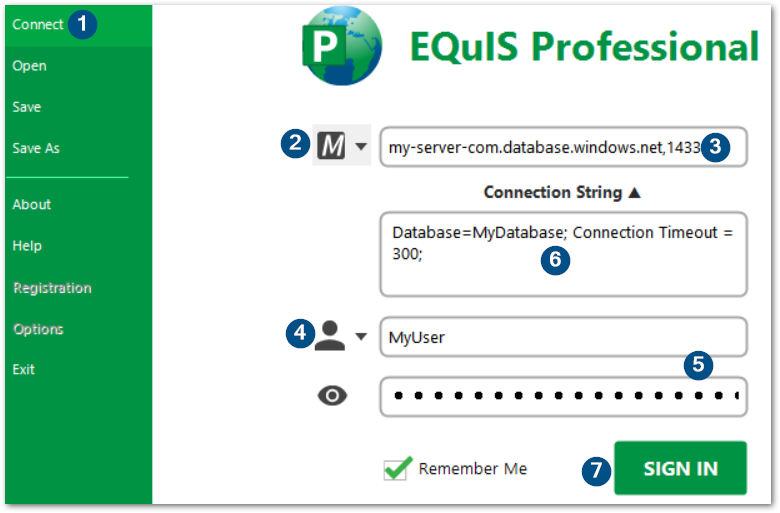
SQL Server Login for a SQL User
|
SQL Server Login for a Windows User
|
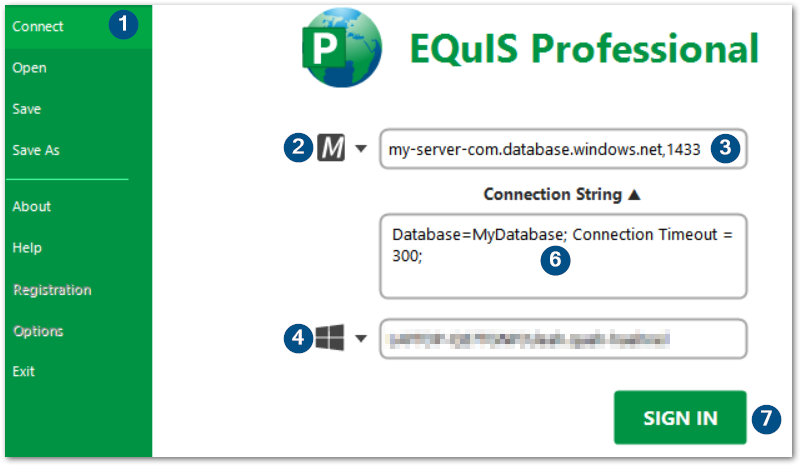
Connect to a database by following the steps below.
1.EQuIS Professional will automatically open to the Connect tab.
2.Select Server Type: EQuIS Enterprise, EQuIS Enterprise Windows User, or SQL Server (select from drop-down next to Server Name). Alternately, EQuIS Professional can automatically detect and switch server types based on the input of the following step.
3.Enter a Server Name or EQuIS Enterprise Site URL: The name (or IP address) of the server that is being connected to. If the server name is unknown, contact the system administrator.
Note: Selecting the EQuIS Enterprise server type for Application Level Security connections will hide the connection string options. For information on editing Connection String Options in the EQuIS.exe.config file, see the EQuIS.exe.config article. |
4.Select the User Authentication type from the drop-down.
5.If applicable, enter User Name and Password information.
6.Connection String Options: This option will appear if a SQL Server was picked in Step 2. Click “Connection String” under the Server Name to enter user-specific connection string preferences for database level connections. SQL users may need to specify their database name here. For example:
Database=MyDatabase;
See Connection String Options below for details.
7.Click Sign In or, if a different authentication method, Sign in with Microsoft or Sign in with OpenID. For Enterprise ALS Login with Username, the Enterprise Login Screen authentication window will open to enter credentials.
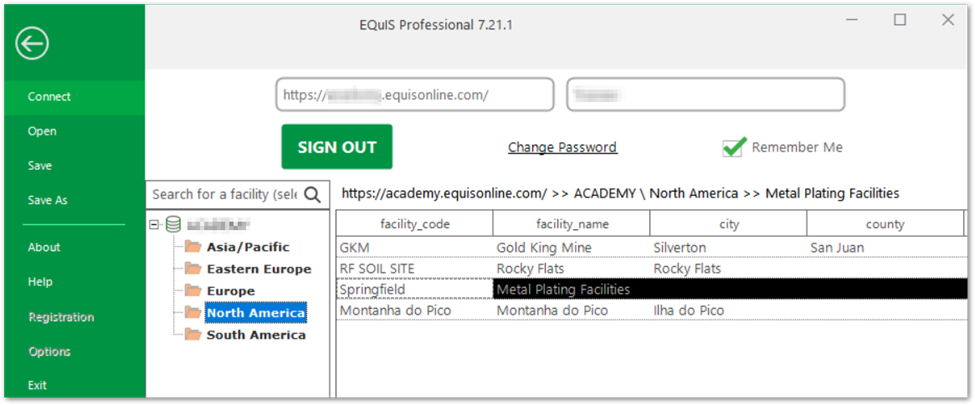
Connect to Facility or Facility Group
Once logged in, a user can expand the database(s) to view facility groups and individual facilities. The left pane under the login details, the Database Pane, shows facility groups under database names. The right pane under the login details, the Facility Pane, displays individual facilities.
Select a Facility – Expand and select the appropriate database or facility group folder in the database pane.
Search for a Facility – The Search bar above the database list.
Open a Facility – Double-click the facility row in the facility pane (such as Springfield below)
Open a Facility Group – Double-click a facility group folder in the database pane.
After logging into a facility, the remembered license level or lowest (Standard, if present) available license will automatically be checked out.
EQuIS Professional Connections
EQuIS Professional connection files can be saved, pinned and launched from your Desktop or a folder. See Saving EQuIS Connections for additional information.
Change Password
Change a user password in EQuIS Professional by following the steps below.
1.From the Connect tab on the backstage, enter the database connection information.
2.Enter the Username and Password for the user whose password will be changed.
3.Once logged in, click the Change Password button at the top of the page.
4.Enter the current password.
5.Enter a new password.
6.Confirm the new password and click OK.
The new password must meet the default complexity requirements:
•Between 6 and 30 characters in length
•At least one lowercase character
•At least one uppercase character
•At least one numeric digit
Note: •Each previously saved *.equis connection for this user will need to be updated with the new password. •Password Complexity requirements can be configured in the ST_CONFIG table. |
Connection String Options
The Connection String Options field is available for advanced connection string settings for users with SQL logins. Click the "Connection String" text after inputting a server name to reveal this field:
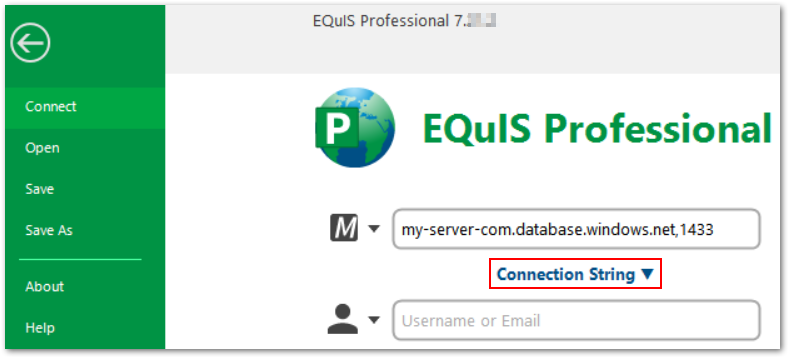
For example, when connecting to a SQL Server Database with large datasets, it may be necessary to increase the Connection Timeout to avoid timeout errors. Timeout errors may occur anytime the database is accessed, commonly when first connecting to the database, but also when reference values are called when creating reports. Type Connection Timeout=xx in the Connection String Options field (where xx is the number of seconds) as shown below.
Connection Timeout = 300;
SQL accounts set up for specific databases may need to specify the database name in the connection string to be able to connect, e.g.:
Database=MyDatabase;
Notes about Connection Strings: •Adding this option through the Connection String Options field will apply it to the current connection only. •Be sure to include a semicolon (;) at the end of the connection string. |
Additional Connection String Options
For SQL Accounts:
•If the database needs to be specified in EQuIS, it will also need to be specified in SQL Server Management Studio (SSMS) in the Options tab of the Connect window, as shown below.
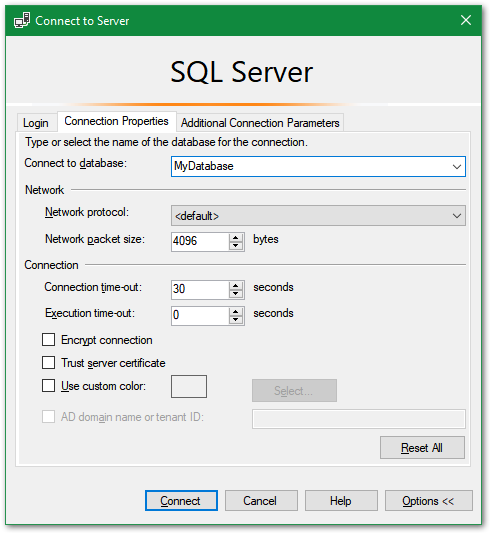
•For additional options, refer to the Microsoft SqlConnection.ConnectionString Property page.
Additional Information: Which type of authentication should I use?
Contact a database and/or system administrator to find out what type of authentication to use. The administrator will either provide a username and password or grant a Windows domain user account permission to log in to the database.
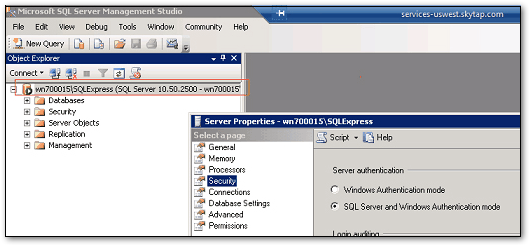
The Authentication mode that the server is using is indicated in SQL Server Management Studio by right-clicking on the database engine name>Properties>in the Security Section.
There are two possible modes.
Windows Authentication Mode
Windows Authentication mode enables Windows Authentication and disables SQL Server Authentication. Mixed mode enables both Windows Authentication and SQL Server Authentication. Windows Authentication is always available and cannot be disabled. When connecting through a Windows user account, SQL Server validates the account name and password using the Windows principal token in the operating system.
Mixed Mode
If Mixed Mode Authentication is selected during setup, the user must provide, and then confirm, a strong password for the built-in SQL Server system administrator account named sa. The sa account connects by using SQL Server Authentication. More information about this is available in the Microsoft Library article Choosing an Authentication Mode.
Only the roles of user indicated in the ST_LICENSE table connection string will be used for the linking process. License Linking is independent of the individual logging into a specific Professional database.
EQuIS uses only the credentials of the user indicated in the connection string in the ST_LICENSE table for license linking. This user will need to have read capability on the ST_LICENSE table and read/write capability on the ST_LICENSE_USE table. The EarthSoft Online Help article Application Level Security has more information on configuring SQL roles. All other users will be able to access any database, regardless of their user roles. |