New releases of EQuIS often include Schema updates with changes to the functions and tables within the EQuIS Database Schema (in Microsoft SQL Server). Check the Schema Updates section of the build summary page in the Release Notes chapter for any changes to a build.
An administrator should apply any database updates during an upgrade, using the SQL Database login with the full read/write credentials and the default schema set to 'dbo'. EQuIS Online clients must contact EarthSoft (their Account Manager or Support) to perform an upgrade; the below instructions do not apply for those databases.
This article explains the database update process using EQuIS Professional. For more details on other updates, see Overview of EQuIS Updates.
Notes: •Prior to updating the Schema, back up the database. A backup on the same day is required to perform the EQuIS Professional Schema update. Database updates cannot be reversed or undone, so it is essential to have a current backup before performing an update. •The ST_LOG table is intended to store logging information on a short-term basis. If the ST_LOG table is large, consider periodically truncating that table (e.g., prior to a database upgrade). •When a Schema update is applied, records with the details are added to ST_VERSION and ST_MODULE (MODULE_TYPE=db). Records are only created when updates to a Schema are available and applied. |
EQuIS Online clients must contact EarthSoft (their Account Manager or EarthSoft Support) to perform an upgrade.
A database administrator must use an SQL Database login with the following credentials:
•db_datareader, db_datawriter, and db_owner roles on the database
•default schema set to 'dbo'
•the ability to view, modify, and update tables in the database through Windows Active Directory (when Windows logins are being used)
Any of the following login types can apply the update provided that the criteria above are met:
•a Windows login via SQL Server (e.g. ORGANIZATION\MyUser)
•a SQL login via SQL Server (e.g. MyEQuISUser)
•an active (ST_USER.STATUS_FLAG = ‘A’) EQuIS Enterprise administrator login via an Application Level Security (ALS) role, where the SQL login used to set up the connection string matches the above criteria
Updating from an SQL Server login, if available, is preferred over updating from an Enterprise login. An Enterprise user may not know the database permissions associated with an ALS role. SQL Server logins can also specify Connection String Options such as increasing the connection timeout, which can help avoid timeout errors related to large changes.
If unable to identify your login type, consult the EQuIS Professional Login page.
Note: Users need to have VIEW DEFINITION permission for all the EQuIS tables granted to ES_PUBLIC. This permission is automatically given as part of the Schema Finalize process. |
1.While logged in to the database in EQuIS Professional as an EQuIS administrator, review the ST_MODULE system table with the MODULE_ID sorted by descending order (so that newer modules appear at the top). Additionally, filter MODULE_TYPE either by:
a.MODULE_TYPE = 'db' to see which schemas will be required. Except where the module associated with a schema is no longer in use, updates should involve applying each unique schema listed. If adding a new module for the first time, it will not have an entry in this table. The VW_DB_VERSION view shows this information without needing to filter or be an EQuIS administrator.
or
b.MODULE_TYPE = 'Report.class' to see which reports may require republishing. See When to Republish Reports for a discussion of when this is required.
The VERSION_NUMBER column for 'db' modules shows strings structured as 'yyddd.yyddd', where ddd represents a calendar day number within a year, and the numbers after the period represent the build release date. For example, '19176.19214' would relate to the EQuIS 7.0.0.19214 build, released on the 214th day of 2019. The first number, 19176, relates to the final VERSION_DATE from the previous update for that Schema.
If a module's most recent VERSION_NUMBER has a '.yy' value indicating a release date of 2016 or earlier (e.g., containing '.16', '.15', '.14', etc.), additional files and steps may be required for your upgrade; please contact EarthSoft Support.
If unsure what within the database will require an upgrade, please send an export of the ST_MODULE table to Support.
2.Review the Overview of EQuIS Updates, particularly the Significant Changes section.
3.Check the Database Schema page to find the source of your required modules.
4.Download the latest builds of all the required modules (except for Enterprise, if an EQuIS Online site is being used) from the EarthSoft Community Centre (ECC) Downloads Dashboard.
5.Unblock the files, then extract/install as appropriate.
6.Copy the schema XML/XME files from the requisite modules to the EQuIS Professional db folder (C:\Program Files\EarthSoft\EQuIS\db in a typical installation or, for per-user installation, %localappdata%\Programs\EarthSoft\EQuIS\).
7.Back up the database the day of the updates prior to updating.
Note: When upgrading an EQuIS database, the database compatibility level must meet the minimum requirements for the SQL Server version and target EQuIS build. If the compatibility level is set too low, the schema update may fail with errors such as “Incorrect syntax near ‘WITHIN’”, indicating unsupported SQL syntax. Verify that the compatibility level aligns with the SQL Server version in use, as outlined in EQuIS 7 Hardware and System Requirements, before running the database update. |
1.If you have not already done so, launch EQuIS Professional and connect to a database server/site in the Backstage view.
2.Connect to a facility, then access the Backstage from the File button on the EQuIS ribbon.
3.Within the Connect tab, click a database to select it, then right-click the database to open the context menu.

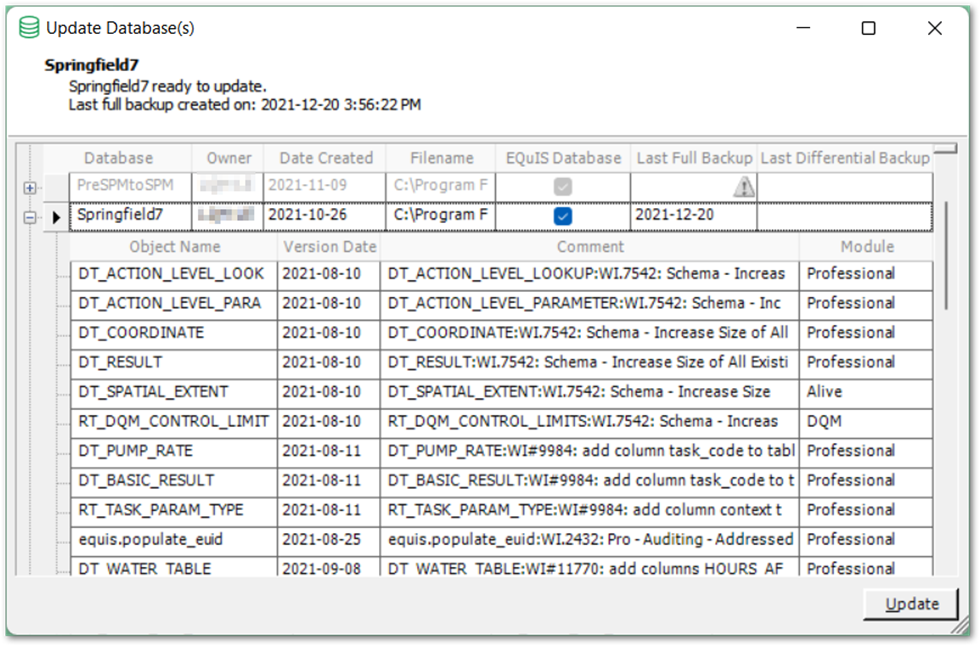
4.Select Update in the context menu. The Update Database(s) window opens and lists the databases for which available updates can be performed.
a.The available updates reflect the schema files (*.xme / *.xml) present in the EQuIS Professional directory (typically C:\Program Files\EarthSoft\EQuIS\db\ or, for per-user installation, %localappdata%\Programs\EarthSoft\EQuIS\db ).
b.By default, databases without a current backup are listed, but not available for selection. Backing up the database will enable its selection. A header message and tooltip provide information about the current update status of the selected database, and also warn users to backup databases within 24 hours of updating the schema.
Note: Databases will not be listed in the "Update Database" window if: •The database is fully up to date •If the database does need an update, older schema files in the installation's "db" subfolder |
5.Expand the database row of interest to review the available updates.
a.When each database row in the grid is expanded, each table, stored procedure, and view or function that needs to be updated for that database is listed. Each is listed by date and includes a comment providing more detailed information regarding required updates. Each object definition or update in the schema is defined by a tag similar to the following:
<version date="24 Aug 2004 08:10:12">
6.Right-click within the grid and select Module(s).
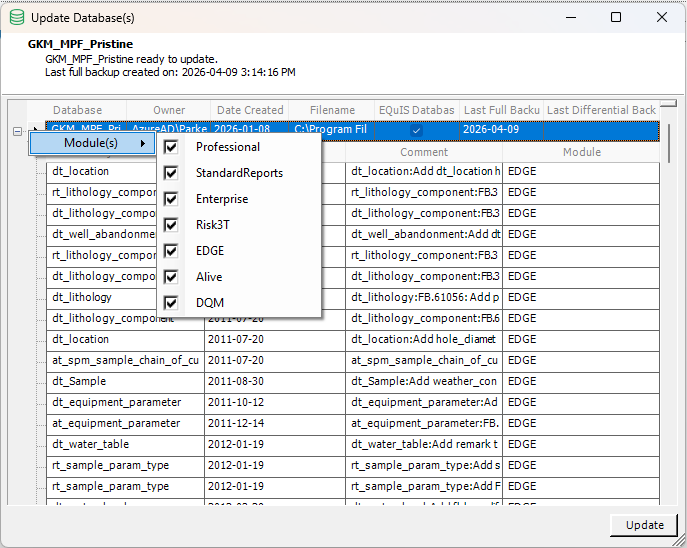
a.Check or uncheck the modules listed to select only the appropriate schema(s) for the update to apply. The Update function will only process those schema files with check marks in the corresponding check box.
b.Professional and Enterprise Schemas are required; both must be checked when updates are available.
7.Select and highlight the database of interest. Multiple databases can be selected using the Shift+click or Ctrl+click common to multiple selections with Windows.
8.Click Update.
Note: The Update button may be cut off if EQuIS Professional opens in French or Spanish. In that setup, after selecting the database to update and the modules, press Tab + Enter to access the Update button and start the update. Alternatively, run EQuIS Professional in a different supported culture, per Regional Settings or Languages. |
9.After clicking the Update button, a warning message explaining that the update is irreversible will display. To complete the database update process, click Yes on the warning prompt once you are certain about proceeding with the update.
10.Click OK on the Update Status window that pops up to indicate success.
a.When working with multiple databases, the Database Update screen only shows a single confirmation message, regardless of how many databases are selected. The error message is: Successfully updated X of Y database(s). Databases that update successfully are shown with a light gray background.
b.Databases that do not update successfully are shown with a red background and the tooltip of the row shows the error message. Expand the row to see exactly what update caused the error.
11.Close the Update Database(s) window when complete.
Note: Significant updates may need an extended connection. If a timeout issue occurs, extending the timeout may be needed as shown in the Connection String Options section of the help article Connecting EQuIS Professional To a Database. |
The final step of updating an EQuIS Database is the Schema Finalize process, which runs automatically after applying the specified schema(s). This process does the following and adds records to the ST_VERSION system table:
•EQUIS.REFRESH_SCHEMA: This stored procedure runs for each current table (i.e., the table name does not begin with 'z__' like obsolete tables) to perform tasks like the following:
ochecks for the EUID column in tables and, if appropriate, adds it
obuilds and refreshes all table types in the database, granting permission on those to the ES_PUBLIC database role
oupdates the XT_TABLE and XT_COLUMN tables
omakes triggers consistent, particularly for auditing purposes
•EQUIS.TABLE_ROW_COUNT_BUILD: rebuilds the EQUIS.TABLE_ROW_COUNT stored procedure for displaying row counts for each table
•Updates EQUIS.REPORT_FACILITY_ID scalar function if Live schema has been applied and the update has not yet been made
The records added to ST_VERSION will list the modules applied during that update, e.g.:
(modules: Professional|SPM|Geotech)
1.Hover over each column of the red line in the Database Update Form to review the error message(s) in the tooltips. For further information, consult the equisdebug.log file, typically located in Documents\My EQuIS Work. Common issues include:
a.insufficient permissions, leading to an error in the first line of the update (see Required Permissions section)
b.updates time out prior to completion (see note box above)
c.fields required by that line of the update are not populated.
2.Correct the issue(s). If uncertain of the issue, send the equisdebug.log file and screenshots of the error to Support for assistance.
3.Repeat the update process.