EQuIS Enterprise 7 includes a powerful and flexible permission system that lets administrators configure system security according to specific needs. Roles are an important component of the permission system. Roles can be created with specific sets of permissions and then users can be assigned to the desired role(s). Using roles can be simpler and more efficient than managing specific permissions for many individual users. Create and assign roles using the Role Profile editor.
To open the Role Profile Editor window, click on a role name in the Role Manager widget. Administrators can view/change attributes of a role, add/remove users to/from the role, and set permissions for the role. All changes made on Role Profile window will only be saved when the Save ![]() icon is clicked. If the Close without Saving
icon is clicked. If the Close without Saving ![]() icon is clicked, none of the changes will be saved.
icon is clicked, none of the changes will be saved.
Role Info
The first portion the Role Profile window displays the role information.
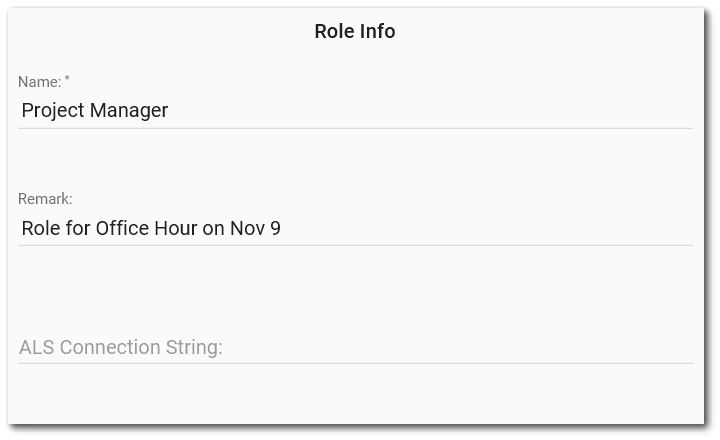
Role Name – This is the name of the role. This value is required and will already be populated.
Remark – This is the remark or description of the role.
ALS Connection String – This is the connection string for enabling Application Level Security (ALS) access to the database via EQuIS Professional. The database privileges associated with the connection string user are refined by the permissions set in Enterprise. Any database access denied from the connection string user will also be unavailable to users via the ALS role.
For security reasons, the Role Profile Editor connection string will be displayed as an encrypted value.
Example Connection Strings – The following examples presume a connection to a server named CorpDBMS01 with a database named 'EQUIS', username 'equis_service', and password 'pa$$w0rd'.
•Microsoft SQL Server using SQL credentials:
Data Source=CorpDMS01; Database=EQUIS; User ID=equis_service; Password=pa$$w0rd;
•Microsoft SQL Server using Windows Active Directory credentials:
Data Source=CorpDMS01; Database=EQUIS; Integrated Security=SSPI
Note: EQuIS Enterprise 7 ships with one role, the Admin role. The Admin role includes Owner and Creator permission on all Object Types. Do not ever remove the Admin role.
The Licensing role will get created when licenses are applied to the database via EQuIS Professional. |
|---|
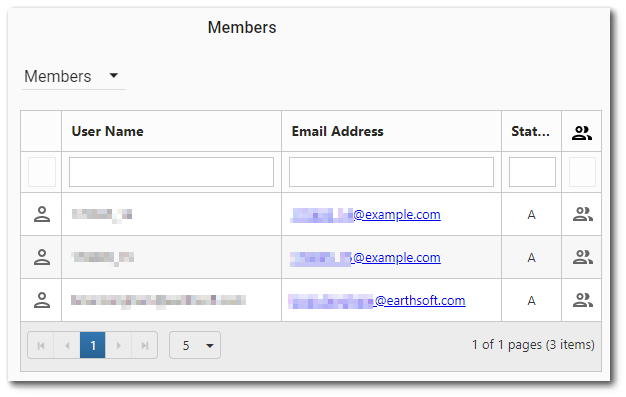
Members
The Role Profile window contains a grid that displays users as members of the role.
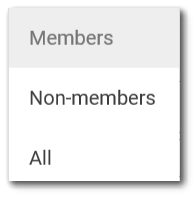
Non-members can be viewed by selecting the Members drop-down menu and selecting Non-members or All. Viewing non-members allows these users to be added to the role.
|
|
Name Search Box – Enter a search term (user name, email address, first name, last name) that will be used to search for users. Only users will be displayed that contain the search term used. Press the keyboard <ENTER> key or click the Search button (just to the right of the Search box) to search for users.
The grid columns contain attributes of the user (i.e., role member). The columns are sortable by clicking on the column header (click again to reverse the sort). The columns are as described below.
User Icon ![]() – The icon used to indicate a user. This column is for display purposes only and may not be changed.
– The icon used to indicate a user. This column is for display purposes only and may not be changed.
User Name – The name of the user. This column is for display purposes only and may not be changed.
Email Address – The email address of the user. Click on the email address to use a "mailto:" link to send an email to the user.
Status – This indicates the status of the user.
•A – Active user assigned to at least one role based license.
•C – Limited to communication. Used for EIA notifications.
•D – Disabled / Deleted.
•R – Pending review. New users or users not assigned to a license role.
Role ![]() – If the icon is displayed in the right-most column, then the user is a member of the role. If the icon is not displayed (i.e., the cell is empty), the user is not a member of the role.
– If the icon is displayed in the right-most column, then the user is a member of the role. If the icon is not displayed (i.e., the cell is empty), the user is not a member of the role.
•Click the column header to sort by role membership (i.e., to see users that are members of the role sorted separately from users that are not members of the role).
•Click the cell to toggle role membership for the given user. Membership is not saved until the Save ![]() button is clicked.
button is clicked.
The bottom of the grid contains paging controls for displaying a limited number of users at a time, as described below.
Arrows – Use the left/right arrows to navigate through pages.
Go to Page List – Select a specific page to navigate directly to that page.
Rows per Page – Change the number of items to be displayed per page by using the drop-down menu.
Count of Pages and Total Items – This control indicates the total number of items available in the grid, how many pages to display the items, and which page is currently selected.
The paging controls are specific to the current search. For example, if there are 100 users, but only 15 users match the current search term, then the paging controls will apply only to the 15 matching users.
Permissions
The Role Profile window contains the permissions grid, where user permissions can be viewed and/or changed. If the User Permissions Report has been enabled, a download button will be available to download the User Permissions report for the given role. Permissions for individual objects can be downloaded by clicking on the Excel icon at the last column for that particular object.
Applying or Removing Roles
Roles are important for activating users, adding EQuIS Professional access via Application Level Security, or providing predefined permissions.
To change members of a role, an administrator can:
1.Click on the role name in the Role Manager widget, located by default on the Administration dashboard.
2.Locate the user in either the Members or Non-Members dropdown of the Members grid, depending on their current status.
3.For the row associated with that user, click within the cell of the final column (with the ![]() icon) to toggle role membership on or off.
icon) to toggle role membership on or off.
4.Click Save ![]() to apply changes.
to apply changes.
To apply a role to a single user directly, an administrator can also toggle the final column for roles within the Roles tab of the User Profile Editor for that user.
Note: In larger databases or databases with many permissionable objects such as facilities or groups, roles may take a long time to apply. After clicking Save, wait 5 or 10 minutes before checking the role status. |
|---|