The User Profile Editor window displays the user's attributes, role membership and permissions. If users are viewing their own profiles, then some items may not be visible or may be read-only. If an administrator is viewing (or editing) the profile of a user, then all items will be visible. Such distinctions are indicated below.
To open the User Profile Editor window as an administrator, click on a username in the User Manager widget. The Edit User menu will appear. Click the More Options ![]() icon within the widget for additional administrative functions:
icon within the widget for additional administrative functions:
•Impersonate a User
For other user management functions available through the widget, see:
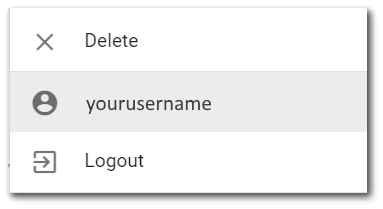
To open the editor to view your profile as a user, click the More Options ![]() icon on the right-side of the main window frame for the selected dashboard. in the top-right corner of the selected dashboard. From the drop-down menu, click on your username next to the user profile icon
icon on the right-side of the main window frame for the selected dashboard. in the top-right corner of the selected dashboard. From the drop-down menu, click on your username next to the user profile icon ![]() . The User Information menu will appear.
. The User Information menu will appear.
All changes made in the User Profile Editor window will only be saved when the Save ![]() icon is clicked. If the Close without Saving
icon is clicked. If the Close without Saving ![]() icon is clicked, none of the changes will be saved.
icon is clicked, none of the changes will be saved.
General User Information
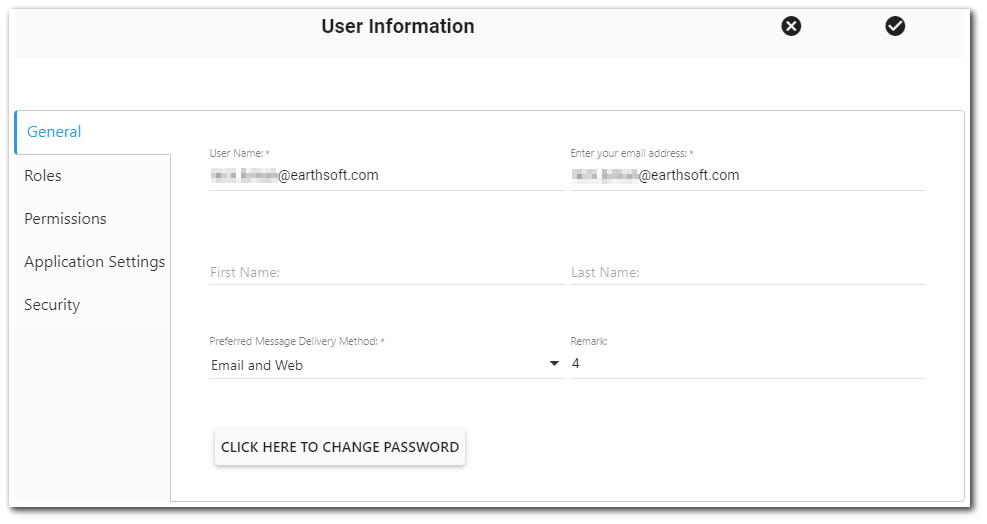
User Name – The user name of the user. This value is required (i.e., may not be null), must be unique in the ST_USER table, and is immutable (i.e., cannot be changed after the user is created). Letters with diacritical marks are allowed in the user name field. By default, the database's user name field is of type varchar, which limits it to UTF-8 characters. The diacritical marks in languages supported by Enterprise (German, French, Portuguese, Spanish) should all be able to be stored correctly in the database, while other characters found in other Latin character sets (Slavic languages, Turkish) will be reduced to their UTF-8 form in the database unless the user name field is changed to nvarchar.
Warning: Users with a space in their username cannot save changes in the User Profile Editor. Please contact your administrator and EarthSoft Support if changes are required. |
Email Address – The email address of the user. This value is required (i.e., may not be null), must be unique within the ST_USER table, and must be a valid email address. A user can have multiple comma-separated email addresses, using the following criteria:
•Each email address needs to be separated by 1 comma.
•There can be 0 or 1 white space characters after each comma.
•There can be 0 characters following the last email address in the list.
•The list of email addresses, including the comma and white space characters, can not exceed 100 characters in length.
Creating a new user with multiple email addresses or updating an existing user to have multiple email addresses:
If a new user is created with or an existing user is updated to have multiple email addresses, the individual email addresses may exist as the email address for another user in the EQuIS database.
First Name – The user's first name. This value is optional.
Last Name – The user's last name. This value is optional.
Preferred Message Delivery Method – Used to set the message delivery method to either Web Only or Email and Web. This value is required.
Remark – This is an optional field for storing a remark.
Click Here to Change Password Button – Used to change the user password.
Multi-Factor Authentication Button – Used to enable/disable or reset Multi-Factor Authentication (MFA), via an authentication app.
•Enable – If the user's MFA is disabled, then the "enable" MFA button will be displayed to setup MFA for the user. When clicked, the MFA dialog window will open with a QR code to be scanned by their MFA app and and users will need to enter the one-time 6-digit passcode from their MFA app. See the Multi-Factor Authentication article for more details.
•Disable – If the user's MFA is enabled and MFA is not enforced for the site (by the ST_CONFIG setting), then the "disable" MFA button will be displayed. Users will need to enter the one-time 6-digit passcode from their MFA app to disable MFA. If they cannot provide the passcode, then an administrator needs to disable MFA for them. Administrators can disable the MFA button for another user without needing the 6-digit passcode.
•Reset – If the user's MFA is enabled and MFA is enforced for the site, then the "reset" MFA button will be displayed. The reset button disables and then re-enables MFA for the user. If the user aborts resetting their MFA after they disable MFA but before they re-enable MFA, they will still be prompted to enable MFA the next time they login; they will not be able bypass MFA.
Note: An Active Client Access License (ACAL) is unique to each user. The user may log in from any device at any time and use the same license. A single ACAL may be used across multiple EQuIS databases if both of the following conditions are true: •All of the EQuIS databases point to the same license database, and •The user name (ST_USER.USER_NAME) and email address (ST_USER.EMAIL_ADDRESS) are exactly the same in each EQuIS database. |
|---|
Roles
The Roles tab displays the user's membership. Users that are not administrators will only see the roles to which they are members of and will not be able to change role membership. Administrators will be able to see all roles and optionally change the user's role membership. For information on administering user status via roles, see Applying Licenses in EQuIS Enterprise and Activate Users,
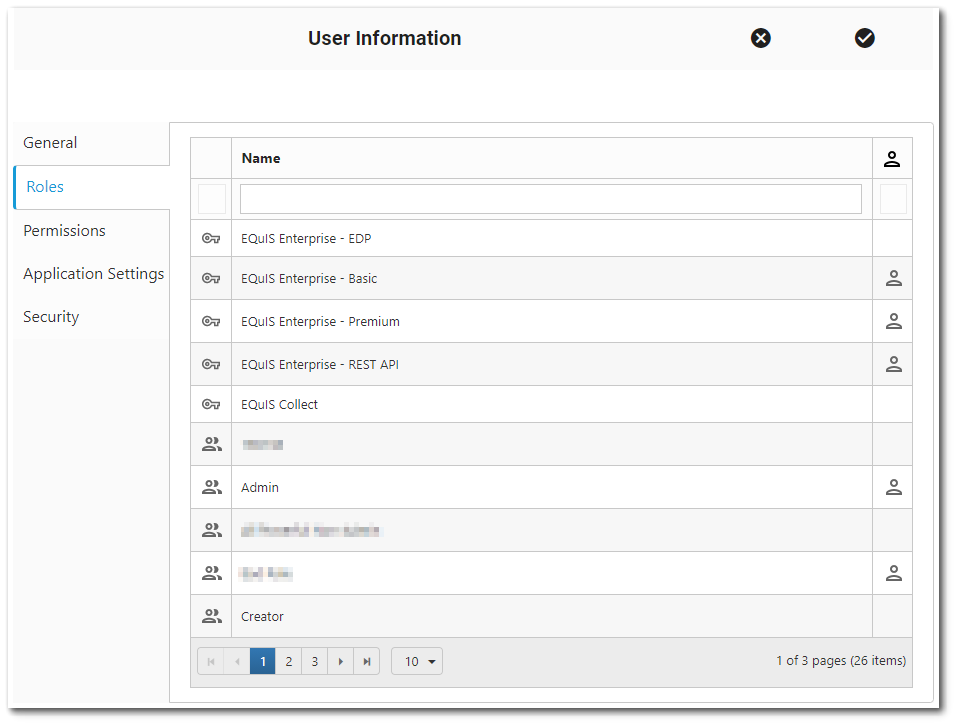
Name Search Box – Enter a search term (one or more characters) that will be used to search for roles. Only roles will be displayed that contain the search term (name, remark). Press the keyboard <ENTER> key or click the Search button (just to the right of the Search box) to search for roles.
The grid columns contain attributes of the role. The columns are sortable by clicking on the column header (click again to reverse the sort). The columns are as described below.
Role Icon – This column is for display purposes only and may not be changed. The column indicates a role ![]() , a licensed role
, a licensed role ![]() , or an ALS (application-level security) role
, or an ALS (application-level security) role ![]() .
.
Name – The name of the role. This column is for display purposes only and may not be changed.
User ![]() – If the icon is displayed, then the user is a member of the role. If the icon is not displayed (i.e., the cell is empty), the user is not a member of the role.
– If the icon is displayed, then the user is a member of the role. If the icon is not displayed (i.e., the cell is empty), the user is not a member of the role.
•Click the column header to sort by role membership (i.e., to see roles for which the user is already a member sorted separately from roles for which the user is not already a member).
•Click the cell to toggle role membership for the given user. Membership is not saved until the Save ![]() button is clicked.
button is clicked.
The bottom of the grid contains paging controls for displaying a limited number of roles at a time, as described below.
Arrows – Use the left/right arrows to navigate through pages.
Go to Page List – Select a specific page to navigate directly to that page.
Rows per Page – Change the number of roles to be displayed per page by using the drop-down menu.
Count of Pages and Total Items – This control indicates the total number of items available in the grid, how many pages to display the items, and which page is currently selected.
The paging controls are specific to the current search. For example, if there are 15 roles, but only four roles match the current search term, then the paging controls will apply only to the four matching roles.
Permissions
The Permissions tab contains the permissions grid, where user permissions can be viewed and/or changed. If the User Permissions Report has been enabled, a download button will be available to download the User Permissions report for the given user.

Notes: •Altering user permissions results in notifications being displayed in the upper-right corner of the screen, informing the administrative user about the progress of the permissions change(s). The notifications are presented when the permissions change is being processed, when the permissions change has successfully been completed, or if the permissions change failed. If the permissions update failed, information pertaining to the failure is located in the web browser console log. •If DT_FILE contains any records where the FILE_NAME and TITLE fields are blank, the Files/Documents drop-down will not render. Populate FILE_NAME and/or TITLE for these records to proceed. |
|---|
For more information, see the Permissions chapter.
Application Settings
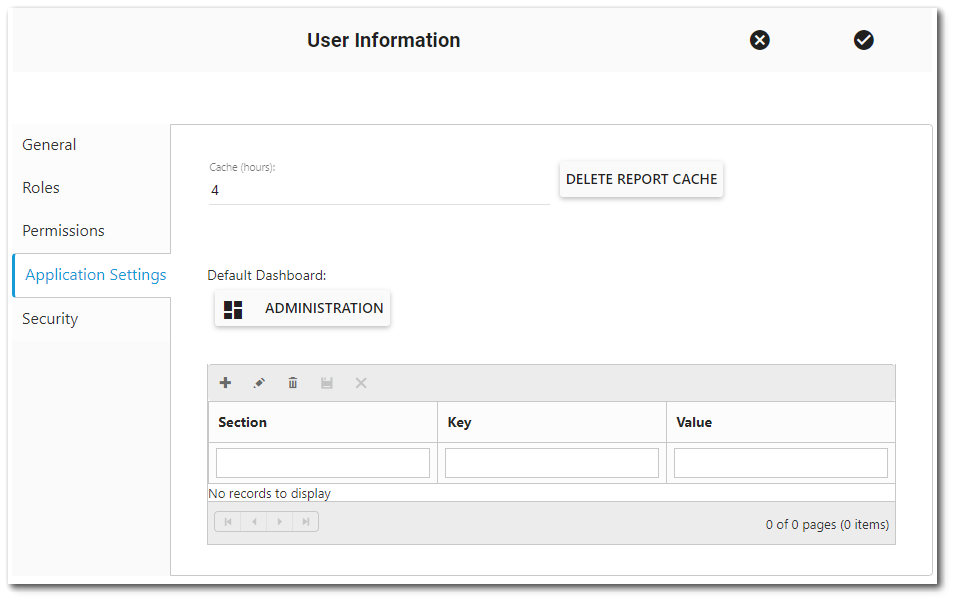
Cache (hours) – This setting pertains to the number of hours to cache report output. Fractional values are allowed (e.g., 0.25 = 15 minutes). Report caching cannot be disabled. Although a zero (0) value can be entered, the minimum report cache will always be 1/10 of an hour (i.e., 6 minutes). See Report Caching Service article for more information.
Delete Report Cache Button – This will delete the Enterprise report cache.
Default Dashboard – This is an optional setting that can be used to set the default dashboard to load upon user login. If a default dashboard has not been set, the current dashboard title is displayed. Clicking on the ![]() Choose Dashboard button will open the Dashboard Chooser and a default dashboard can be selected.
Choose Dashboard button will open the Dashboard Chooser and a default dashboard can be selected.
Note: Using a URL that contains a dashboard ID (e.g., https://XXX.equisonline.com/Default.aspx?d=2498) will navigate the user to that dashboard rather than the Default Dashboard. |
|---|
Note: Users can adjust default settings by populating the Section, Key, and Value fields. Examples demonstrating how a user can configure a Default View and View Mode (Renderer) are available here. |
|---|
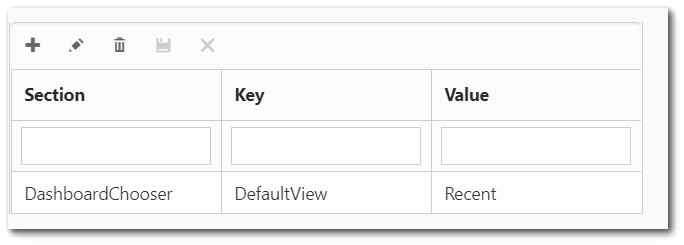
Configuration Grid
This is the application grid that shows the user’s configuration settings and pulls from the ST_CONFIG table. Users with the appropriate permissions can also add entries to the grid and populate ST_CONFIG. For example, if the following entry is in the ST_CONFIG table, it will be shown in the application grid, and vice-versa:
CONFIG_SECTION = DashboardChooser
CONFIG_KEY = DefaultView
OBJECT_TYPE = null
OBJECT_VALUE = null
STRING_VALUE = Recent
USER_ID= Targeted user's ID (e.g., 12345)
If a user adds the above entry, the Dashboard Chooser will default to Recent.
Users may wish to set the default view and/or renderer (grid/tile/map view) for the Dashboard, Facility, Report, and/or Widget Choosers. The DefaultView value can be either "Favorites" or "Recent". The Renderer value can be either "Tile" or "Details" (will display the Grid View). In addition, the Facility Chooser can have a Renderer value of "Map". See the Chooser Configuration article for additional details.
Note: Administrative users will have to add the configuration settings for non-administrative users, who can then modify the settings as desired in the User Profile Editor. |
|---|