Form Name: EQuIS SQL Form
File Name: EarthSoft.Forms.Library.42804.dll
Software: EQuIS Professional
Source: Available for the EarthSoft Primary Point of Contact (POC) on the EarthSoft Community Center downloads dashboard > Products > Additional Resources > v7.0
Description: The EQuIS SQL Form allows users to query the database using T-SQL. The form allows select statements, but cannot be used to delete, create or update records.
Installation Instructions: Download the EQuIS SQL Form from the EarthSoft Community Center. Starting in 7.24.3, the form is packaged together with other standard-by-request forms, i.e., "EQuIS_By_Request_Forms_All_7.24.3.zip".
Unblock the *.zip file, and extract the DLL to the EQuIS Professional installation folder. For standard installations, this directory is C:\Program Files\EarthSoft\EQuIS; for per-user installations, this directory is %localappdata%\Programs\EarthSoft\EQuIS by default. After the user reopens Professional or refreshes the Open window, the form will appear in the Forms list.
Overview:
•Setup Instructions for Non-Admin User
The form allows you to write database queries for viewing data. If you do not have direct access to the database or to Microsoft SQL Server Management Studio, the form allows you to quickly find certain records in the database or to combine records from multiple tables using a join statement. For example, the form supports UNION and EXCEPT operators, along with TOP, ORDER BY and COUNT commands. Note that certain functions, such as deleting or updating, are disabled in the form.
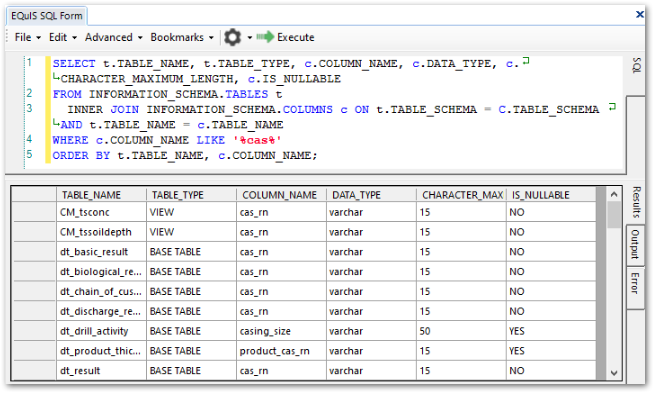
Build 7.22.2 added support for the following:
•Comments anywhere in the SQL query, for example:
-- comment prior to SQL
SELECT dt, year, /* in-line comment that...
...spans multiple lines */ day_name
FROM dbo.st_calendar -- comment at end of line
WHERE dt ='2020-01-01'; -- instead of CAST(GETDATE() AS DATE) use hard coded value\\
•Common Table Expressions, for example:
WITH date_cte AS
( SELECT dt AS c_date, [year] AS c_year, day_name
FROM dbo.st_calendar
)
SELECT c_date, c_year, day_name
FROM date_cte
WHERE c_date ='2020-01-01';
If the Open in New Tab option (via the ![]() gear button) on the initial screen is checked, the SQL Form query output window also contains all the standard report functions, such as crosstab reports, XY charts, and export options:
gear button) on the initial screen is checked, the SQL Form query output window also contains all the standard report functions, such as crosstab reports, XY charts, and export options:
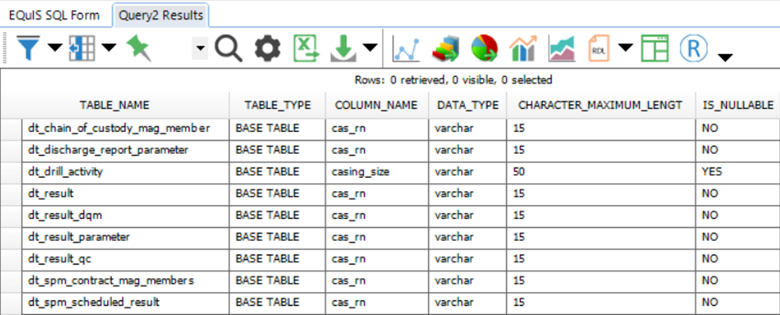
Notes: •Toggle the filter row, or set and unset a filter, to see the row count for a query's results. •Clicking Refresh in the grid of a different tab will clear any tabs with SQL query results (e.g., Query1 Results and Query2 Results). |
Additionally, the SQL Form query can be published to the database and utilized in EQuIS just as any other EQuIS grid report, such as a crosstab in the Enterprise Data Grid or EZView Widget.
•The EQuIS SQL Form editor features syntax highlighting, line numbers, zoom in/out, find and replace, change tracking, quick indentation or comments, go to line navigation, and bookmarks.
Limitations
•This form is not available for non-administrator Application Level Security logins, unless set up specifically.
•Certain functions, such as deleting, inserting, or updating records, are disabled in the form. The Errors Tab of the form will return an "Unsupported SQL Found" message for these functions.
•Only one instance of the EQuIS SQL Form at a time should be used. To perform and display results from multiple queries, return to the original EQuIS SQL Form tab and run each query individually.
•Only run one query at a time in the EQuIS SQL Form, as only the first will process successfully. Use the standard SQL UNION operator to combine queries into a single result set.
•Prior to EQuIS 7.22.2, comment functionality was limited. See the Comments in Code historical documentation for more information.
•The EQuIS SQL Form reads anything that contains the @ (at) or : (colon) symbols as parameters, even if it should be read as a string. The form then displays the parameter selector screen. For the @ symbol, continuing past that screen by clicking the Go button will still show correct results from the form. To work around this behavior, use the CHAR function to replace those characters, as follows:
oat symbol, @ – replace with CHAR(64), such as
SELECT user_id FROM st_user WHERE email_address = 'username' + CHAR(64) + 'domain.com';
ocolon, : – replace with CHAR(58), such as (depending on user's date format)
SELECT * FROM dt_sample WHERE sample_date = ('12/15/2007 1' + CHAR(58) + '35' + CHAR(58) + '00 PM');
or
SELECT * FROM dt_sample WHERE sample_date = ('2008-10-16 00' + CHAR(58) + '00' + CHAR(58) + '00');
Setup Instructions for Non-Admin User
Note: "VIEWER" permission to ALL facilities in the database is required, and use of the form enables viewing data (query results) which are typically hidden from non-admin ALS users (i.e. certain system tables [ST_*]). |
The following instructions must be followed so that a non-admin ALS user can use the EQuIS SQL Form:
1.Publish the EQuIS SQL Form DLL to the database (i.e., EarthSoft.Forms.Library.42804.dll. (Once published, the DLL does not need to be installed on the computer running Professional).
2.Using SQL Server Management Studio (or other similiar tool), execute the script.
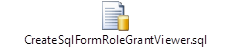
Right-click the image above and select Save link as. Once downloaded, unblock the file and change the file extension from .txt to .sql. When executed, this script does the following:
a.Creates a special role named "EQuIS SQL Form" (used for assigning permissions).
b.Grants the appropriate permissions to "EQuIS SQL Form" role.
3.Using EQuIS Enterprise, associate the users (ALS non-admin) that will use the form to the "EQuIS SQL Form" role.
Alternately, assign roles to non-admin ALS users directly. At minimum, they will need the following roles assigned:
a. No Admin role
b. An EQuIS Enterprise licensing role (Basic or Premium)
c. An ALS role
d. The EQuIS SQL Form role |
|

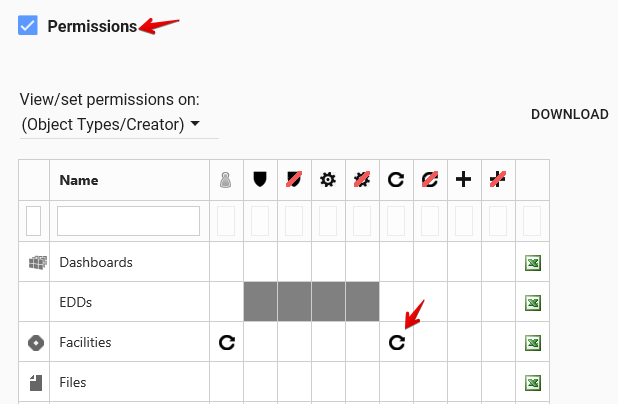
4.If the non-admin ALS user does not already have Viewer access to all facilities, go to the Permissions tab of the User Profile Editor for that user and select Viewer for the Facilities object, as shown below.
5.If, after following the steps above (in order), a user is not able to use the EQuIS SQL Form, it is likely that they do not have "VIEWER" permission to EVERY facility in the database. To find facilities that a user does not have "VIEWER" permission to (i.e., where Deny Viewer is set), execute the following SQL query:
Right-click the image to the right and select Save link as. Once downloaded, unblock the file and change the file extension from .txt to .sql. |
|

Note: If a new version of the EQuIS SQL Form is published, the CreateSqlFormRoleGrantViewer script (from step 2 above) may need to be run again in order for non-admin users to continue to be able to access the EQuIS SQL Form. |