On the right side of the Form Template Layout page, forms can be built within the template based on the selected format. After the new template is saved, build forms by selecting the + New Form button on right side of the page.

The Form Setup page opens.
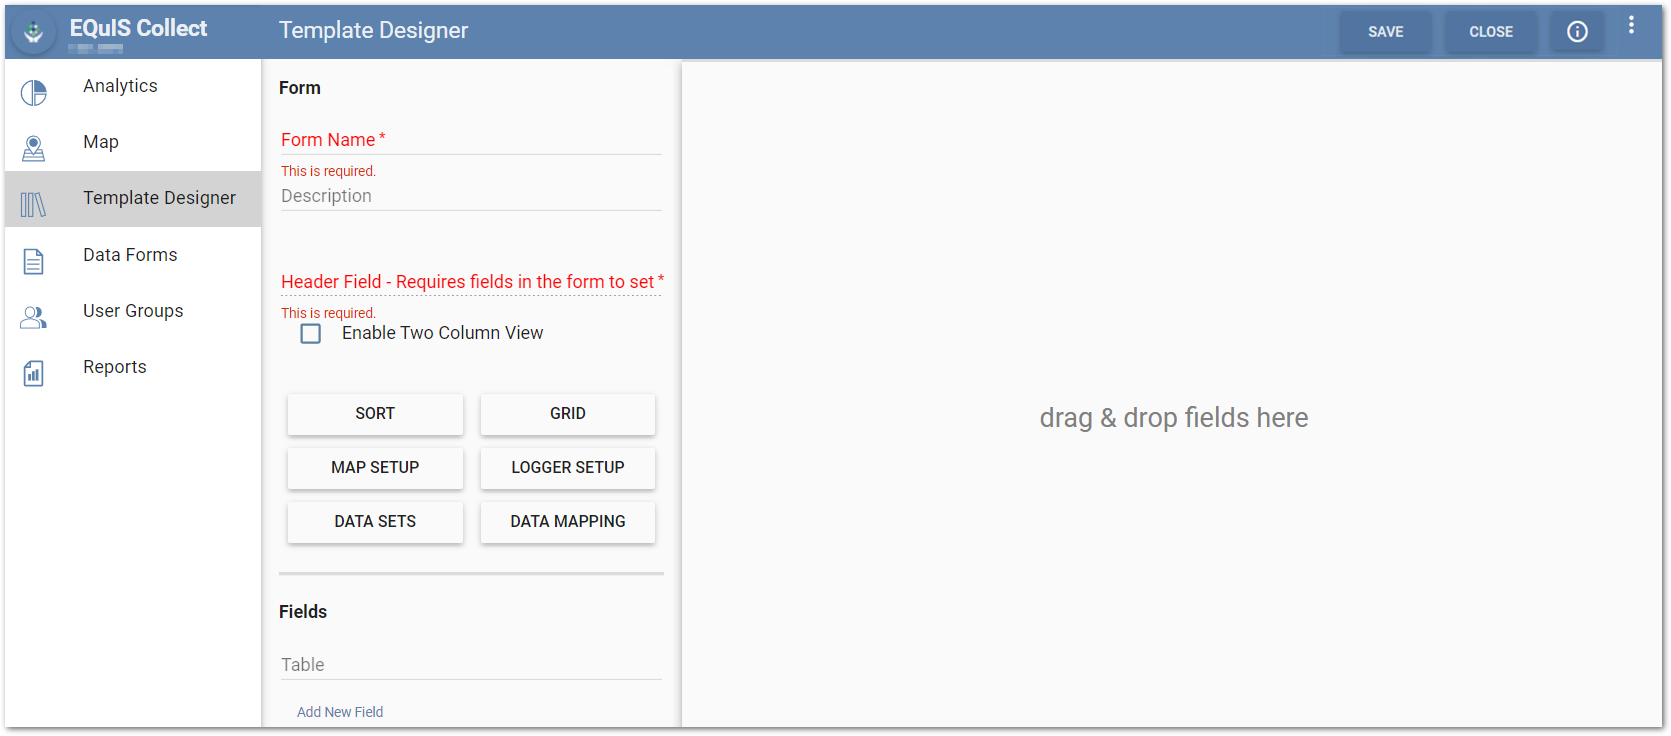
Populate the form details and add fields to create the new form. Enter the Form Setup details in the left pane. Note that the Red Bold* details are required fields.
•Form Name – The name of the form. Once saved, the form name cannot be changed because this name is referenced when building formulas. For instance, if aggregate functions are being used in formulas and the name of the form was changed, the references would break making the form and Collect unusable.
•Description – Although this field is not required, providing a clear and concise description is recommended as the form description will be displayed on the mobile device rather than the form name. If no description is given, then the form name will be displayed instead. This field remains editable.
•Header Field – The form cannot be saved unless the header field is defined. This header will be visible on the mobile device in a number of places:
•The name of the form record (if Grid View is not in use).
•The label for a form's pin on the Collect Map Form Viewer.
Tip: Designate a field of type = Formula in the form's Header Field. This can allow for dynamic names for form records. For example, the header field could show different text when certain fields on the form have been completed. An example of this kind of formula follows:
CONCAT('Well ID: ',[loc_name],' Sample ID:',[sys_sample_code],' Type: ',[sampleType],IF(NOT(ISEMPTY([StartDate],[SampleDate])),' ✔',IF(NOT(ISEMPTY([StartDate])),' - In Progress',''))) |
|---|
•Enable Two Column View – Selecting this check box enables data entry fields to display two columns when using Collect Mobile on large screen devices, such as tablets and PCs, and when the data entry mode is direct. If the Enable Two Column View option is selected for the template form, the field(s) will display in the order defined in the template. By default, the option is not selected and only one column is displayed.
Note: Smaller screen devices, such as mobile phones, will only display one column for data entry regardless of the Enable Two Column View setting. |
|---|
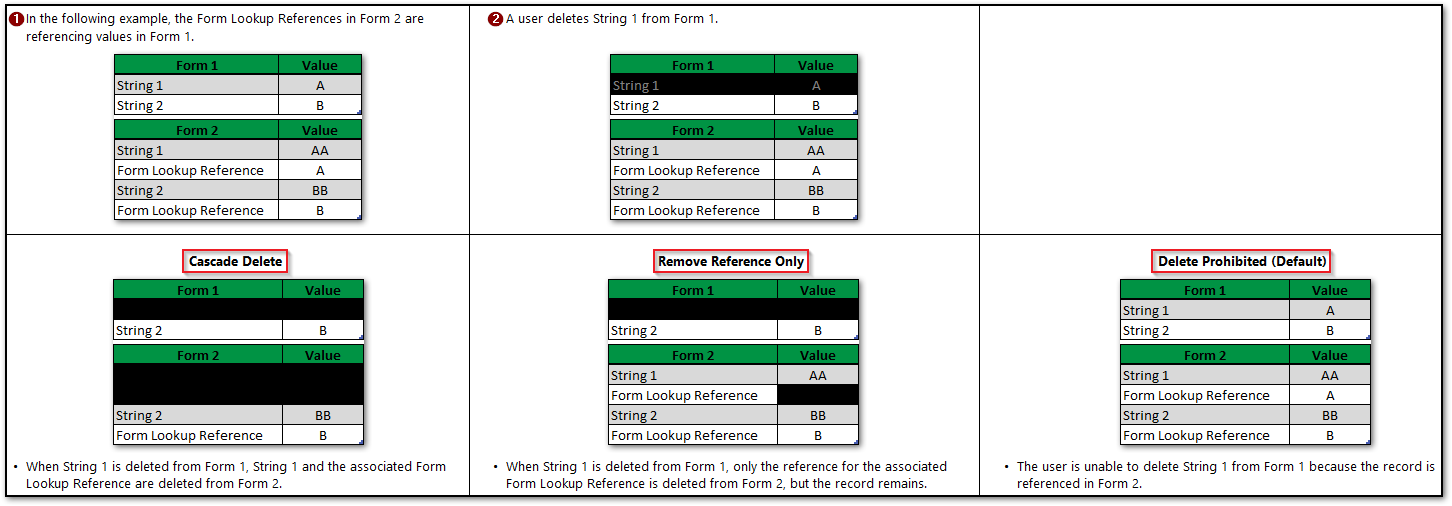
•Related Records – A drop-down list of options allowing users to select how records referenced via Form Lookup fields are handled when a related record is deleted (unless Delete Prohibited is selected). The options include:
•Cascade Delete – Record is deleted along with all referencing records.
•Remove Reference Only – Record is deleted along with the value in the referencing Form Lookup field(s).
•Delete Prohibited (Default value) – Record will not be deleted if the record is referenced elsewhere.
Note: The Related Records feature is applicable to templates used in Collect Mobile and the Web Forms widget. |
|---|
Related Records Scenario Example: The following tables show a simple scenario and the results depending on which Related Records setting is selected:
The Fields section provides a means to add fields and control field features. Within this portion of the Form Setup page, manage the fields available on the form and how they will appear. After fields are added to the form, the following action buttons will be available on the Form Setup page:
•Add Group – This feature allows fields to be grouped together within a form. See the Add Group article for more details.
•Combine Fields – This feature allows fields to be united, easily viewed, and have data entered together. Combined fields will be displayed on the Collect Mobile app under the Combined Fields Group Name and will appear as a form field. See the Combine Fields article for more details.
After fields are added to the form, other form properties can be set. The Sort, Map Setup, Grid, Logger Setup, Data Sets, and Data Mapping buttons allow for customization of how the form will appear on the mobile device. Any button on the Form Setup page that can accept customization will change to blue when changed from the default properties.
•Sort – By default, form records shown in Collect Mobile are sorted by the field set as the header (e.g., the Well ID). The Sort attribute can control the sort order based on a formula. Collect Mobile sorts the forms alphanumerically based on the string result of the Sort formula.
Note: Employ a natural sort order by using a Sort formula like the following. The example here is sorting a "sample" form based on its "location" field:
ADDLEADING(TRIM(POS([location],SORT(JOIN([sample.location])))),6,'0') |
|---|
•Map Setup – The Map Setup button allows the user to set properties for how locations will be displayed on the map view in Collect Mobile. See the Map Setup article for more details.
•Grid – The Grid feature allows specified fields to be selected and displayed in a Grid view on the mobile device. See the Grid View article for more details.
•Logger Setup – Use the Logger Setup option to define how fields on a form will receive data from a data logger. See the Logger Integration article for details.
•Data Sets – Provides a method of further constraining form requirements and maintaining uniqueness in the data as well as facilitating the automation of index or interval generation. See the Data Sets article for more detail.
•Data Mapping – Mapping to the database is provided by default (depending on the EQuIS format used), but can also be customized. See the Data Mapping article for more detail.
Once the desired fields are added and edited, save the form by clicking the Save button on the upper right portion of the Form Setup page.