EQuIS Enterprise must be configured for EQuIS Geotech to use the standard out-of-the-box Enterprise dashboards that mirror typical geotechnical workflows.
Notes: •Ensure that the same build of Enterprise, Collect, and EnviroInsite are installed prior to performing the EQuIS Geotech Enterprise configuration steps. •Users will have to manually update the Site URL and User Report ID to match their database values in the Map Widget Popup template in order to match their database values. These values need to be manually updated as part of the Geotech deployment configuration. |
|---|
This article covers:
•Add Report File to Bin Folder
•Collect Template Configuration
Add Report File to Bin Folder
Standard EQuIS Geotech sample reports are contained within the EarthSoft.Reports.Library.176839.dll file. Standard EQuIS Geotech field reports are contained within the EarthSoft.Reports.Library.d26526.dll file. Since the176839.dll file is a referenced assembly for the d26526.dll file, the 176839.dll file must be present in the Enterprise \bin folder for the field reports to run properly.
Place the 176839.dll file in the \bin folder for Enterprise.
Collect Template Configuration
Ensure the EQuIS Geotech Collect templates are configured prior to configuring the Enterprise dashboards. See the Collect Template Configuration article for more information.
User Report Configuration
Report parameters for a published report can be saved to the database as a user report, appearing in the ST_USER_REPORT and ST_USER_REPORT_PARAMETER tables. With the appropriate permissions, the user reports will appear:
•in the 'User report' drop-down for each opened report in EQuIS Professional, and
•as individual entries in the Enterprise Report Chooser.
The EQuIS Geotech dashboards are designed with widgets calling specific EQuIS Geotech user reports that have already been setup with the correct report template. Prior to configuring the EQuIS Geotech dashboards, these user reports MUST be created.
Open Professional and create user reports for the following reports used in the EQuIS Geotech dashboards. Reports that require selection of a template are indicated with an asterisk (*). Make sure to select the proper template (where applicable) when configuring the user report.
Note: EarthSoft recommends using the Suggested User Report names outlined in the "User Report Creation" worksheet of the EQuIS Geotech Dashboard Configuration Reference.xlsx file provided in the \Configuration Files\EQuIS Geotech Dashboards folder of the EQuIS Geotech package downloaded from the EarthSoft Community Center (ECC). For the reports marked +, the User Report names are not a suggestion, but required for the dashboard to configure correctly. |
|---|
1.Collect – API: Location Info
2.Geotechnical Collect
3.EnviroInsite Boring Logs II * – Create 4 different user reports with each using a different report template. For each user report, set the "Add cover page" parameter to "false".
a.CPT – Use GeoCPT_EIReport_Template.xml file
b.DMT – Use GeoDMT_EIReport_Template.xml file
c.Field and Well – Use EarthSoft_StandardGeoField_WithWellConstBLTemplate.xml file
d.Field and Data – Use EarthSoft_StandardGeoBLTemplate.xml file
4.EnviroInsite Subsurface Profile *
5.Geotechnical Analytical Results
6.Geotechnical Atterberg *
7.Geotechnical Atterberg 3 Point *
8.Geotechnical Compaction *
9.Geotechnical CPT Apparent Rod Breaks
10.Geotechnical CPT Data +
11.Geotechnical CPT Dissipation Data
12.Geotechnical CPT Parameters *
13.Geotechnical CPT Parameters Export
14.Geotechnical CPT Pore Pressure – Dissipation *
15.Geotechnical DMT Data +
16.Geotechnical DMT Parameters Export
17.Geotechncial Export - AGS 4
18.Geotechnical Gradation (Hydrometer) – ASTM D7928 *
19.Geotechnical Gradation (Sieve) – ASTM D6913 *
20.Geotechnical Grain Size D422 *
21.Geotechnical Lab Forms *
22.Geotechnical Lab Summary *
23.Geotechnical Lab Test Assignments
24.Geotechnical Unconfined Compression *
25.Geotechnical Unconfined Compression Data
26.Geotechnical Unconsolidated Undrained *
27.Geotechnical Unconsolidated Undrained Data
28.Geotechnical Water Content vs. Depth *
29.gINT Export *
Note: Keep a list of the USER REPORT ID values (ST_USER_REPORT.USER_REPORT_ID) for each of these reports to assist with the configuration steps in each dashboard section. |
|---|
Note: For performance efficiency, EarthSoft suggests having the EnviroInsite User Reports load only when a location filter is applied. Set the PARAM_VALUE = “None” for ST_REPORT_PARAMETER.PARAM_NAME = @sys_loc_codes.
The image below displays the ST_REPORT_PARAMETER records for a user report based on the EnviroInsite Boring Logs II Report configured to load only when a location filter is applied.
|
|---|

Dashboard Configuration
Prior to configuring the EQuIS Geotech Dashboards. It is essential that all aspects of the EQuIS Geotech Database Configuration be completed as well as the prior sections in this article.
The EQuIS Geotech Dashboard files are located in \Configuration Files\EQuIS Geotech Dashboards folder of the EQuIS Geotech package downloaded from the ECC.
Dashboard Files (*.dashboard) to Configure:
1.EQuIS Geotech (Home Page)
2.Field Data Entry
3.CPT_DMT
4.Boring Logs and Profiles
5.Lab Assignments
6.Lab Data Entry
7.Lab Instrument Files
8.Report & Visualization
The EQuIS Geotech dashboards can be configured via two methods:
•Option 1 – Dashboard configuration by editing dashboard JSON files (suggested method)
•Option 2 – Dashboard file configuration in Enterprise
Option 1 – Dashboard Configuration by Editing Dashboard JSON Files
1.Gather all the ST_USER_REPORT.USER_REPORT_ID values created in the User Report Configuration Step.
2.Open the "Dashboard Configuration" worksheet of the EQuIS Geotech Dashboard Configuration Reference.xlsx file located in the \Configuration Files\EQuIS Geotech Dashboards folder of the EQuIS Geotech package downloaded from the ECC.
•This file outlines the ST_USER_REPORT.USER_REPORT_ID values present in the dashboard files.
•These are the values that need to be updated to match the ST_USER_REPORT.USER_REPORT_ID values in your database.
•Column A lists the corresponding Dashboard File where the ST_USER_REPORT.USER_REPORT_ID values will need to be updated.
3.Navigate to the \Configuration Files\EQuIS Geotech Dashboards folder and extract the contents of the EQuIS_Geotech_Dashboards zipped folder.
4.Open one of the EQuIS Geotech Dashboard Files in NOTEPAD/NOTEPAD++ (or a similar application) located in the deploy folder of the unzipped EQuIS_Geotech_Dashboards folder.
5.In the Dashboard File, replace the existing USER_REPORT_IDs with the corresponding USER_REPORT_IDs created in the User Report Configuration step. This will involve:
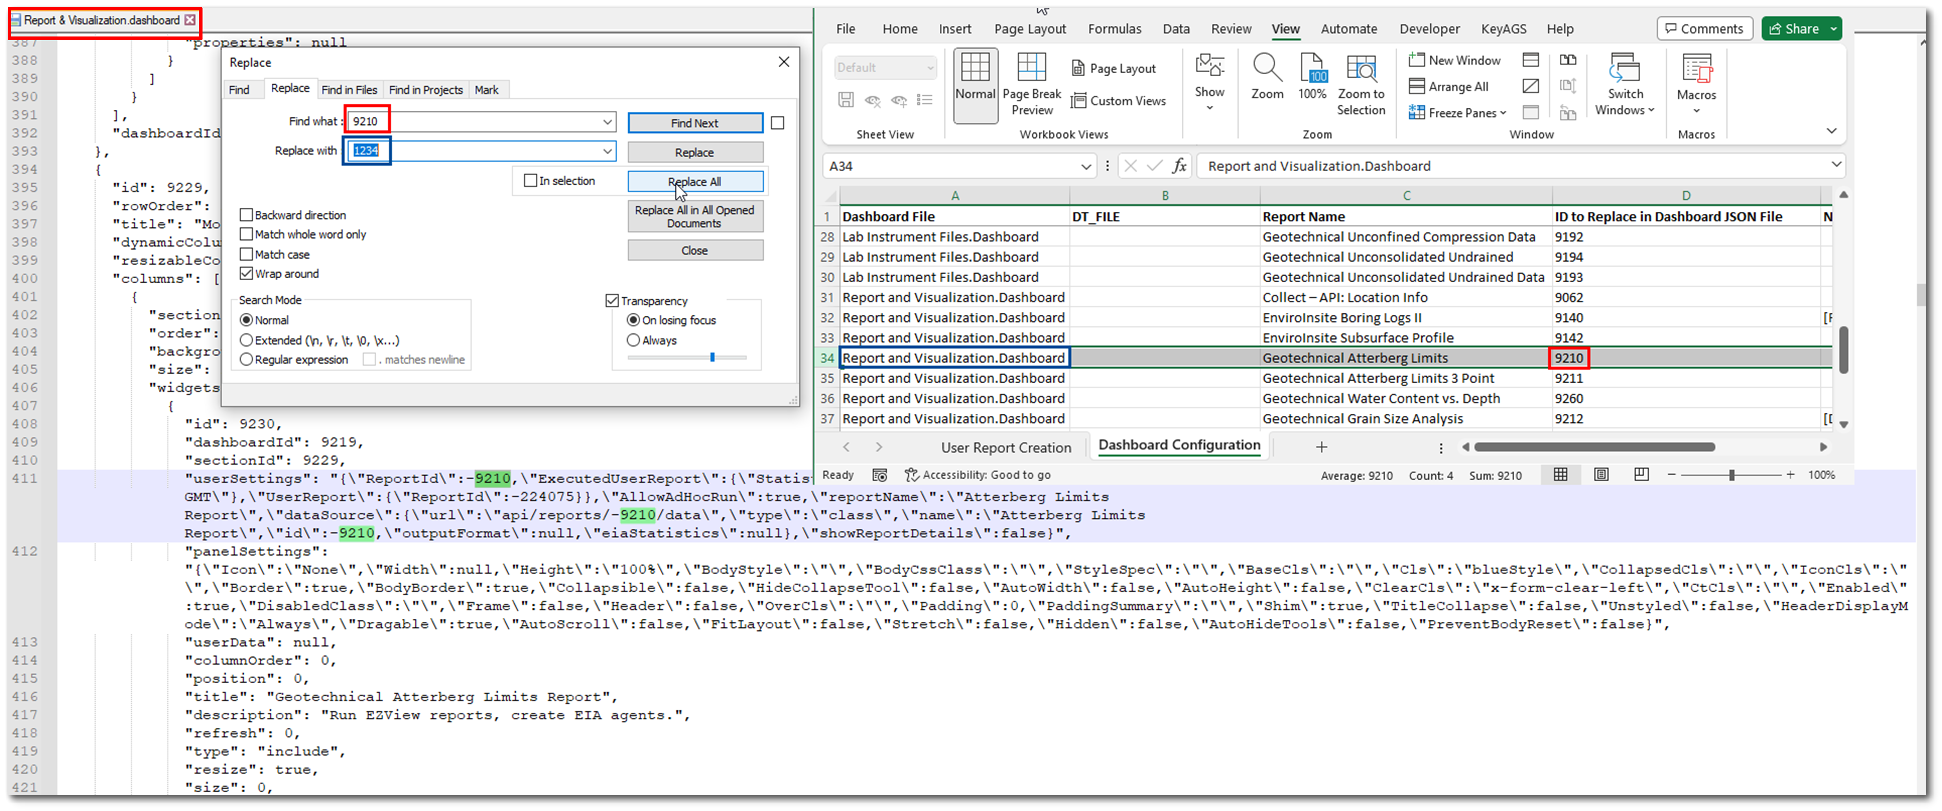
a.Search for the ST_USER_REPORT.USER_REPORT_ID specified in EQuIS Geotech Dashboard Configuration Reference.xlsx file.
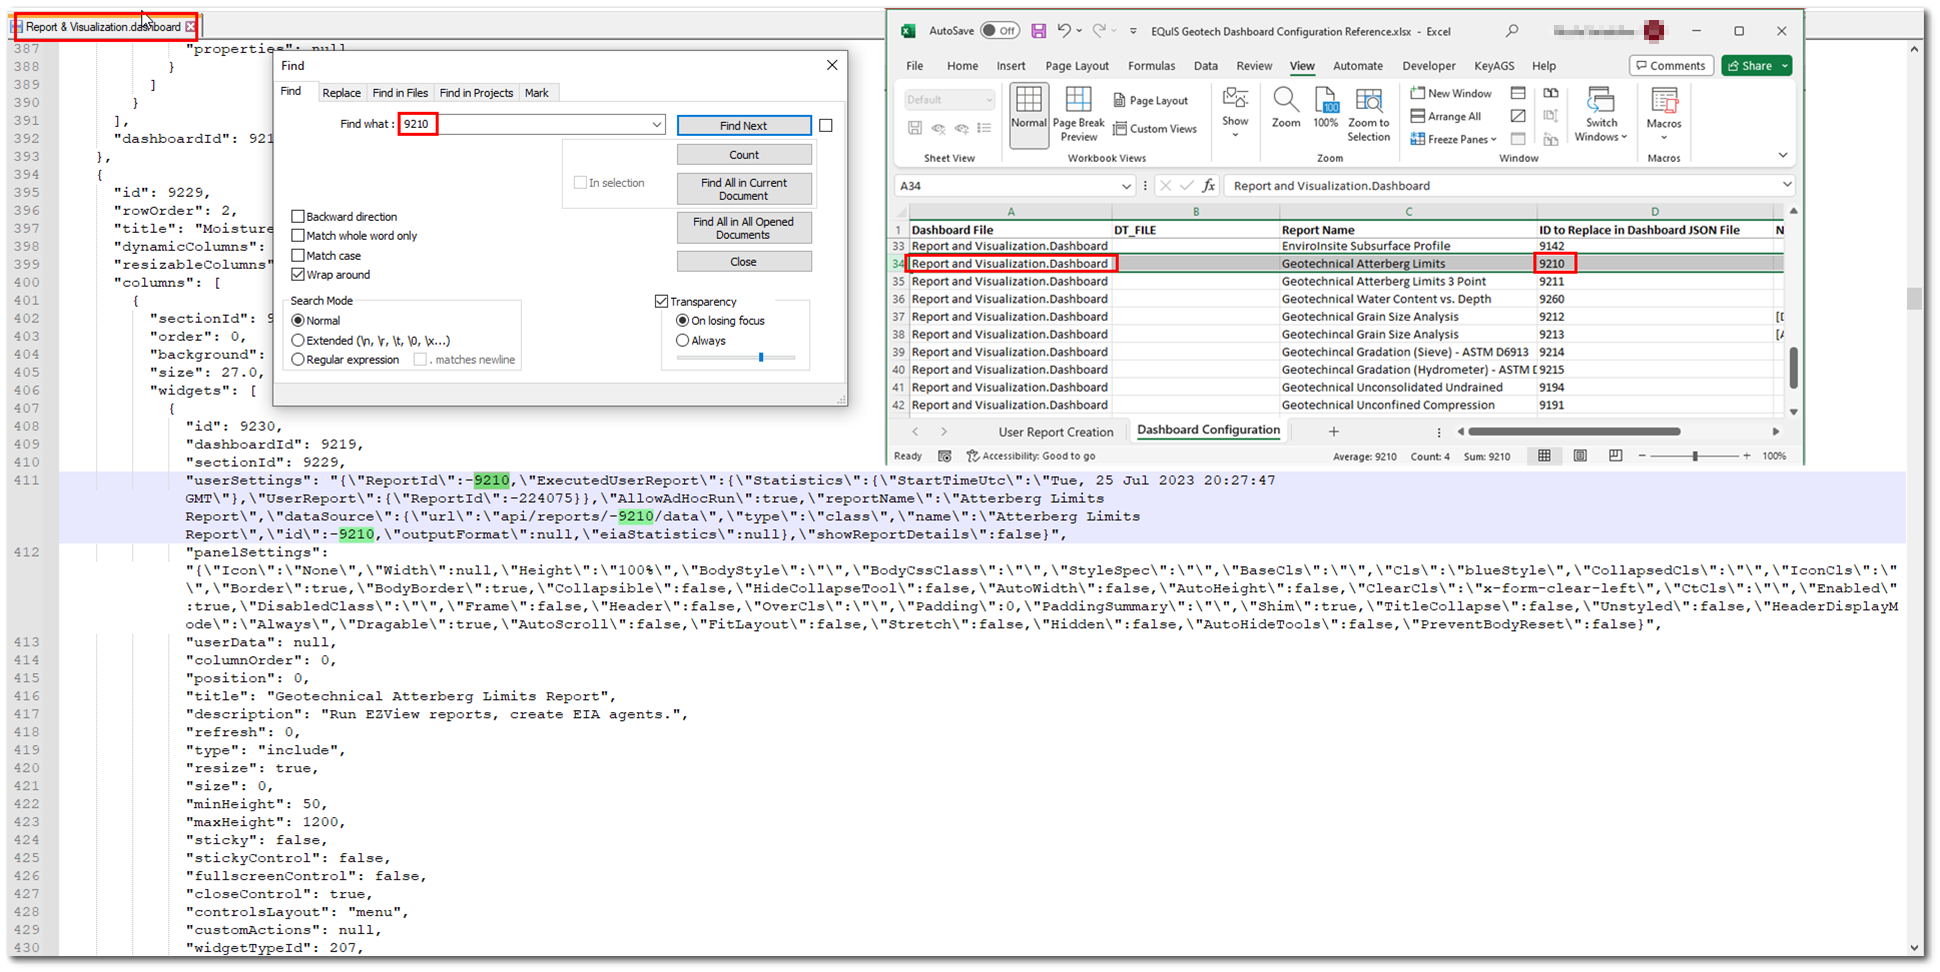
b.Replace the USER_REPORT_ID to reflect your database.
In the example below, the newly created Geotechnical Atterberg Limits User Report has an ST_USER_REPORT.USER_REPORT_ID = ‘1234’. The user is searching the Report & Visualization dashboard file for ‘9210’ and replacing this value with ‘1234’.
6.Once all the USER_REPORT_IDs in the Dashboard File have been updated to reflect the values in your database, save the file.
7.Repeat Steps 3 – 5 for each dashboard file. Follow the EQuIS Geotech Dashboard Configuration Reference.xlsx file to understand which reports are present in each file. There are a total of 8 dashboard files.
8.Navigate to the \Configuration Files\EQuIS Geotech Dashboards\EQuIS_Geotech_Dashboards (unzipped) folder and select the deploy and assets folders. Compress these two folders into a ZIP file.
9.Login to EQuIS Enterprise using an EQuIS Enterprise administrator account and create a new Dashboard.
10.In the new Dashboard, add the Module Manager widget. Click Save.
11.Ensure that no facility is selected in the Facility Chooser. In the Module Manager Widget, select the Browse button and upload the ZIP file created in Step 8.
Note: Dashboards must be uploaded through an Administrator user. |
|---|
12.Complete the deployment step by appending "action=deploy" to the Enterprise URL (e.g., https://localhost/equis7/default.aspx?action=deploy).
13.Log out of the Enterprise site and log back in.
14.Click the Dashboard Chooser ![]() button and select the EQuIS Geotech dashboard.
button and select the EQuIS Geotech dashboard.
Option 2 – Dashboard File Configuration in Enterprise
1.Login to EQuIS Enterprise using an EQuIS Enterprise administrator account and create a new Dashboard.
2.In the new Dashboard, add the Module Manager widget. Click Save.
3.Ensure that no facility is selected in the Facility Chooser. In the Module Manager Widget, select the Browse button and upload the EQuIS Geotech Dashboard ZIP file provided in \Configuration Files\EQuIS Geotech Dashboards folder of the EQuIS Geotech package downloaded from the ECC.
Note: Dashboards must be uploaded through an Administrator user. |
|---|
4.Complete the deployment step by appending "action=deploy" to the Enterprise URL (e.g., https://localhost/equis7/default.aspx?action=deploy).
5.Log out of the Enterprise site and log back in.
6.Click the Dashboard Chooser ![]() button and select the EQuIS Geotech dashboard.
button and select the EQuIS Geotech dashboard.
7.Remove and reconfigure each widget in each tab in each Dashboard File.