•Uploading and Publishing Reports
Introduced in Enterprise 7, the Module Manager widget is a widget that makes deployment of modules (widget or dashboard) easier for administrators.
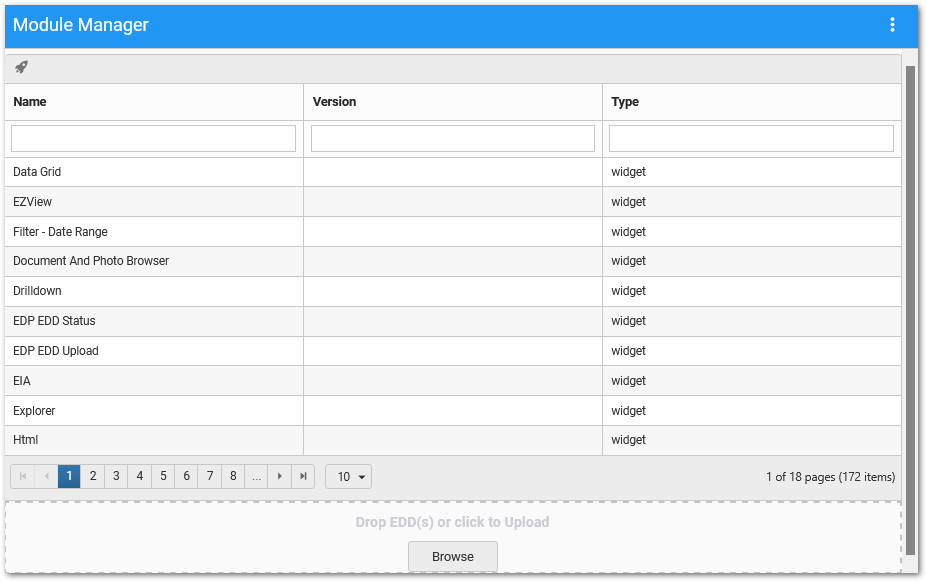
The Module Manager widget has three columns that show the name of the module, version, and type.
Name – Displays the name of the module.
Version – Indicates the version of the module.
Type – Indicates whether the module is a widget or dashboard.
The widget also includes a search box for each of these fields. Enter a search term (three or more characters) in the appropriate search box beneath the column header. The display of modules will be limited to the search string.
Beneath the grid displaying the modules, the Module Manager widget contains paging controls for displaying a limited number of modules at a time, as described below.
Arrows – Use the left/right arrows to navigate through pages.
Go to Page List – Select a specific page to navigate directly to that page.
Rows per Page – Change the number of modules to be displayed per page by using the drop-down menu.
Count of Pages and Total Items – This control indicates the total number of modules available in the widget, how many pages to display the modules, and which page is currently selected.
Deploying Modules
There are two options for deploying modules, listed below under Step 4. Steps 1–3 and Step 5 are the same for both methods.
The bottom part of the widget contains an upload box to upload dashboards and widgets as follows:
1.Click on the Browse button. Alternatively, files can be dragged and dropped in the upload box.
2.Navigate to the module file to be deployed. The Module Manager widget allows deployment of the *.dashboard, *.widgettype, *.widget, *.dataset, *.sql, *.zip file types.
3.Click Open.
4.Option 1 – Complete the deployment step by appending "action=deploy" to the Enterprise URL (e.g., https://localhost/equis7/default.aspx?action=deploy)
or
Option 2 – Users can click the Deploy ![]() button, located in the upper left corner of the widget. This simplified process automatically redirects to the user's Enterprise site with "/api/modules/deploy" appended to the URL and displays the XML output of the deployed module(s).
button, located in the upper left corner of the widget. This simplified process automatically redirects to the user's Enterprise site with "/api/modules/deploy" appended to the URL and displays the XML output of the deployed module(s).
5.Clear the browser cache. See the Clearing Cache article for more information.
Modifying – Redeploying a module will modify the module, with the older file(s) getting replaced by the newer file(s).
Uploading and Publishing Reports
Report dependencies and some module-specific reports must be in the EQuIS Enterprise installation's bin folder for use within Enterprise. An administrator can upload a report to the bin folder via the Module Manager as follows:
1.In Windows Explorer, create a folder called "bin" in a directory where there is full user access (for example, a personal folder like Documents or the Desktop, rather than within Program Files).
Tip: If a report DLL needs to be published, name the folder "deploy" instead. The deploy action will publish the report as well as move it to the bin folder. See Deploy Dashboards, Widgets, and Config Settings for Enterprise for more information on publishing reports via the deployment process. |
2.Copy the report *.DLLs into this folder.
3.Right-click on the folder created in Step 1 and zip it by selecting Send to > Compressed (zipped) folder. This folder structure must exist in the zip file, so the zip should contain a folder after being created.
4.Double-check that the file size does not exceed the site's maximum upload limits, typically 10 MB.
5.Click and drag the zip file into the Upload area of the Module Manager.
6.Follow any additional prompts to upload the files accordingly.
7.Select the Deploy ![]() button.
button.
Report *.DLLs can be uploaded to the Module Manager widget to be automatically published to the database. This functionality requires settings in ST_CONFIG to be enabled. These settings can be set in the Module Manager widget's properties.
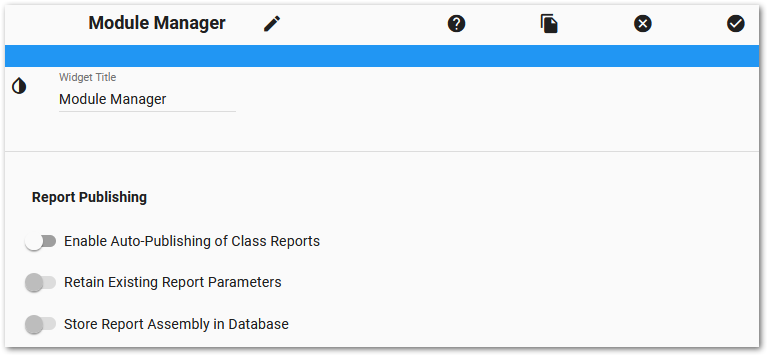
Widget Properties
To configure the Report Publishing options or to change the title or color of the Module Manager widget, open the Widget Editor by selecting the More Options ![]() icon in the upper right corner of the widget to open the drop-down menu and then select the Edit menu option.
icon in the upper right corner of the widget to open the drop-down menu and then select the Edit menu option.
Widget Title – By default, the widget title is Module Manager. The title can be modified.
Widget Description – The description field provides a caption of the widget content for screen readers. This field improves accessibility by allowing visual elements such as charts to be given accessible text descriptions. It also displays a tooltip when hovering on the widget header. Default text (of the widget type's description) is provided but can be edited by users for additional context. This field has a 250-character limit.
Widget Color – The color of the widget can be changed using the Widget Theme![]() icon to the left of the widget title.
icon to the left of the widget title.
Widget Object Editor – To set various appearance properties of the widget, select the Object Editor ![]() icon in the widget header to open the Widget Object Editor. See the Widget Editor article for more details.
icon in the widget header to open the Widget Object Editor. See the Widget Editor article for more details.
Help – The Help ![]() icon connects to the online documentation related to the specific widget.
icon connects to the online documentation related to the specific widget.
Copy Settings – Select the Copy Settings ![]() icon to to copy the settings from another widget of the same type. See the Copy Widget Settings article for more information.
icon to to copy the settings from another widget of the same type. See the Copy Widget Settings article for more information.
Cancel – Select the Close without Saving ![]() icon to exit the Widget Editor without saving changes.
icon to exit the Widget Editor without saving changes.
Save – Changes will be applied to the widget by clicking on the Save ![]() icon. The Widget Editor screen will close after the save operation is complete.
icon. The Widget Editor screen will close after the save operation is complete.