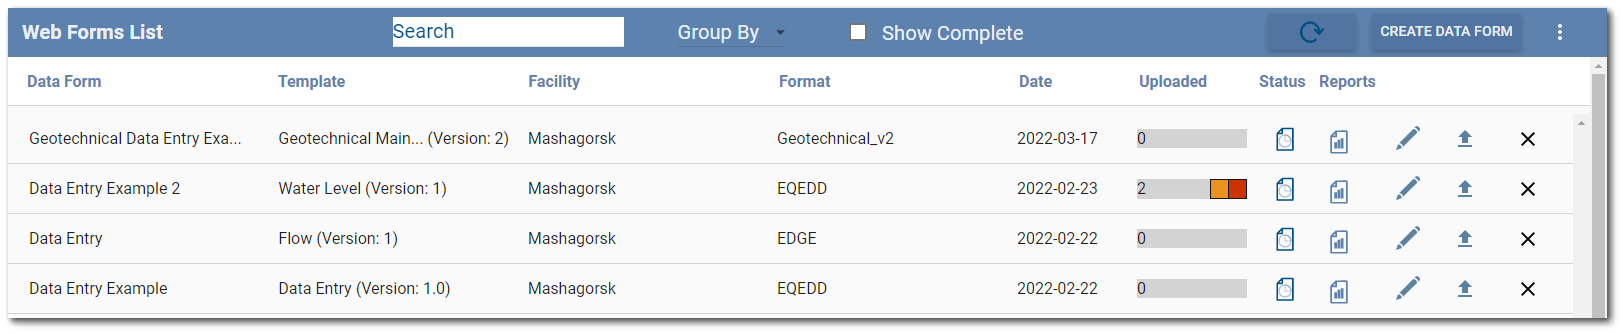
The Web Forms widget will display the existing data forms for the selected facility or facility group on the Web Forms List, which is similar in structure to the Collect Enterprise Data Forms page. Users can also create a new data form from the Web Forms List.
Topics discussed in this article:
•Sorting, Grouping, and Filtering Data Forms
Data Forms List
The Web Forms widget provides a summary list of data forms available for data entry. Data forms must meet three criteria before displaying in the list:
•Data form must have a user group that includes the current user.
•Data form must be associated with the current facility or facility group (session facility on dashboard).
•Template upon which the data form is based must match a selected template in the widget’s settings (if specific templates are selected in the widget settings). See the Web Forms Settings Manager article for more information.
By default, the following information is provided for each data form. The columns displayed on the Data Forms page can be configured in the widget’s settings (see the Web Forms Settings Manager article).
•Data Form – Data Form name.
•Template – Template name and version number.
•Facility Code – Facility where the form is deployed.
•Format – Template format upon which the data form is based; frequently a specified EQuIS EDD format.
•Date – Date the data form was created or modified. The data forms are displayed in date order, with most recent at the top.
•Uploaded – Number of times the completed data form was uploaded from the Web Forms widget; icons shown for success or failure of data forms to be processed by Enterprise EDP. EDDs and error logs may be accessed from the Uploaded column.
•Status – Data form status (In Progress ![]() or Complete
or Complete ![]() ).
).
•Reports – Create PDF report(s) of data entered on the data form.
Note: The Reports column shows all available reports for the data form. It is possible to select one, multiple, or no reports in the Template Reports field in the Collect Enterprise Template Designer. •If one template report is selected in the Template Reports field, it will automatically be selected to download as a PDF in the Web Forms widget. •If multiple template reports are selected in the Template Reports field, the user will be able to select which report to download as a PDF in the Web Forms widget. •If no template reports are selected in the Template Reports field, a message will be displayed to the user stating "There are no template reports enabled for this data form.". •Reports can be downloaded prior to the data form being submitted to the database, which is in contrast to Data Forms in the Collect Widget where the configured Template Report can only be downloaded after the data has been submitted to the database. |
|---|
•Data Form Refresh – Selecting the Form Refresh ![]() icon will refresh a pre-populated data form with the latest data from the database. The icon only displays for data forms using pre-population.
icon will refresh a pre-populated data form with the latest data from the database. The icon only displays for data forms using pre-population.
Note: If the form contains Unique Data Set entries that are not unique, a warning will indicate which entries need to be changed. In order to not lose data, the form will not refresh until the duplicate values have been changed. |
•Edit – Selecting the Edit ![]() icon allows further editing of the data form. See the Web Forms Grid Entry article for more information about editing data forms.
icon allows further editing of the data form. See the Web Forms Grid Entry article for more information about editing data forms.
•Submit – Selecting the Submit ![]() icon sends the data form to be checked by Enterprise EDP using the EQuIS format defined in the Collect template upon which the data form is based. Users will be asked to confirm data submittal prior to uploading to EQuIS.
icon sends the data form to be checked by Enterprise EDP using the EQuIS format defined in the Collect template upon which the data form is based. Users will be asked to confirm data submittal prior to uploading to EQuIS.
•Clear – Selecting the Clear X icon will remove content of the data form.
The Refresh ![]() button in the header of the Web Forms List allows the user to refresh the list without having to refresh the site or leave the widget.
button in the header of the Web Forms List allows the user to refresh the list without having to refresh the site or leave the widget.
Sorting, Grouping, and Filtering Data Forms
The Search box can be used to filter the data forms. Type a search into the search box to filter the list of data forms. The display of data forms in the widget will be limited to the search string.
Each of the columns in the Web Forms List can be sorted alphabetically or chronologically. The mouse cursor changes from the default arrow to a pointer when hovering over selectable items on the Web Forms List. Clicking a column will sort the list by that column.
The data forms can also be grouped into folders based on the following columns. To organize the data forms, click the Group By selector button at the widget header to open a drop-down menu and choose the desired column.
•Template Name
•Facility
•Format
•Date
•Status
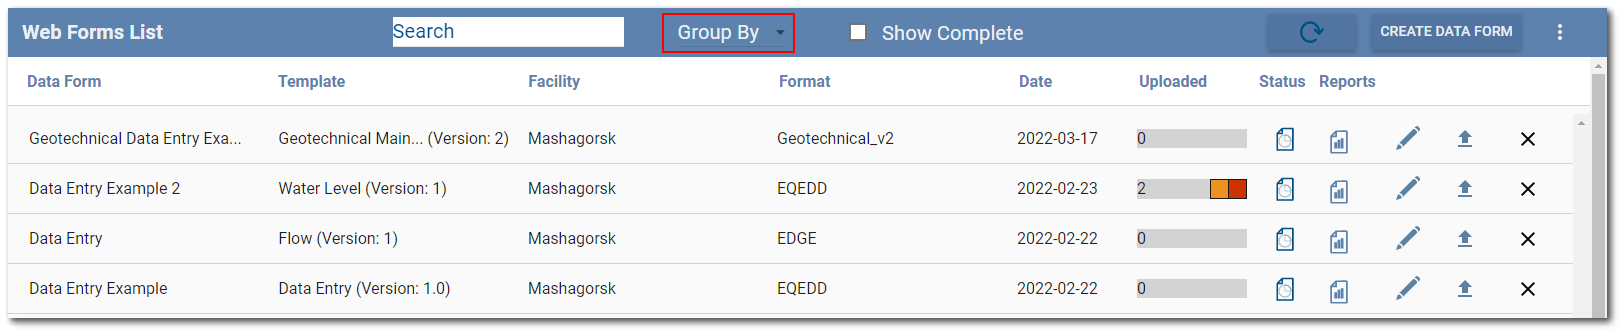
The view will change when organizing the data forms to a file folder like setup. Clicking on each of the tabs will open that folder view to see the data forms available in that folder.

Note: Once a column is chosen for folder sorting, it is removed from the columns that are viewed in the folders view, as the folder tabs now display the selected column values. |
|---|
Uploaded Column
The Uploaded status provides the number of times the data form was uploaded from the Web Forms widget and displays the status of the data form upload to EQuIS through EDP as indicated by color.
Orange – The data form is still processing.
Grey – The data form was received but not yet sent to EDP.
Green – The data form passed EDP checks and was sent to the database.
Red – The data form did not upload successfully to the database (i.e., it was rejected by EDP). If this happens frequently due to data issues, consider adding other checks to the form template (e.g., using the Error attribute on form fields to ensure users can only enter valid data).
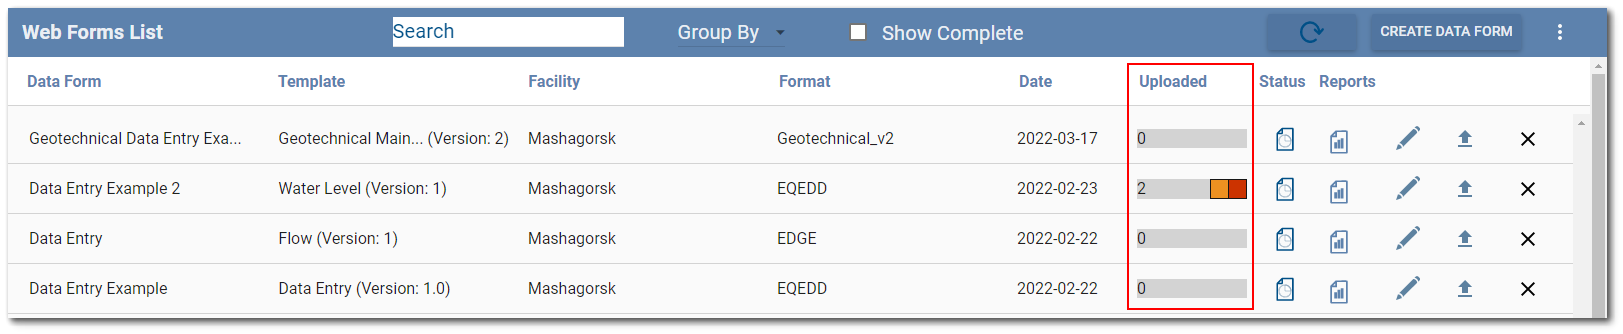
Click the status bar of an individual data form to view details of the uploading process in the Status/Download window.
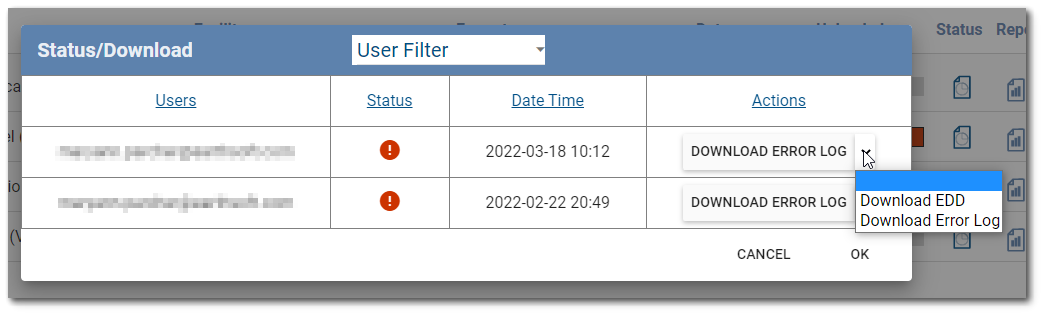
The upload details are described below.
•Users – User who uploaded the data form.
•Status – Status of EDP submission, which matches the colors displayed on the Web Forms List. The Fail icon is displayed in red, the word Processing is orange, the word Pass is Green, and the word Received is Black.
•DateTime – Date/time stamp of submission.
•Actions – Select the drop-down menu to choose from the following actions:
•Download EDD – Download the EDD (*.zip) file. This is generated by processing the submitted data form into the EQuIS format defined in the template upon which the data form is based.
Note: The Time and DateTime fields capture data in local time. When the data are mapped to the resulting EDD, the time is in UTC to account for all users' time zones. |
|---|
•Send to EDP – Shows if the data form has been received but not yet pushed to EDP. Click here to submit to EDP.
•Download Error Log – If EDP reports errors when processing the EDD, the error log is useful to understand why the EDD failed. Select this action to download the error log.
Status Column
Data forms are listed with one of two statuses:
•In Progress ![]() – Active data form, which may receive future data entry.
– Active data form, which may receive future data entry.
•Complete ![]() – Data form is archived. This status is set by an Enterprise user by clicking the Testing or In Progress status icon and confirming to mark the form as complete. The data form is not visible on the Web Forms List unless the “Show Complete” check box on the widget header is enabled.
– Data form is archived. This status is set by an Enterprise user by clicking the Testing or In Progress status icon and confirming to mark the form as complete. The data form is not visible on the Web Forms List unless the “Show Complete” check box on the widget header is enabled.
Any data form with a "Complete" status can be changed back to an "In Progress" status. Select the Show Complete check box to display all completed data forms. Find the desired data form and click on the Complete status icon. Move the selected data form back into the list by confirming to mark the dataform as In Progress.
Note: Marking a data form as "Complete" sets ST_COLLECT_FILES.EDD_STATUS for the data form to TRUE. |
|---|
Create New Data Form
New data forms can be created either by using Collect or by selecting the Create Data Form button on the Web Forms widget header.

The Create Data Form dialog opens. Enter a Name for the data form and edit the form details in the available fields. Note that Red Bold* denotes required fields.
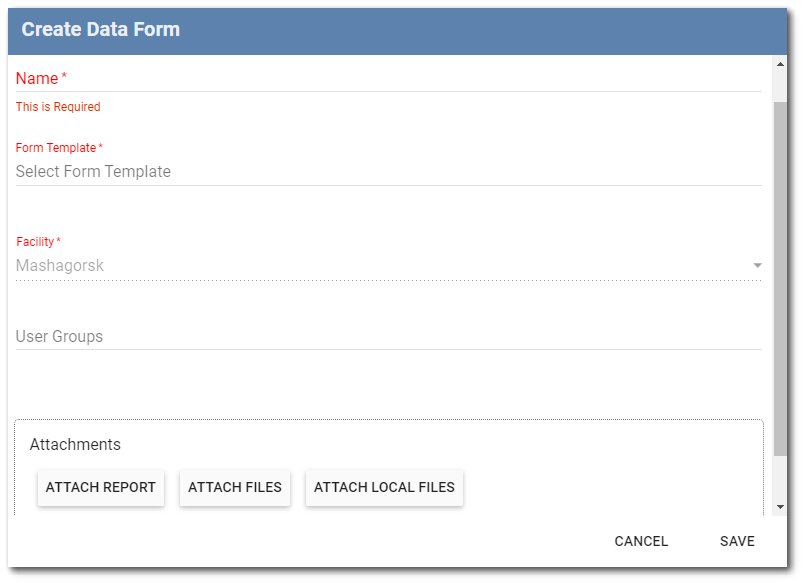
Note: Data form names are limited to 60 characters. The name of the data form cannot contain: •periods (.) •forward slashes (/) •backward slashes (\) •ampersands (&) •colons (:) •apostrophes (')
If these characters are included in the name, an error message will be displayed and the data form will not be created.
Special characters for languages supported in EQuIS Collect can be used in data forms and form names. |
|---|
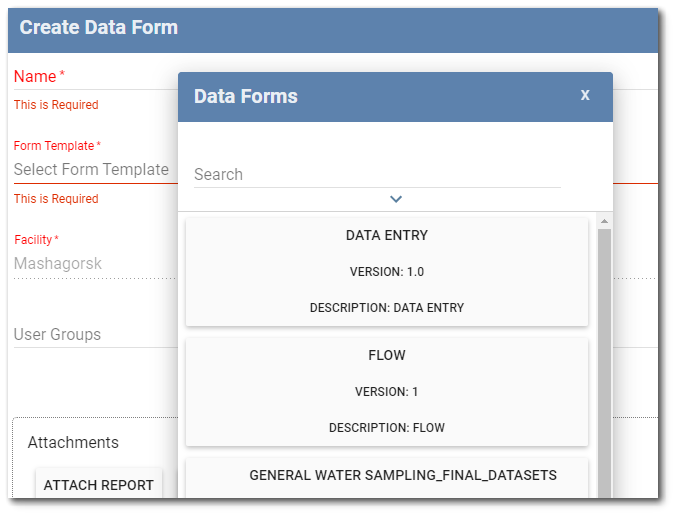
Click on Select Form Template to open a searchable dialog window of existing templates listed in alphabetical order.
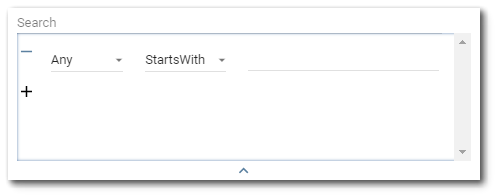
Advanced Search – Click the down arrow to expand the advanced search dialog window. Items that can be searched (e.g., Name, Version, Description) will appear in the first drop-down. By default, the first drop-down will be selected as Any. The Any option will search all the items to match the expression with any of the properties. The second drop-down allows the user to select an operator (e.g., Starts With, Ends With, Equals, Contains). By default, the operator is set to StartsWith. The operator defines how the expression is matched to the items being searched. Enter the expression to be searched in the text field. Multiple expressions can be set by clicking the + button below the first expression. Expressions can also be removed/cleared by clicking the – button to the left of each expression. To collapse the advanced search dialog, click the up arrow at the bottom of the advanced search dialog. Note that collapsing the advanced search will not clear search expressions that have been setup.
Facility – The Facility auto-populates with the active Facility session for the Enterprise dashboard and cannot be changed. If creating the data form while in a Facility Group or a specific facility has not been chosen on the dashboard, a drop-down will appear requiring the user to select a specific facility to assign to the data form.
Note: Only individual facilities are available in the drop-down menu for selection when creating a data form, not facility groups. |
|---|
Pre-population – If the selected template has pre-population defined, a Use Pre Population Report check box appears. Check this box to enable pre-population on this form; this will default to using the same report parameters for this form as were used when originally designing the template’s pre-population logic. If a different set of report parameters is desired, click User Report. On the Parameters screen that opens, users can load a previously saved user report by clicking Load or select the desired parameters in the main portion of the window. Click OK to save the report parameters that will be used to pre-populate this form. The name of the user report selected for pre-population will display to the right of the User Report button. To preview the pre-population output, click Preview Pre Population.
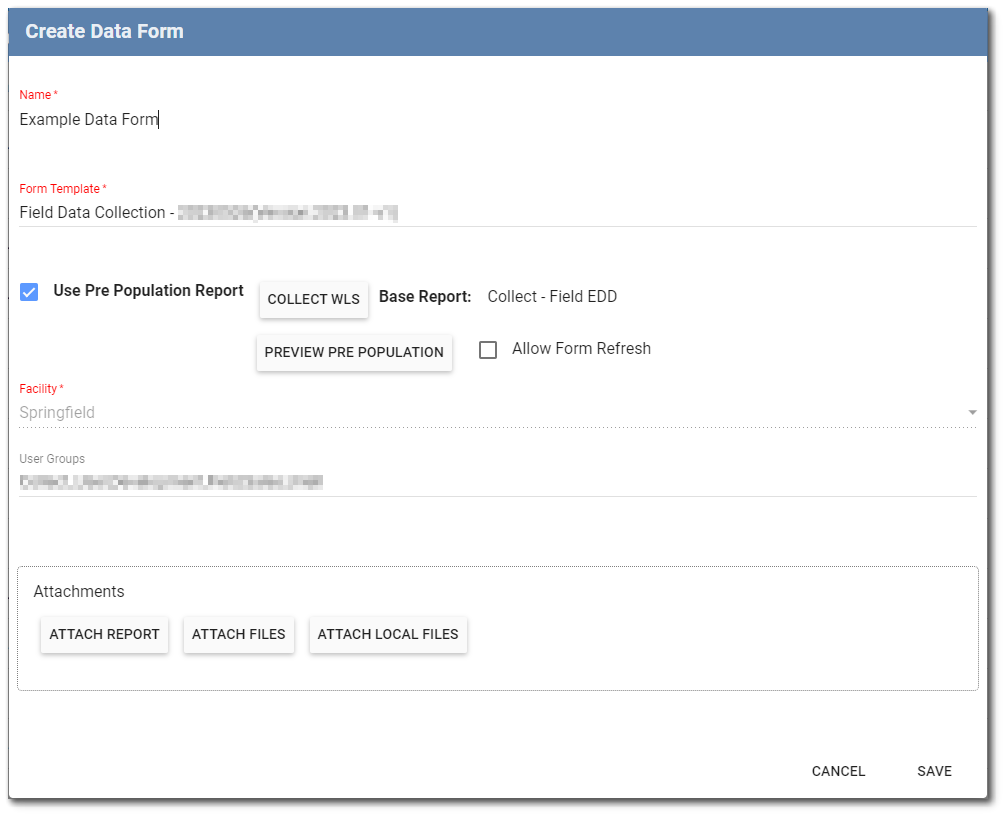
Notes: •If the selected template contains pre-population, then the 'Use Pre Population Report' check box is displayed along with the associated report. Pre-population can be previewed. If the user unchecks the 'Use Pre Population Report' check box, then the resulting data form will be blank. •A warning is displayed at the bottom of the Create Data Form dialog when a dashboard filter, except FACILITY_ID, is applied that could affect the pre-population results. |
|---|
Allow Form Refresh – The Allow Form Refresh check box, when checked, allows users to refresh a pre-populated Collect form with the latest data from the database without needing to create a new form. The Allow Form Refresh check box is unchecked by default.
Notes: •If the Use Pre Population Report option is unchecked, the Allow Form Refresh option is unchecked and disabled, even if it was previously selected. •If the names of the User Report and the Base Report are the same (i.e., pre-populating without a user report), the Allow Form Refresh check box is unchecked and disabled. •If a user report has been modified, but not saved as a new user report, the User Report button will display "Modified User Report" and the Allow Form Refresh check box will become disabled. |
|---|
User Groups – The User Groups will auto-populate to the User Groups currently assigned to the selected template. To change the User Group settings, select Users Groups to open the Groups window. Check the boxes for all desired user groups and select the OK button.
Note: If a user group has been associated with a facility, the user group will automatically populate when that facility is selected for the data form, if the user group has been assigned to the template. |
|---|
Files can be attached to the data form. See the Create New Data Form article in the Collect documentation for more details on attaching files.
Click the Save button to create the new data form. The new data form will display on the Web Forms List. Click the Create ![]() icon to the right of the new data form to open the Web Forms Grid Entry screen and begin entering data.
icon to the right of the new data form to open the Web Forms Grid Entry screen and begin entering data.