•Install and Register EQuIS for AutoCAD
•Run AutoCAD and Connect to EQuIS Database
•Showing a Report in EQuIS for AutoCAD
Requirements and compatibility for EQuIS for AutoCAD are as follows.
•EQuIS v7.0+ is compatible with AutoCAD 2019+
•AutoCAD Civil 3D and AutoCAD LT are not supported.
The Office Hour video EQuIS for AutoCAD is available to view on Vimeo; for viewing reports, see the section on plotting Spider Diagram.
Install and Register EQuIS for AutoCAD
1.Download and unblock the installer that corresponds to the version of Professional installed.
2.If upgrading the EQuIS for AutoCAD interface, EarthSoft recommend removing any AutoCAD reference to the previously installed assemblies. To do this, run the AutoCAD application named Reset Settings to Default, located alongside AutoCAD in the application list accessed from the Windows Start menu.
Note: If this step to clear AutoCAD settings does not prevent or resolve an issue with upgrading, please contact EarthSoft Support. |
3.Unzip and run the EQuIS for AutoCAD.exe file.
4.If not already present, copy the following files from the EQuIS Professional install folder (typically at .\Program Files\EarthSoft\EQuIS), and paste them into the EQuIS for AutoCAD installation of matching version (.\Program Files\EarthSoft\EQuIS for AutoCAD).
EarthSoft.Reports.Library.50943.dll (Analytical Results II reports)
EarthSoft.Reports.Library.51729.dll (Action Level Exceedance II reports)
EarthSoft.Reports.Library.113024.dll (Location Information [Class] Report)
log4net.config
IdentityModel.dll
The above files represent the typical reports used with EQuIS for AutoCAD. If other base reports are being used in published Spider Diagram crosstabs or Advanced Action Levels (AALs) will be used, copy the corresponding DLL files (such as EarthSoft.ActionLevels.Library.105851.dll). The Object Name of an AAL, as shown in the Action Levels Form – Action Level Code Details tab, references the specific DLL file being used.
5.Send Computer ID or ServerID with registration request, if applicable.
6.Keys may be applied in Professional or after prompted by selecting Connect in EQuIS for AutoCAD.
Upgrade EQuIS for AutoCAD
If the user or organization has AutoCAD profiles or configurations in place, those should be backed up. From the Windows Start Menu group for the specific AutoCAD version in use (e.g., “AutoCAD 2021”), select Reset Settings to Default. This will remove any reference to previous files used by EQuIS for AutoCAD.
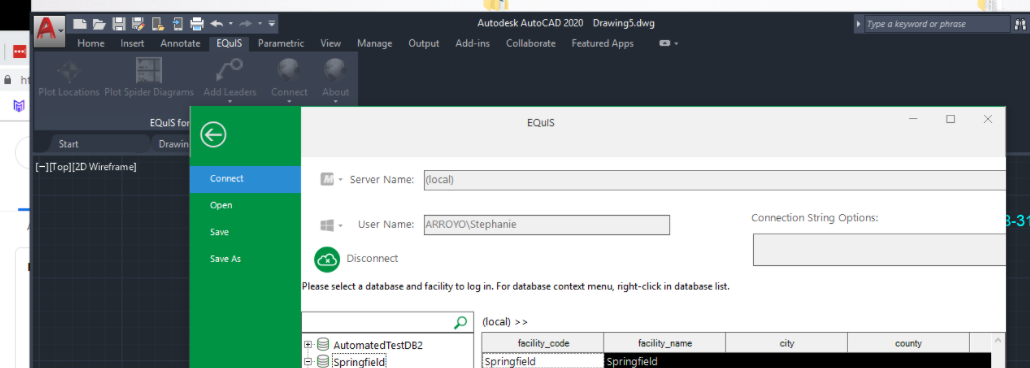
Run AutoCAD and Connect to EQuIS Database
Launching the "EQuIS for AutoCAD" button from the EQuIS Professional Graphics ribbon may show a registration error if a Premier Graphics license is used. If this is the case, use the alternate method of loaded EQuIS for AutoCAD directly, as described below.
1.Launch EQuIS_for_AutoCAD from the application shortcut or executable, typically at:
C:\Program Files\EarthSoft\EQuIS for AutoCAD\EQuIS_For_AutoCAD.exe
2.Click on the EQuIS tab in the top ribbon.
3.Click Connect and navigate to the desired database connection in the EQuIS Login window that opens and double-click to connect.
Tips: After an EQuIS for AutoCAD installation, if the EQuIS tab does not appear in AutoCAD, load the tab manually: 1.Type cuiload in the AutoCAD command prompt to open the Customizations Manager. 2.Remove any existing EQuISCAD customization groups in the menu that appear. 3.Select Browse and navigate to C:\Program Files\EarthSoft\EQuIS for AutoCAD and select the cuix file. 4.Select Load to reload the EQuIS tab in AutoCAD. If, after executing the steps above, you are unable to make a connection to the facility, do the following: 5.Type "NETLOAD" into the command prompt and push "Enter" on your keyboard. 6.Navigate to the EQuIS For AutoCAD directory, typically "C:\Program Files\EarthSoft\EQuIS For AutoCAD". 7.Select the EarthSoft.Interface.AutoCAD.dll file and click OK. You should now be connected to the facility. |
Showing a Report in EQuIS for AutoCAD
Any report can be shown in EQuIS for AutoCAD by following the steps below in EQuIS Professional.
1.Publish the report to the database as shown in the help articles Publishing a Report - Quick Start Guide and Report Publisher.
2.Save the report parameters as a User Report.
3.Create a Crosstab configuration from this report where Separate tables by each unique: SYS_LOC_CODE is selected in the options.
4.Publish the Crosstab configuration to the database (do not publish as grid report).
5.Add the report DLL file (shown if hovering over the report in Open > Reports) to the "EQuIS for AutoCAD" installation folder, typically C:\Program Files\EarthSoft\EQuIS for AutoCAD.
The report plots as an AutoCAD table and can be moved and formatted accordingly.