Overview
The Data Qualification Module (DQM) is organized around a primary key field, DQM_QAPP_CODE, which allows all of the DQM checks, rules, and parameters to have different values for different agencies, regions, individual Quality Assurance Project Plans (QAPPs), etc.
For each DQM_QAPP_CODE uploaded or copied, the user can modify the parameters, qualifiers, and remarks associated with each check/rule in DQM Settings. Note that control limits in the RT_DQM_CONTROL_LIMITS table defines QAPP-specific control limits for certain checks.
After a dataset has been uploaded into EQuIS, it can be run through the DQM review process by selecting the Chain of Custody, Field SDG, Lab SDG, Test Batch ID or Task Code (or combination thereof) to be included in a DQM review "Event".
Every DQM QAPP must have a Global Parameters "Check". The Global Parameters check holds the parameters used by all other checks within a given DQM QAPP and can be easily modified in the Parameters tab of the DQM Settings Form. The Global Parameters check is not listed in the Check menu on the DQM Start Event Form, because it does not run an actual check.
Each DQM event is a review of an analytical results dataset (such as the lab results reported for a given Lab SDGs).
•The review begins with Creating a DQM event, which runs a selected dataset through one or more or all of the automated checks for the selected DQM QAPP Code.
•The review continues with Processing a DQM Event, which displays results in the Event Summary, Exceptions by Check, Review All Results, Results by Sample, Event Status, Third Party Validation, and Errors tabs. At this stage, the DQM event is available for future reference and to edit at a later time, without saving changes to results.
•If an analytical result in the dataset 'breaks' a Rule, then an exception is thrown and DQM will place the QUALIFIER assigned to that Rule in the APPLY_QUALIFIER column, the "suggested qualifier" column for that result.
•If the result that is breaking the Rule is a non-detect, then the ND_QUALIFIER value from RT_DQM_RULE is placed in the APPLY_QUALIFIER column.
•When the validator is satisfied with the values in the APPLY_QUALIFIER column, the Event is "Completed" and those values are "applied" to the INTERPRETED_QUALIFIER and/or VALIDATED_QUALIFIER columns in DT_RESULT.
•Finally, Completing a DQM Event saves the qualified updates to DT_RESULT and moves the event to the History list.
Installation
DQM must be installed and configured prior to usage. DQM only needs to be installed one time. Prior to creating a DQM event, complete all of the installation steps described here.
Note: If a previous version of DQM has already been installed, it is still necessary to proceed with these steps. |
The installation of DQM is a three-step process:
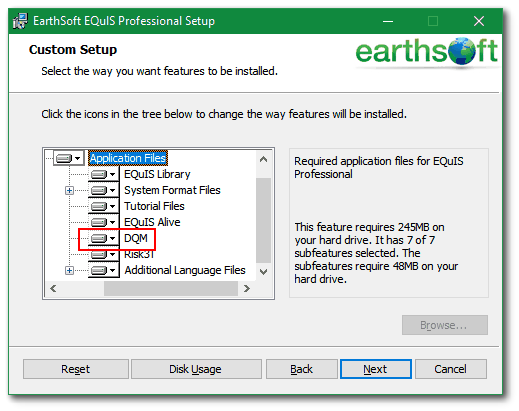
1.Install the DQM application files during the custom setup step. To install DQM, select the DQM Module during the installation of EQuIS Professional. If EQuIS Professional is already installed, the installer can be run again using the Repair or Change Installation to add the DQM Module..
2.Publish the DQM report .dll file (EarthSoft.Reports.Library.63867.dll) to the EQuIS database. Instructions for publishing reports such as this can be found in the Report Publisher help.
Note: If republishing the DQM report .dll after an upgrade, overwrite the existing reports. Multiple builds of the DQM report .dll in ST_REPORT are known to cause unexpected behavior within DQM. |
In addition, be sure that the EarthSoft.Reports.Library.63867.dll is in the EQuIS Professional folder (e.g., C:\Program Files\EarthSoft\EQuIS or, for per-user installation, %localappdata%\Programs\EarthSoft\EQuIS\).
3.Apply the DQM Schema (Schema.DQM.xme) to the EQuIS database, following Applying Additional Modules/Schemas to a Database. Steps 2 and 3 must be performed for each EQuIS database that will utilize DQM.
Set Permissions
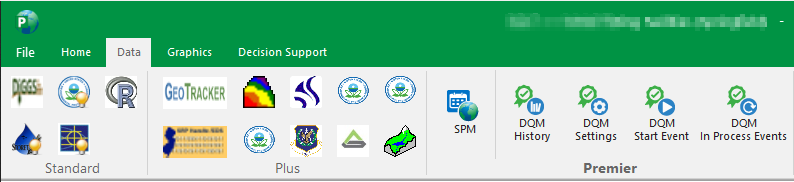
After all three of the Installation steps on the ribbon have been completed (remember especially Step 2: the DQM report DLL must be published to the database), then users with ALS Admin permissions have access to DQM, as shown by the DQM buttons being enabled on the DQM Ribbon.
Use the following instructions to make DQM available to users without ALS Admin permissions:
1.Except for the special read-only user described below, start by assigning the standard ALS Read-Write role to the user.
2.To enable the History, Settings, and In Process Events buttons, give the user Owner permission to the published DQM Report - DQM Exceptions Report by EDD.
3.To enable the Start Event button, give the user Creator permission to Reports.
4.To enable the DQM Settings Form button, give the user Editor permissions on the facility they will use to login.
Note that it is now possible to disable all other EQuIS Professional Ribbon buttons to make the user a "DQM only" user by following the instructions here.
Any one of the DQM buttons (such as Settings) can be disabled for the user using that same EQuIS Professional Tools Access functionality.
Also, the DQM Settings can be set to read-only by creating and assigning an ALS connection role, which calls a database user that has only been granted SELECT permissions on the tables listed below.
•AT_DQM_RESULT
•RT_DQM_QAPP
•RT_DQM_RULE
•RT_DQM_CHECK
•RT_DQM_CHECK_PARAM
•RT_DQM_CHECK_PARAM_TYPE
•RT_DQM_CONTROL_LIMITS
•RT_HOLDING_TIME
Note: The DQM reference tables are not visible for non-admin users. Non-Admin users can make changes to DQM QAPPs that are not locked using the DQM Settings form. |