Tap the Menu ![]() icon. Tap the Settings menu item to open the Settings page for accessing user profile information, changing data entry and file synchronization settings, managing interactions with data loggers, and generating support packages. The Settings menu includes the following tabs:
icon. Tap the Settings menu item to open the Settings page for accessing user profile information, changing data entry and file synchronization settings, managing interactions with data loggers, and generating support packages. The Settings menu includes the following tabs:
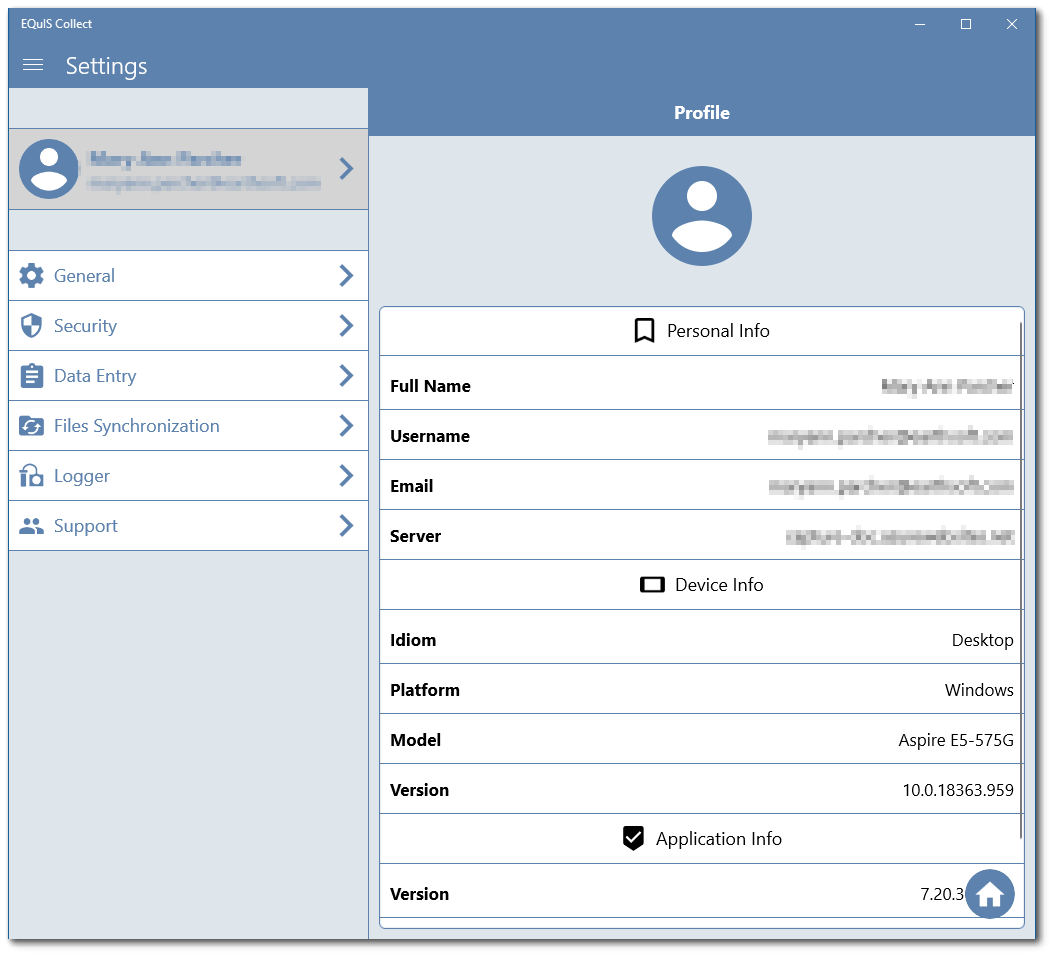
Profile Information
Personal Info provides:
•Full Name
•Username
•Email address
•Data Server Connection
Note: The Profile Icon can be selected to add a user specified picture. |
|---|
Device Info provides:
•The type and model (Idiom) of the device
•The Platform on which Collect Mobile is running
•The Version number of Mobile Collect
General Tab
Tap the General settings menu item to manage settings pertaining to automatic downloads, the templates tab, and removing deleted forms.

General Settings options include:
•Automatic downloads: This option is turned on when the slider is to the right and blue. When turned on, Collect will automatically download all published templates assigned to the logged-in user. This option is disabled by default.
•Hide templates tab: By default, the Templates tab is hidden (i.e., the slider is to the right and blue ). To display the Templates tab on the device, turn off the Hide Templates tab option.
•Remove all deleted forms: To remove all deleted forms, tap Delete All.
Prior to removing forms, they must be deleted on the Forms tab in Collect Mobile following these steps:
1.Click Edit in the top right corner
2.Click the pencil icon next to the form to be deleted
3.Click Delete
After the form(s) are deleted, the deleted form(s) can be removed using the Remove All Deleted Forms setting.
Note (Android Only): If your Android device updates to Android 14 while using Collect 7.23.2 or earlier, previously collected data may appear to be missing. Contact EarthSoft Support for help in making these data forms visible again. |
|---|
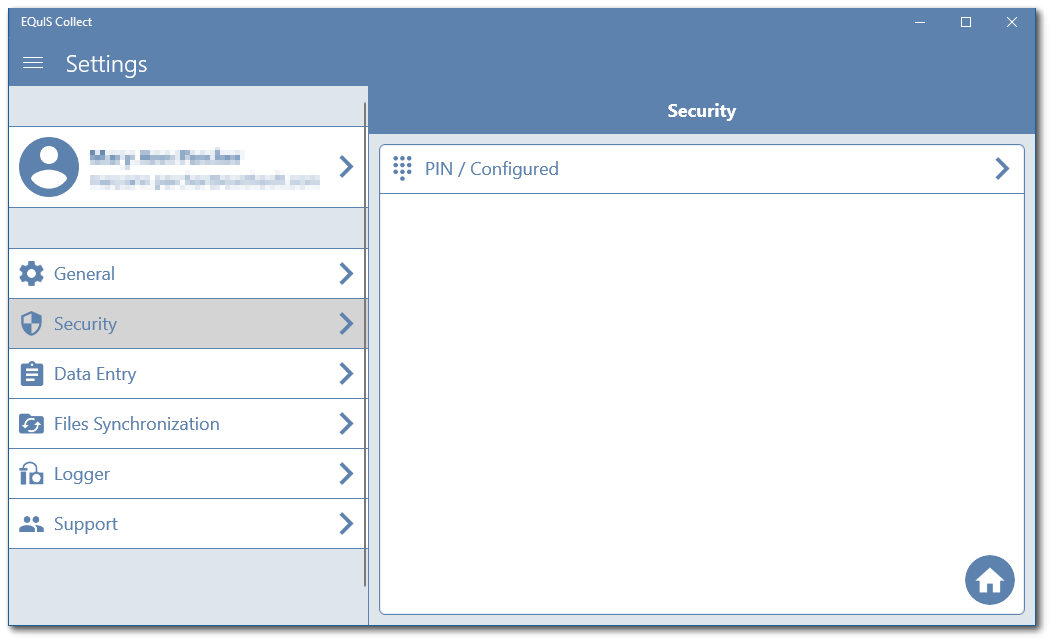
Security
PIN: Users can establish a Personal Identification Number (PIN) to use for Collect Mobile login. Setting up a PIN allows users to login to Collect Mobile without internet connectivity. To initially set up a PIN, users must be able to connect to the Enterprise site via normal username/password login or Microsoft Entra ID authentication. To setup a PIN, tap the Security tab.

Creating a PIN:
1.Tap the PIN option.
2.Users will need to enter their password or Microsoft Entra ID, formerly known as Azure Active Directory (AAD).
3.Tap the Sign In button.
4.Using the numeric keypad, enter a PIN between 4 and 10 digits. The Clear ![]() icon can be used to remove entered digit(s). Tap Continue after entering the PIN.
icon can be used to remove entered digit(s). Tap Continue after entering the PIN.
5.Users will be required to confirm their PIN. A confirmation message will be displayed. Tap Ok and the PIN will be set.
6.Once PIN is set, the option will read PIN / Configured.
Using the numeric keypad, enter a PIN between 4 and 10 digits. The Clear ![]() icon can be used to remove entered digit(s). Tap Continue after entering the PIN.
icon can be used to remove entered digit(s). Tap Continue after entering the PIN.
Users will be required to confirm their PIN. A confirmation message will display. Tap Ok and the PIN will be set.
Note: If a re-entered PIN contains values that do not match, the entered values will be cleared and the PIN will need to be re-entered. |
|---|
Data Entry Tab
This section sets controls for entering data on forms:
•Auto edit next available fields
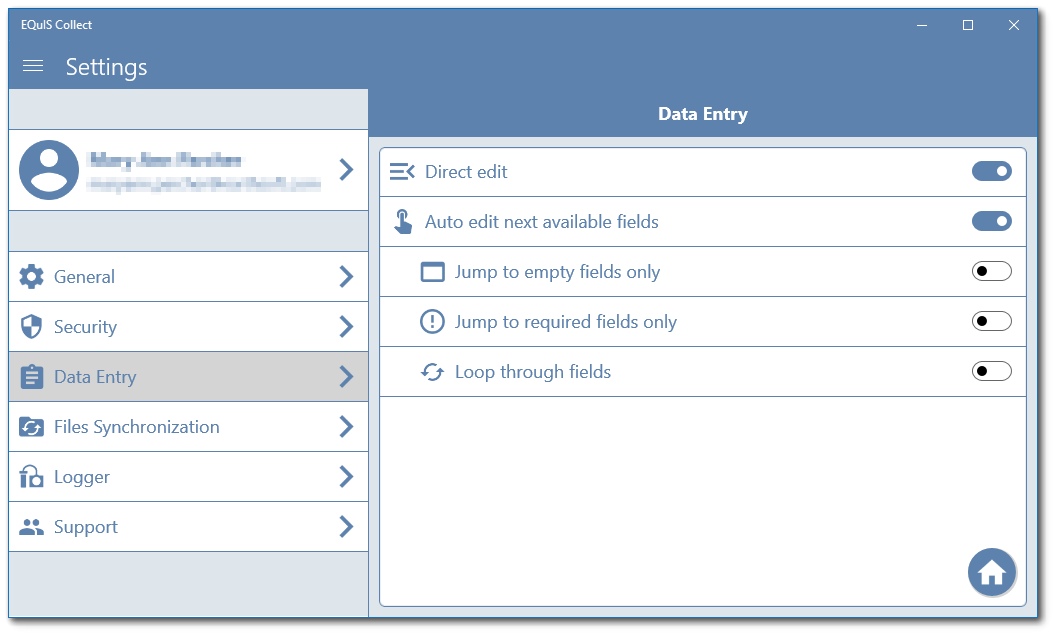
Direct edit: This mode is turned on by default. When the direct edit option is on, users can enter data directly and tab to the next field. A form navigation pane is also available. A re-set option allows users to set the current field value to the previous value or an empty value.
Auto edit next available fields: This option is turned on by default (i.e., slider is to the right and blue). When this option is on, the next available field for data entry is automatically selected when working in a form. Three further sub-options allow further customization:
1.Jump to empty fields only – If on, will skip any field that has data entered and only select empty and editable fields
2.Jump to required fields only – If on, allows the user to stop in the next field only if it is required
3.Looping through empty fields – If on, will continue to cycle through empty and editable fields
When the Auto edit next available fields option is off (i.e., slider is to the left), automatic editing of next available field is disabled on the forms. Each field will need to be selected for data entry. The other sub-options also become unavailable.
The following table provides an overview of the resulting actions that a user will experience when the Auto edit next available fields option is on and the various data entry settings are combined.
"Auto edit next available field" is On |
|||
Jump to Empty |
Jump to Required |
Loop through Fields |
Resulting Action |
On |
On |
On |
Iterate over empty required fields only and loop back to start |
On |
On |
Off |
Iterate over empty required fields only once |
On |
Off |
On |
Iterate over empty fields only and loop back to start |
On |
Off |
Off |
Iterate over empty fields only once |
Off |
On |
On |
Iterate over all required fields and loop back to start |
Off |
On |
Off |
Iterate over all required fields only once |
Off |
Off |
On |
Iterate over all fields and loop back to start |
Off |
Off |
Off |
Iterate over all fields once |
Files Synchronization Tab
Tap the Files Synchronization settings menu item to manage how files are uploaded and downloaded in the Collect Mobile app. By default, all files are set to automatically upload/download. The options are turned on when the slider is to the right and blue. See Files Synchronization for more detailed information on applying these settings.
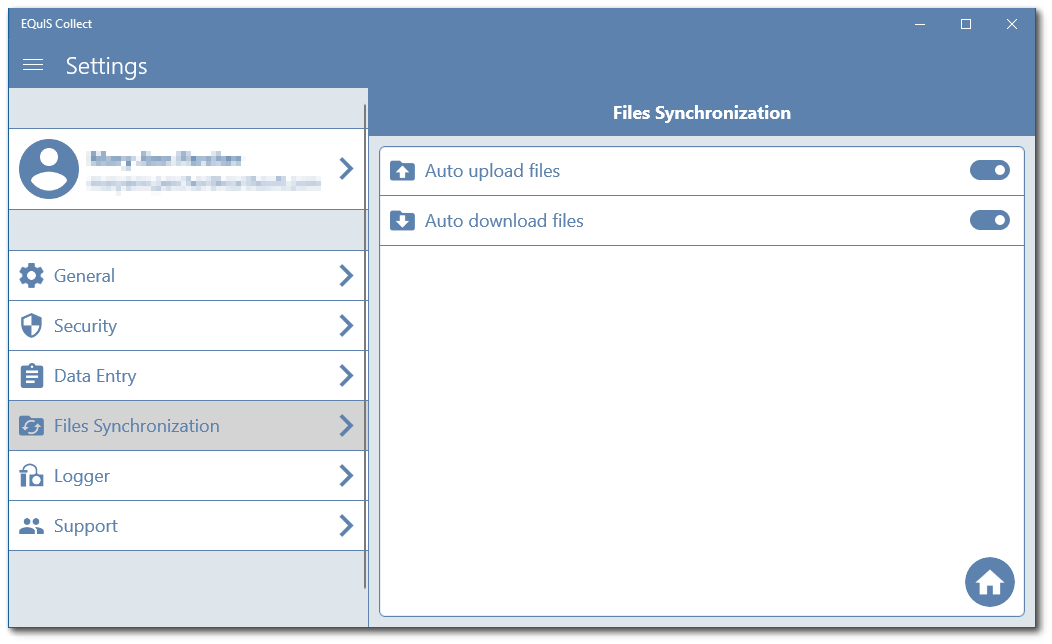
Auto upload files: This option is turned on by default. When enabled, this allows all files associated with captured data records to automatically be submitted when uploading the associated data form to the server. When this is disabled, the user must navigate to the File Synchronization tab in Collect Mobile and manually submit the file records.
Auto download files: This option is turned on by default. Auto download files only play a role when Sync Data is enabled on the data form where the files are collected on. When enabled, this allows all files available from the server, uploaded by other users filling out the same data form, that have not been synced to the user’s device to be downloaded. When this is disabled, files must be manually submitted. downloaded.
Note: Automatically uploading and downloading files requires an internet connection (WiFi/Mobile). |
|---|
Logger Tab
Tap the Logger settings menu item to manage interactions with data loggers.
See the Logger Integration articles for more information on using data loggers with Collect.
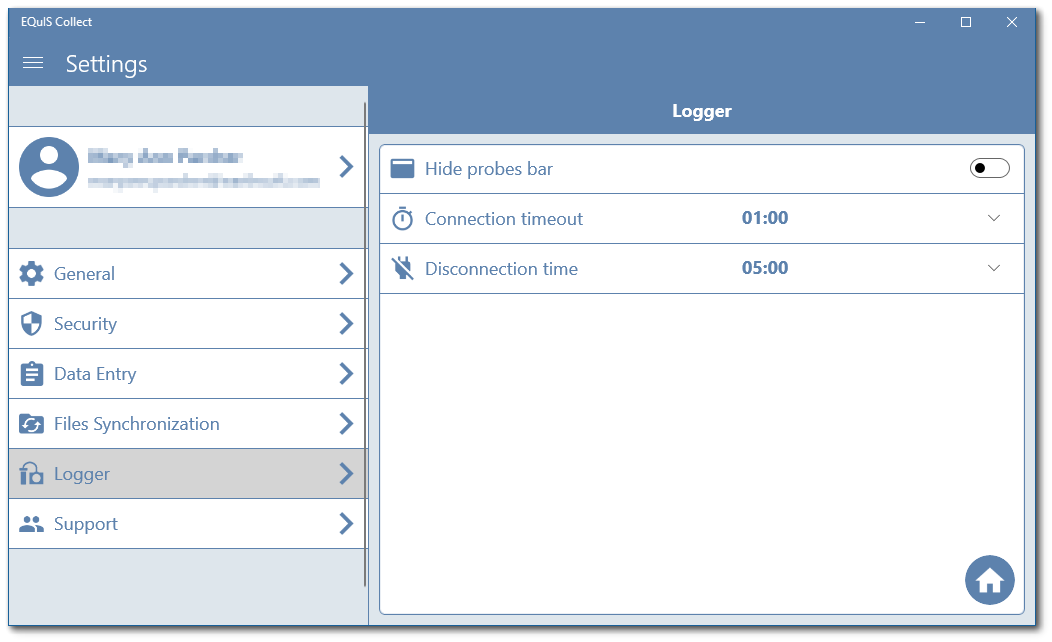
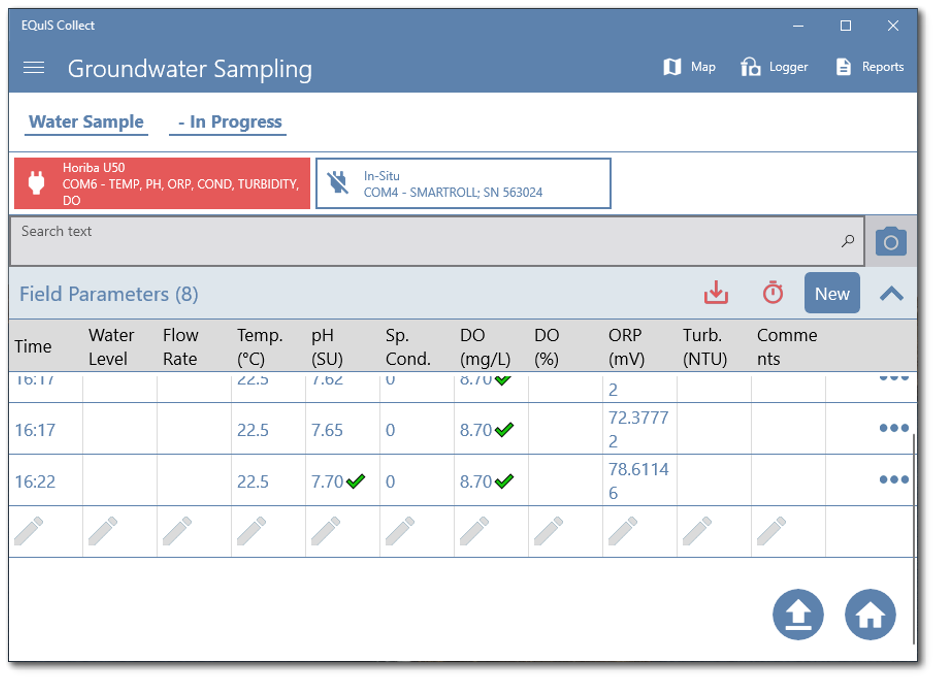
Hide probes bar: Allows users to show or hide the probes bar for the current form screen. By default, the probes bar is set to display, i.e., the option is turned on when the slider is to the right and blue.
Connection timeout: This setting represents the length of time in minutes to disable the logger on the device when data are no longer being received. When this value is exceeded, the logger is disabled and appears as red on the probes bar. The Fast Creation and Interval icons on the tool bar are also red. By default, the value is set to one minute.
Disconnection time: This setting represents the length of time in minutes to disconnect the logger from the Collect Mobile application when new data are no longer being received. By default, the value is set to five minutes. A disconnect error message will be displayed when the currently connected logger is disconnected:
It was not possible connect to the probe
Support Tab
Tap the Support settings menu item to manage the logging of diagnostic information or to generate a support package email sent to EarthSoft Support.
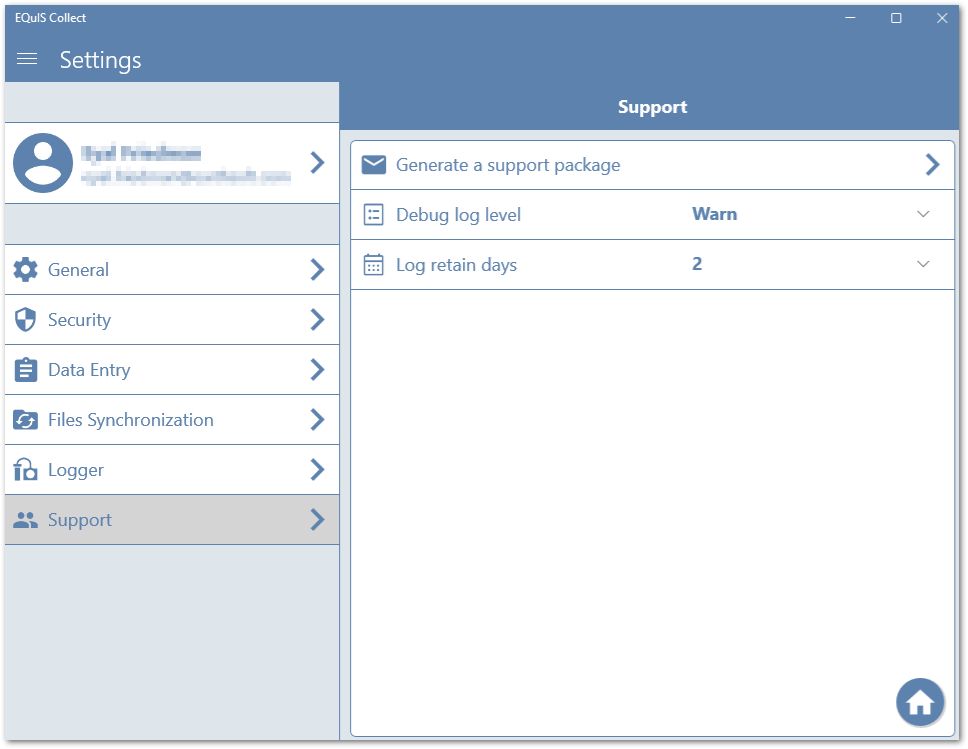
1.Tap Generate a support package
2.Write information pertinent to the issue
3.Tap Generate to create the email
4.An email* to the Support Team is automatically generated that contains the user profile information and the note entered above. If there is no active email setup on the device, it will be unable to send a support email.
*Be sure there is a .zip attached to the generated email. For troubleshooting, see Create Collect Crash Support Package.

Debug log level: Allows for configuring diagnostic logging. The Debug log level is used to capture different levels of diagnostic information about Collect Mobile, with "Warn" set as the default.
The options for Debug log levels available in the drop-down menu include:
•Trace
•Debug
•Info
•Warn
•Error
•Critical
Note: Each of the Debug log level options is additive with the levels below the selected level. For example, if the Debug log level is set to "Warn", the logs will also include "Error" and "Critical" messages. Less restrictive levels, such as "Info", "Debug", and "Trace" will not be included in the logs. If the logging level is set to "Trace", all levels of diagnostic information will be logged. |
|---|
Log retain days: Allows for the selection of the number of days that the log file will be saved and available for viewing or, if needed, submitting to support. The Log retain days drop-down menu allows for selecting a minimum of 1 day to a maximum of 7 days in single day increments, with 2 days set as the default.
Example 1
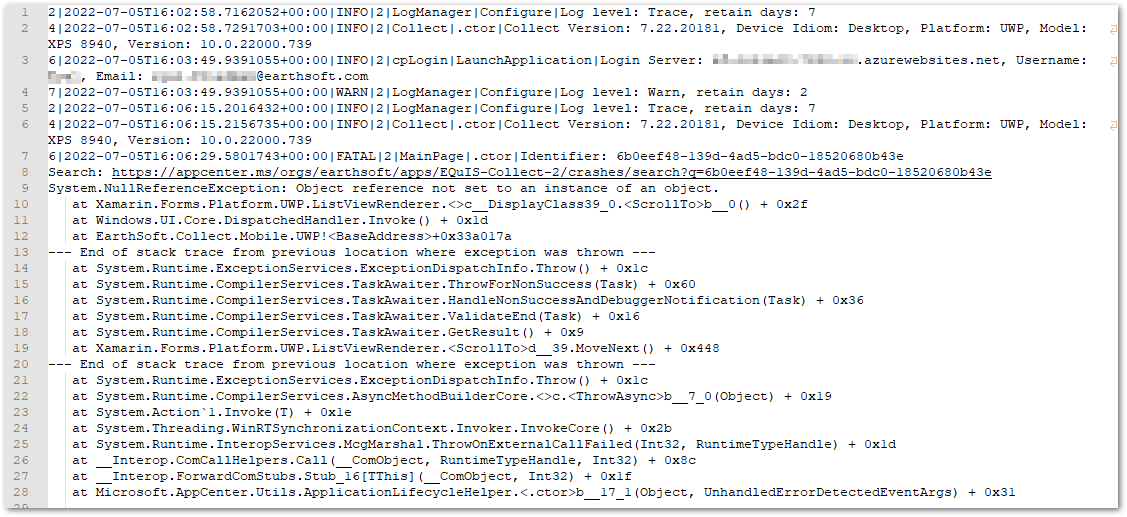
Example 1 shows a log file with entries for the log level and retain days settings, which are maintained at the default level. The log also shows a crash of Collect Mobile occurred, on line 7, followed by diagnostic information that may be helpful to help identify the cause of the crash.
Example 2
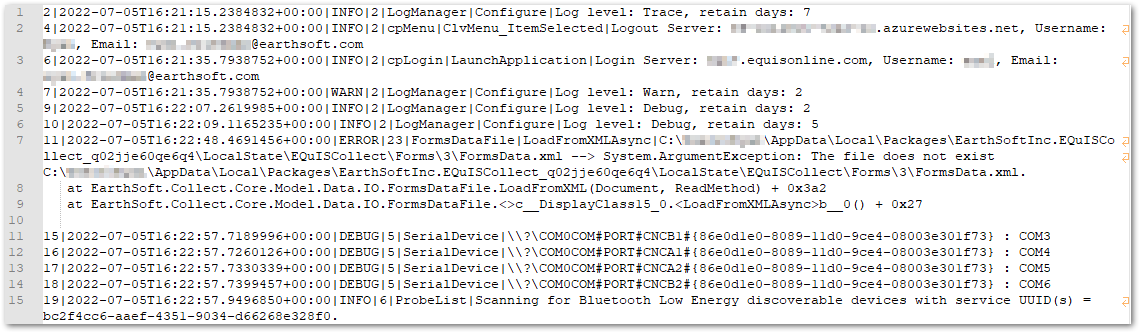
Example 2 is a log file with entries showing the log level and retain days were updated to "Debug" and 5 retain days. The log includes additional information, such as an error due to a missing file and an "Info" message about Collect Mobile searching for a Bluetooth® logger.
Notes:
•If a logs.zip file is created because of a Collect Mobile crash and the application is restarted, a crash report is available to EarthSoft. The logged information only includes device and crash specific information, no personal information is collected or sent. •If Collect Mobile crashes, an EQuIS Collect Crash Support Package can be generated and sent to EarthSoft Support to diagnose the crash. |
|---|
Test Crash: Selecting this will crash Collect. Upon reopening Collect, an EQuIS Collect Support Crash package email can be generated. For more information, see Create Collect Crash Support Package.