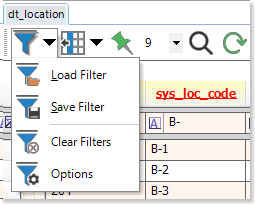
To enable filtering in grid (such as table or report) columns, click the Filter ![]() icon in the grid toolbar. The Filter icon also has a drop-down arrow that opens the Filter Menu, with Load Filter, Save Filter, Clear Filter, and Options selections.
icon in the grid toolbar. The Filter icon also has a drop-down arrow that opens the Filter Menu, with Load Filter, Save Filter, Clear Filter, and Options selections.
Filtering will display or highlight only values that meet the specified filters. EQuIS Professional also allows saving and loading of filter selections to and from *.XML files. For information on customizing the filter appearance, see Filter Options.
Note: Users may experience one of these behaviors when using a special character in the Filter row to filter a grid: •A user may receive an error if special characters such as "#" or "," are used. •A user may receive an 'Error in Like operator' error when exporting to Excel after filtering on a special character such as "[".
As a workaround, please use a custom filter when using special characters instead. |
Filter Row
By default, clicking the Filter ![]() icon turns on the filter row (for filtering without the filter row, see Filter Options). The filter row consists of the following components:
icon turns on the filter row (for filtering without the filter row, see Filter Options). The filter row consists of the following components:
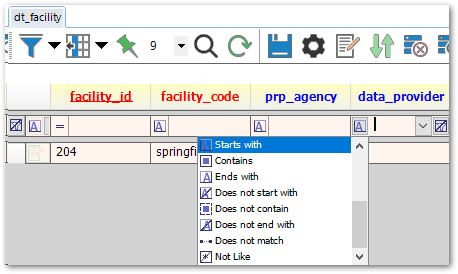
•Filter type icon on the left side of the field, with options such as "Starts with" or "Equals".
•Input field to enter filter criteria.
•Drop-down on the right of the input field with the following selections:
o(Custom) – Launches the Custom Filter dialog.
o(Blanks) – Filters to null entries.
o(Non-Blanks) – Filter to not-null entries.
oDistinct existing entries within that column – These are case-sensitive but do not employ case-sensitivity in filtering. For example, "MW" and "mw" would appear as separate choices, but either choice would display both results.
•Clear ![]() button, which appears in multiple areas (see Clear Filters for more information):
button, which appears in multiple areas (see Clear Filters for more information):
oAt the start of the row, to clear all filters
oAt the end of each field, to clear that field's filter
Standard Filter Types
Equals (=) – Typical default filter for most numeric fields Does not equal (≠) Less than (<) Less than or equal to (≤) Greater than (>) Greater than or equal to (≥) Like (*) Matches Regular Expression |
Starts with Contains Ends with – Default filter for non-numeric fields Does not start with Does not contain Does not end with Does not match Not Like |
Note: Once regular expression filters are in place and the filtered results are exported to Excel or crosstab, EQuIS Professional sets the table or report output to read-only. Consequently, users can no longer make changes and save to the database.
To edit the table or output after filtering by regular expression, close the tab by either clearing the workspace or right-clicking on the name in the Workspace pane and selecting Remove item. Then, reopen the table or rerun the report. |
Save Filters
Users can save filters after making filter selections. Selections can be made by clicking on the Filter ![]() icon to enable the filter row, and then entering filter preferences. To save the selections, click on the drop-down arrow next to the filter icon and select Save Filter
icon to enable the filter row, and then entering filter preferences. To save the selections, click on the drop-down arrow next to the filter icon and select Save Filter ![]() . When the Save window appears, give the file a name and click Save. By default, the Save window will open to the facility's Working Folder.
. When the Save window appears, give the file a name and click Save. By default, the Save window will open to the facility's Working Folder.
Load Filters
Filters can be loaded by selecting the drop-down arrow next to the Filter ![]() icon and selecting the Load Filter
icon and selecting the Load Filter ![]() . Navigate to the appropriate filter file and select Open. This will populate the filter row with all of the chosen selections that were saved in the file.
. Navigate to the appropriate filter file and select Open. This will populate the filter row with all of the chosen selections that were saved in the file.
Loading a filter while other filter selections exist will add the new selections into the existing ones, instead of simply replacing them. Multiple competing filters on the same field will lead to no records being returned. For example, if trying to combine two filters on SYS_LOC_CODE (e.g., filter for ="A" and a filter for ="B"), no results will appear since there are no records that meet BOTH of these criteria. To avoid this behavior, Clear Filters before loading a new filter, as described in the next section. Filtering on SYS_LOC_CODE and then loading a saved filter that filters on SAMPLE_DATE would show output if there are any results that meet both of the criteria.
If a filter is loaded to a file where one of the filtered columns does not exist, the following message will appear:
The selected filter condition cannot be applied on this grid |
Clear Filters
Clear filters with the Clear Filters ![]() option in the Filter drop-down menu, or, if the filter row is on, click Clear
option in the Filter drop-down menu, or, if the filter row is on, click Clear ![]() (at the very left of the filter row).
(at the very left of the filter row).
Clearing a filter may also clear automatic FACILITY_ID filters in certain tables (such as DT_ACTION_LEVEL, DT_FILE, or ST_USER_REPORT) for users with sufficient permission.