•Reporting Both Null and Populated Results Using Custom Filter Example
•Set Custom Filter Default Option
EQuIS Professional allows users to apply custom filters to view data within a data table or report. Predefined filters and custom filters can be activated by first turning on the filter by clicking on the Filter ![]() icon within the table view. This will turn on the filter row in the workspace.
icon within the table view. This will turn on the filter row in the workspace.
Note: When using the Filter row to filter a data table, a user may receive an error if special characters such as "#" or "," are used. As a workaround, please use a custom filter instead as discussed below. |
The steps below explain how to add an example set of custom filtered values in EQuIS Professional.
1.Open a table.
2.If the filter row is not already visible, select the Filter icon from the toolbar. This will make the filter row visible.
3.In the filter field of the desired column (e.g., SYS_SAMPLE_CODE), select the drop-down arrow and choose Custom. This will open a Custom Filter window.
4.In the first drop-down menu, select the = Equals tool.
5.In the second drop-down menu, enter the first value (for example, if using SYS_SAMPLE_CODE, 'SS-1_19970919').
6.Select Add.
7.Once again, select an operator of = Equals.
8.Enter the value in the second drop-down menu.
9.At the top of the Custom Filter window, select filter based on any of the following conditions. This will change the filter so that it will return all of the records related to the SYS_SAMPLE_CODE values entered in this filter.
10.Repeat for as many values as desired.
11.Click OK.
Note: The steps above will vary slightly for date fields. If the filter row is visible, turn it off to be able to use a custom filter on a date field. Use the instructions below: 1.Click the drop-down arrow next to the Filter icon in the top toolbar (above the table) and select Options. 2.At the bottom of the Filter Options window, uncheck the box next to "Use Filter Row". 3.In the table, navigate to the date column to be filtered, and click the Filter icon next to the column name. 4.Select "(Custom)" from the drop-down. This will open the Custom Filter window, where users can select the Add button to make a filter with multiple criteria. |
Example – Reporting Both Null and Populated Results Using Custom Filter
1.Run the Analytical Results Report for all depths, leaving Start and End Depth null in the parameters.
2.Turn on the filter row by clicking the Filter icon in the toolbar.
3.Select the filter drop-down arrow and select Custom in the START_DEPTH column.
4.Add START_DEPTH = (Blanks) and START_DEPTH = 0. Make sure Filter based on Any is selected to show both.
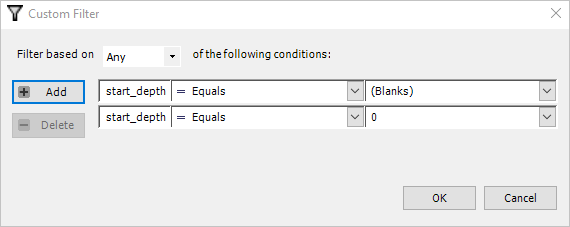
5.Repeat Step 4 for END_DEPTH.
The report can now be exported to Excel or a crosstab can be created with this information.
Set Custom Filter Default Option
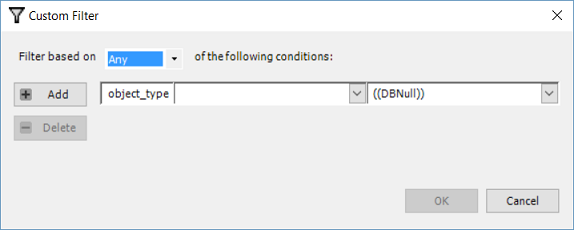
In EQuIS Professional, users can change the custom filter default option from All to Any by completing the steps following the image.
1.Open ST_CONFIG in System Tables.
2.Add a new row to the ST_CONFIG table with the following:
a.CONFIG_SECTION = ReportGrid
b.CONFIG_KEY = CustomFilterDialog
c.OBJECT_TYPE = LogicalOperator
d.OBJECT_VALUE = <username>
e.STRING_VALUE = Any
Note: <username> is the user you are logged in as in EQuIS Professional. |
3.Save changes to the ST_CONFIG table.
Custom Date Filter
The steps below explain how to add an example set of custom filtered values for Date fields in EQuIS Professional.
1.Open a table.
2.If the filter row is already visible, disable the filter row with the following steps:
a.Click the arrow next to the Filter ![]() icon in the toolbar for the Filter drop-down selection.
icon in the toolbar for the Filter drop-down selection.
b.Select Options.
c.Uncheck the 'Use Filter Row' checkbox.
3.Navigate to the Date field column and select the Filter icon next to the field name.
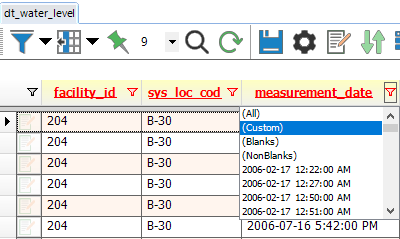
4.Select (Custom) from the drop-down.
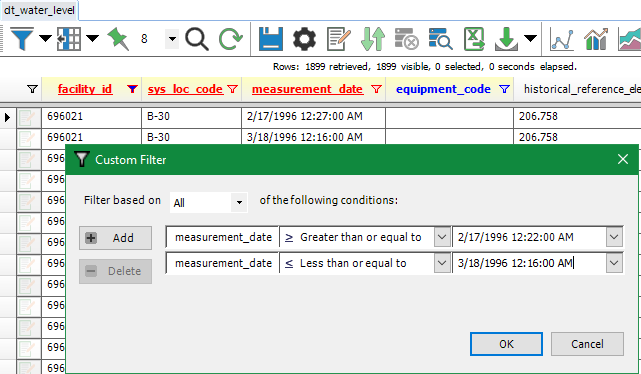
5.Ensure to filter based on "All" of the following conditions, and add two rows: < Less than (date) and > Greater than (date).
International Language Users
The custom filters will not work properly when trying to filter using a "," as a place holder (e.g., 0,005). The current workaround is to use a "." instead, which will allow the custom filters to work properly. This feature will be incorporated in an upcoming release of EQuIS Professional.