Report Name: Collect – COC (example)
File Name: EarthSoft.Reports.Library.149680.dll
Dependencies: Licensed Collect Module and SPM Schema or EDGE Schema
Software: EQuIS Collect, EQuIS Enterprise
Source: EQuIS Collect install
Language: English
Output Type: PDF
Topics in this article:
•COC Word Template with Single Container Per Sample
•More Collect COC Report Features
•Word Template Technical Notes
Introduction
Description: The Collect – COC report returns Chain of Custody (COC) data exports based on data from Collect forms. The report can be run from EQuIS Professional, Enterprise, or the Collect Mobile App (if the device is connected to the Internet). This report can be setup as an EQuIS Information Agent (EIA).
Installation Instructions: This report requires a licensed EQuIS Collect module, the Collect Schema, and either the SPM schema or EDGE schema applied to the database. For use, this report should be published to the database. Download the EQuIS Collect .xcopy zip from the community center, unblock the *.zip file, and extract the EarthSoft.Reports.Library.149680.dll file to the EQuIS Professional installation folder. For default installations, this directory is C:\Program Files\EarthSoft\EQuIS. The report will be available for selection once it has been published.
Overview:
The report uses a Microsoft Word template (DOTX) to generate a PDF output. The Word template can be customized to add logos, hide or show columns, and much more, as detailed later in this article. Example Collect COC Word template files are available on the EarthSoft Community Center in the Downloads section within the "EQuIS Collect Templates" folder.
This template must be uploaded to EQuIS with a DT_FILE.FILE_TYPE like ".dotx" to be an option in the report's Collect Word Template parameter. Use the Docs and Photos form in Professional (similar to instructions for uploading SPM COC Templates) or the Explorer Widget in Enterprise to upload this file.
The report will not return any data if run without a "Chain of Custody" parameter populated. Select a value from the parameter’s list when running manually from EQuIS Professional or Enterprise’s EZView widget. Leave the “Chain of Custody” parameter blank when setting up a User Report for use in Collect Mobile as a Mobile Report or an EIA (triggered on New Data); this allows the report to find the appropriate COCs at runtime based on associations between the submitted Collect form and EBATCH numbers.
Since the Collect - COC report is generated through the server, data from a Collect Data Form must be committed through EQuIS Data Processor (EDP) in order to generate the report.
Tables: AT_SPM_SAMPLE_CHAIN_OF_CUSTODY, AT_SPM_CONTRACT_MTH_CONTAINER, DT_CHAIN_OF_CUSTODY, DT_CHAIN_OF_CUSTODY_MAG, DT_CHAIN_OF_CUSTODY_MAG_CONT, DT_FACILITY, DT_FIELD_SAMPLE, DT_RESULT, DT_SAMPLE, DT_SAMPLE_PARAMETER, DT_SPM_CONTRACT_MAG, DT_SPM_CONTRACT_MAG_MEMBERS, DT_SPM_CONTRACT_METHOD, DT_SPM_SCHEDULED_CONTAINER, DT_SPM_SCHEDULED_SAMPLE, DT_TEST, RT_ANALYTE, RT_COMPANY, RT_SPM_CONTAINER
Report Parameters |
||||||||||||||||||||||||||||||||||||||||||
|---|---|---|---|---|---|---|---|---|---|---|---|---|---|---|---|---|---|---|---|---|---|---|---|---|---|---|---|---|---|---|---|---|---|---|---|---|---|---|---|---|---|---|
* This report includes the following hidden parameter(s) that could affect the output of the report: •Additional MAG Info
Consult an EQuIS administrator if hidden parameters should be visible or use different default values in a published report. Hidden parameters cannot be viewed or changed in unpublished reports outside of a report parameter file. |
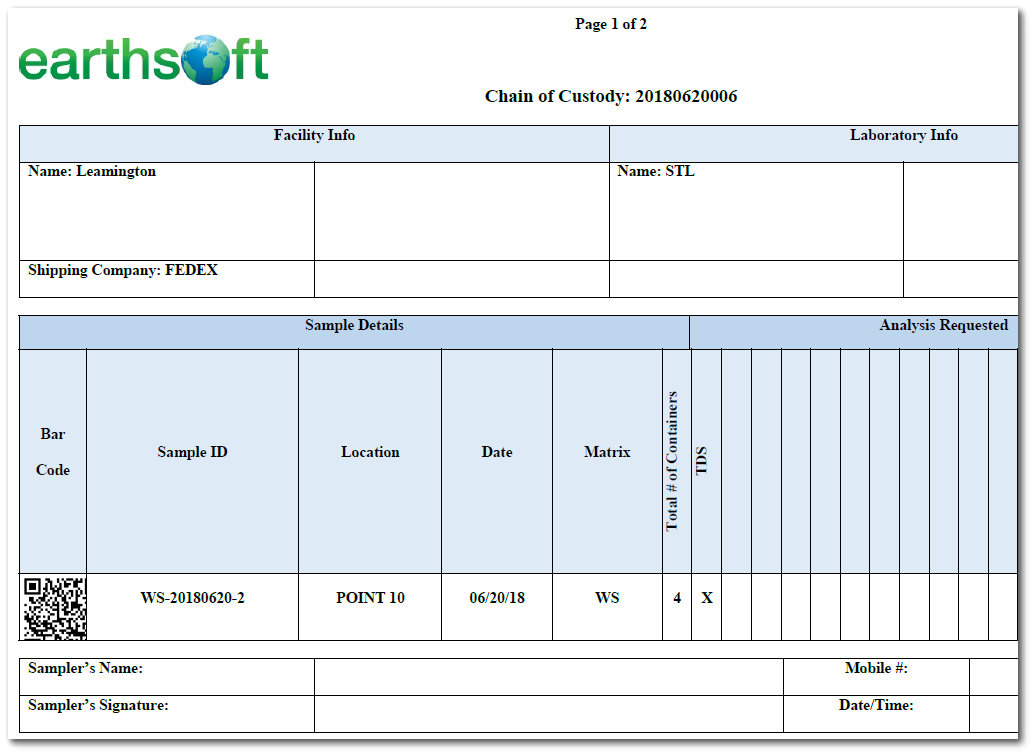
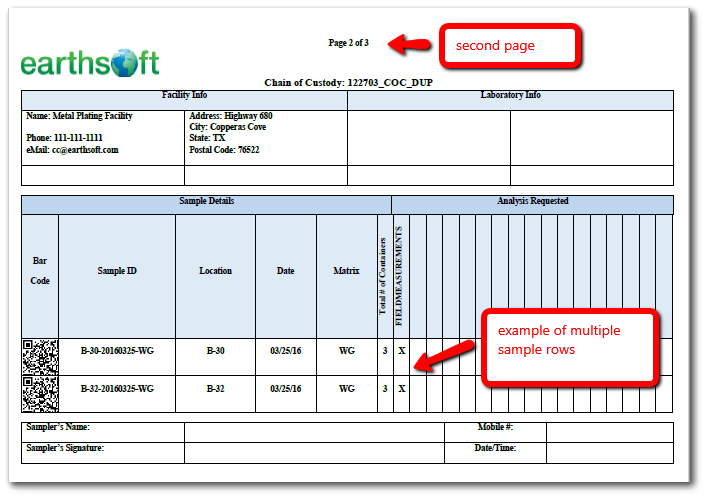
Example Output: The example output below is a populated Word template converted to a PDF document. The document has three data sourced sections: COC related information, sample and analysis column headers, and rows of sample details and requested analyses.

COC Word Template Layout
First Data Sourced Section
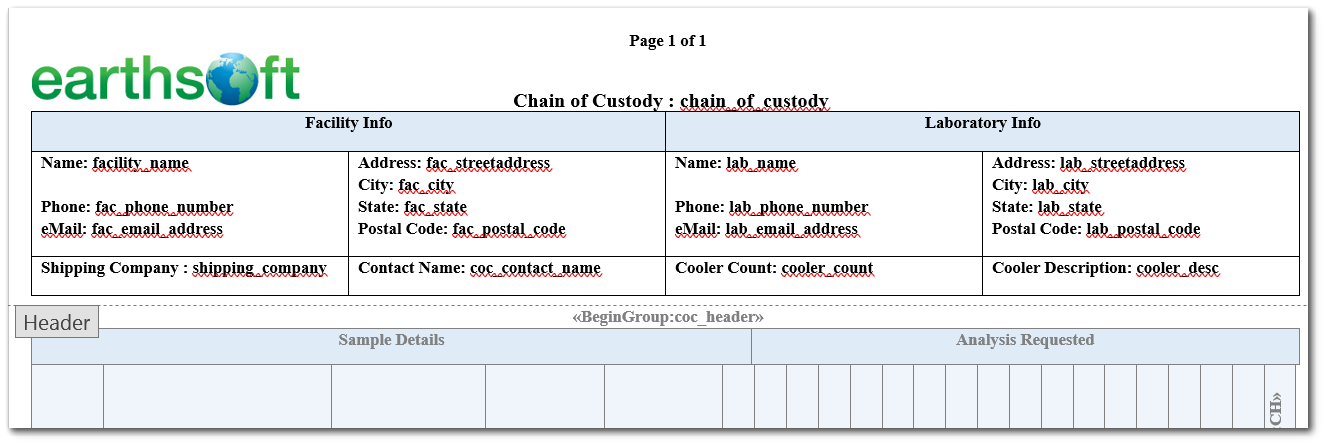
The first data sourced section (i.e., COC related information) has the Chain of Custody ID at the top followed by the Facility and Laboratory Info table. The Facility and Laboratory section will print the following info:
EQuIS Table |
Field |
Word Template Field Name |
|---|---|---|
AT_SPM_SAMPLE_CHAIN_OF_CUSTODY |
SCHEDULED_TASK_CODE |
scheduled_task_code |
DT_CHAIN_OF_CUSTODY |
CHAIN_OF_CUSTODY |
chain_of_custody |
DT_CHAIN_OF_CUSTODY |
SHIPPING_COMPANY |
shipping_company |
DT_CHAIN_OF_CUSTODY |
CONTACT_NAME_1 |
coc_contact_name |
DT_CHAIN_OF_CUSTODY |
COOLER_COUNT |
cooler_count |
DT_CHAIN_OF_CUSTODY |
COOLER_DESC |
cooler_desc |
DT_CHAIN_OF_CUSTODY |
COOLER_ID |
cooler_id |
DT_CHAIN_OF_CUSTODY |
COOLER_TEMP |
cooler_temp |
DT_CHAIN_OF_CUSTODY |
CUSTOM_FIELD_1 |
custom_field_1 |
DT_CHAIN_OF_CUSTODY |
CUSTOM_FIELD_2 |
custom_field_2 |
DT_CHAIN_OF_CUSTODY |
CUSTOM_FIELD_3 |
custom_field_3 |
DT_CHAIN_OF_CUSTODY |
CUSTOM_FIELD_4 |
custom_field_4 |
DT_CHAIN_OF_CUSTODY |
CUSTOM_FIELD_5 |
custom_field_5 |
DT_CHAIN_OF_CUSTODY |
SHIPPING_TRACKING_NUMBER |
shipping_tracking_number |
DT_CHAIN_OF_CUSTODY |
CONTACT_NAME_2 |
contact_name_2 |
DT_CHAIN_OF_CUSTODY |
COMPLETE_YN |
complete_yn |
DT_CHAIN_OF_CUSTODY |
SAMPLER_SIGNATURE |
sampler_signature |
DT_CHAIN_OF_CUSTODY |
TURN_AROUND_TIME |
turn_around_time |
DT_CHAIN_OF_CUSTODY |
QUOTE_NUMBER |
quote_number |
DT_CHAIN_OF_CUSTODY |
SHIPPING_DATE |
shipping_date |
DT_CHAIN_OF_CUSTODY |
EMAIL_INVOICE_TO |
email_invoice_to |
DT_CHAIN_OF_CUSTODY |
EMAIL_REPORT_TO |
email_report_to |
DT_CHAIN_OF_CUSTODY |
RELINQUISHED_BY |
relinquished_by |
DT_CHAIN_OF_CUSTODY |
RELINQUISHED_DATE |
relinquished_date |
DT_CHAIN_OF_CUSTODY |
REMARK |
remark |
DT_CHAIN_OF_CUSTODY |
LAB_RECEIPT_DATE |
lab_receipt_date |
DT_CHAIN_OF_CUSTODY |
LAB_COOLER_COUNT |
lab_cooler_count |
DT_CHAIN_OF_CUSTODY |
LAB_COOLER_DESC |
lab_cooler_desc |
DT_CHAIN_OF_CUSTODY |
LAB_SECURITY_SEAL |
lab_security_seal |
DT_CHAIN_OF_CUSTODY |
LAB_COOLER_TEMP |
lab_cooler_temp |
DT_CHAIN_OF_CUSTODY |
SAMPLER_1 |
sampler_1 |
DT_CHAIN_OF_CUSTODY |
SAMPLER_2 |
sampler_2 |
DT_CHAIN_OF_CUSTODY |
SAMPLER_3 |
sampler_3 |
DT_CHAIN_OF_CUSTODY |
PROJECT_MANAGER |
project_manager |
DT_CHAIN_OF_CUSTODY |
PROJECT_ID |
project_ID |
DT_CHAIN_OF_CUSTODY |
PO_NUMBER |
po_number |
DT_CHAIN_OF_CUSTODY |
DEPARTMENT |
department |
DT_CHAIN_OF_CUSTODY |
NB_OF_BOTTLES_RETURNED |
nb_of_bottles_returned |
DT_CHAIN_OF_CUSTODY |
BOTTLES_RETURNED_DESC |
bottles_returned_desc |
DT_CHAIN_OF_CUSTODY |
LAB_CODE |
lab_code |
DT_FACILITY |
FACILITY_CODE |
facility_name |
DT_FACILITY |
FACILITY_NAME |
facility_name |
DT_FACILITY |
FACILITY_TYPE |
fac_facility_type |
DT_FACILITY |
ADDRESS_1 |
fac_streetaddress |
DT_FACILITY |
ADDRESS_2 |
fac_address_2 |
DT_FACILITY |
CITY |
fac_city |
DT_FACILITY |
COUNTY |
fac_county |
DT_FACILITY |
STATE |
fac_state |
DT_FACILITY |
COUNTRY |
fac_country |
DT_FACILITY |
POSTAL_CODE |
fac_postal_code |
DT_FACILITY |
PHONE_NUMBER |
fac_phone_number |
DT_FACILITY |
EMAIL_ADDRESS |
fac_email_address |
DT_FACILITY |
CUSTOM_FIELD_1 |
fac_custom_field_1 |
DT_FACILITY |
CUSTOM_FIELD_2 |
fac_custom_field_2 |
DT_FACILITY |
CUSTOM_FIELD_3 |
fac_custom_field_3 |
DT_FACILITY |
CUSTOM_FIELD_4 |
fac_custom_field_4 |
DT_FACILITY |
CUSTOM_FIELD_5 |
fac_custom_field_5 |
DT_SAMPLE |
SAMPLE_DESC |
sample_desc |
DT_SPM_SCHEDULED_SAMPLE |
CUSTOM_FIELD_1 |
sample_custom_field_1 |
DT_SPM_SCHEDULED_SAMPLE |
CUSTOM_FIELD_2 |
sample_custom_field_2 |
DT_SPM_SCHEDULED_SAMPLE |
CUSTOM_FIELD_3 |
sample_custom_field_3 |
DT_SPM_SCHEDULED_SAMPLE |
CUSTOM_FIELD_4 |
sample_custom_field_4 |
DT_TASK |
CLIENT |
task_client |
DT_TASK |
CUSTOM_FIELD_1 |
task_custom_field_1 |
DT_TASK |
CUSTOM_FIELD_2 |
task_custom_field_2 |
DT_TASK |
CUSTOM_FIELD_3 |
task_custom_field_3 |
DT_TASK |
CUSTOM_FIELD_4 |
task_custom_field_4 |
DT_TASK |
CUSTOM_FIELD_5 |
task_custom_field_5 |
DT_TASK |
TASK_CODE |
task_task_code |
DT_TASK |
TASK_DESC |
task_task_desc |
DT_TASK |
DELIVERY_ORDER |
task_delivery_order |
DT_TASK |
MAX_TURNAROUND_DAYS |
task_max_turnaround_days |
DT_TASK |
PO_NUMBER |
task_po_number |
DT_TASK |
REMARK |
task_remark |
DT_TASK |
CONTACT |
task_contact |
DT_TASK |
TASK_TYPE |
task_task_type |
DT_TASK |
START_DATE |
task_start_date |
DT_TASK |
END_DATE |
task_end_date |
DT_TASK |
MONITORING_PROGRAM |
task_monitoring_program |
DT_TASK |
MONITORING_TYPE |
task_monitoring_type |
DT_TASK |
PERMIT_NUMBER |
task_permit_number |
RT_COMPANY |
COMPANY_NAME |
lab_name |
RT_COMPANY |
ADDRESS_1 |
lab_streetaddress |
RT_COMPANY |
CITY |
lab_city |
RT_COMPANY |
STATE |
lab_state |
RT_COMPANY |
POSTAL_CODE |
lab_postal_code |
RT_COMPANY |
PHONE_NUMBER |
lab_phone_number |
RT_COMPANY |
CONTACT_NAME |
lab_contact_name |
RT_COMPANY |
EMAIL_ADDRESS |
lab_email_address |
Note: DT_TASK entries are intended to work under the assumption that all samples come from only one task. |
|---|
To repeat this section on all pages of the COC, put this section in the header of the Word template document. In the header, simply type the Word template field name to be populated. The image below is the example “Collect_COC_template,” illustrating how and where information can be controlled within the template.
Second Data Sourced Section
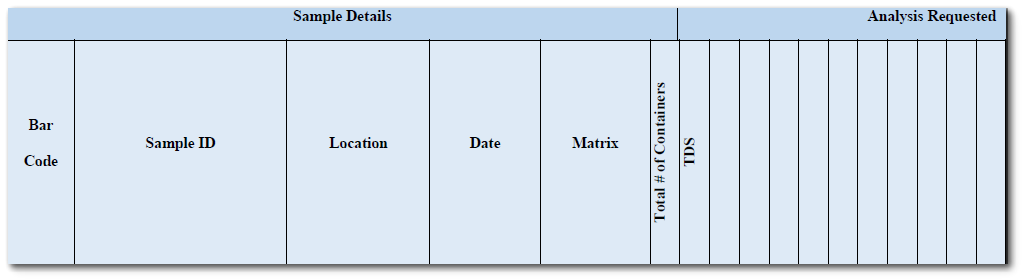
The second data sourced section is the sample and analysis column header. The first 20 column headers under Sample Details are fixed as “Bar Code” (CH0), “Sample ID” (CH1), “Location” (CH2), “Date” (CH3), “Total # of Containers” (CH4), “Matrix” (CH5), “Start Depth” (CH5A), “End Depth” (CH5B), “Depth Unit” (CH5C), “Sample Type” (CH5D), “Sample Method” (CH5E), “Sample Name” (CH5F), “Num” (CH5G), “Sample_Custom_Field_4” (CH5H), “Sample Parameter” (CH5I), “Sample_Filtered” (CH5J), “Sample Start Date” (CH5K), “Sample End Date” (CH5L), “Composite_YN” (CH5M), and “Medium Code” (CH5N). The next 17 column headers under Analysis Requested are variable in number and will list all the METHOD_ANALYTIC_GROUP_CODEs included in the COC. These MAG codes are all the analyses requested for the samples included in the COC. Users can select what value to show as MAG by selecting different options in Analysis Header report parameter.
EQuIS Table |
Field |
Word Template Field Name |
|---|---|---|
DT_CHAIN_OF_CUSTODY_MAG (Collect COC) or DT_SPM_CONTRACT_MAG / DT_SPM_CONTRACT_METHOD (SPM COC) |
METHOD_ANALYTE_GROUP_CODE
METHOD_ANALYTE_GROUP_CODE |
“CH6” to “CH22” |
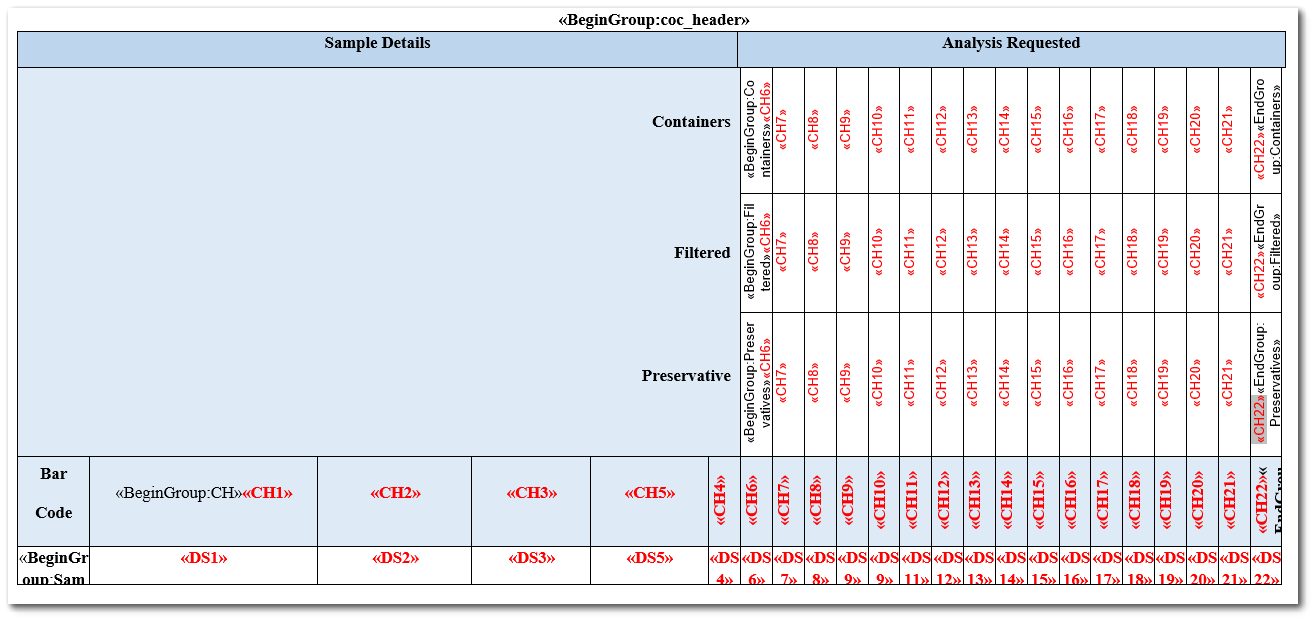
Users also have the option to show Containers Description, Filtered, Preservatives and Holding Time in separate header rows. The image below is the example “Collect_COC_template,” illustrating the sample and analysis column header section.
See Show Individual Containers parameter above for additional information on how that parameter affects the Second Data Sourced Section.
Third Data Sourced Section
The third data sourced section is immediately below the column headers of the second section and contains the rows or list of samples that have been added to the COC.

If the bar code option is set to “YES,” the first column cell is the bar code of the Sample ID. The next five column cells to the right are the Sample ID, the sampling location and date, the sample’s matrix, and the total number of containers used for the sampling event.
EQuIS Table |
Field |
Word Template Field Name |
|---|---|---|
DT_SAMPLE |
SYS_SAMPLE_CODE |
DS1 |
DT_SAMPLE |
SYS_LOC_CODE |
DS2 |
DT_SAMPLE |
SAMPLE_DATE |
DS3 |
DT_CHAIN_OF_CUSTODY_MAG_CONT |
NB_OF_CONTAINERS |
DS4 (total # of containers) |
DT_SAMPLE |
MATRIX |
DS5 |
DT_SAMPLE |
START_DEPTH |
D5A |
DT_SAMPLE |
END_DEPTH |
D5B |
DT_SAMPLE |
DEPTH_UNIT |
D5C |
DT_SAMPLE |
SAMPLE_TYPE_CODE |
D5D |
DT_SAMPLE |
SAMPLE_METHOD |
D5E |
DT_SAMPLE |
SAMPLE_NAME |
D5F |
-- |
-- |
D5G (Sequential Number) |
DT_SAMPLE |
CUSTOM_FIELD_4 |
D5H |
DT_SAMPLE_PARAMETER |
PARAM_VALUE |
D5I (For selected Sample Parameter) |
DT_FIELD_SAMPLE |
FILTERED_DATE |
D5J (Yes/No depending if field is populated or not) |
DT_SAMPLE |
SAMPLE_START_DATE |
D5K |
DT_SAMPLE |
SAMPLE_END_DATE |
D5L |
DT_FIELD_SAMPLE |
COMPOSITE_YN |
D5M |
DT_SAMPLE |
MEDIUM_CODE |
D5N |
DT_SAMPLE |
REMARK |
D5R |
Note: DateTime fields can be formatted in the COC word template. For example, Sample Date (DS3) is a DateTime field. The Sample Date and Sample Time in the Word Templates can be in any format. Sample Date can be formatted as “MM/dd/yyyy”, right-click on <<DS3>> and then Edit Field. Click on the Field Codes button at bottom left corner of the dialog. Copy the text below into the Field Codes textbox: MERGEFIELD DS3 \@ "MM/dd/yyyy" To format Sample Time in 24-hour format, use: MERGEFIELD DS3 \@ "HH:mm" |
|---|
Like the second section column headers, the next 17 column cells will refer to the MAG codes under the Analysis Requested with “X” markings—which means that the MAG code analysis has been requested for this sample row.
EQuIS Table |
Field |
Word Template Field Name |
|---|---|---|
DT_CHAIN_OF_CUSTODY_MAG |
SAMPLE_ID |
“DS6” to “DS22” |
The image below is the example “Collect_COC_template,” illustrating the sample and analysis column header section.

SPM COC
A COC created in SPM can be generated by selecting Source of COC Data as “SPM” and selecting SPM COC in Chain of Custody ID or Chain of Custody.
EQuIS Table |
Field |
Word Template Field Name |
|---|---|---|
DT_SPM_SCHEDULED_SAMPLE |
SYS_SAMPLE_CODE |
DS1 |
DT_SPM_SCHEDULED_SAMPLE |
SYS_LOC_CODE |
DS2 |
DT_SAMPLE if sample was collected, DT_SPM_SCHEDULED_SAMPLE if not |
SAMPLE_DATE |
DS3 |
DT_SPM_SCHEDULED_CONTAINER |
NUMBER_OF_CONTAINERS |
DS4 (total # of containers) |
DT_SPM_SCHEDULED_SAMPLE |
MATRIX |
DS5 |
DT_SPM_SCHEDULED_SAMPLE |
START_DEPTH |
D5A |
DT_SPM_SCHEDULED_SAMPLE |
END_DEPTH |
D5B |
DT_SPM_SCHEDULED_SAMPLE |
DEPTH_UNIT |
D5C |
DT_SPM_SCHEDULED_SAMPLE |
SAMPLE_TYPE_CODE |
D5D |
DT_SPM_SCHEDULED_SAMPLE |
SAMPLE_METHOD |
D5E |
DT_SPM_SCHEDULED_SAMPLE |
SAMPLE_NAME |
D5F |
-- |
-- |
D5G (Sequential Number) |
DT_SPM_SCHEDULD_SAMPLE |
CUSTOM_FIELD_4 |
D5H |
-- |
-- |
D5I (Not Applicable) |
-- |
-- |
D5J (Not Applicable) |
-- |
-- |
D5K (Not Applicable) |
-- |
-- |
D5L (Not Applicable) |
DT_SPM_SCHEDULED_SAMPLE |
COMPOSITE_YN |
D5M |
DT_SPM_SCHEDULED_SAMPLE |
MEDIUM_CODE |
D5N |
COC Word Template with Single Container Per Sample
This COC Word template layout can be used by selecting “YES” for the "Single Container Per Sample" parameter. Each Sample row will have only one container. The MAG code and container details will be displayed on the same sample row. The header row of Sample Analysis table can have columns in any order and can have any column headings. However, the third data sourced section can be populated as per below in the mapping table.
EQuIS Table |
Field |
Word Template Field Name |
|---|---|---|
DT_SAMPLE |
SYS_SAMPLE_CODE |
DS1 |
DT_SAMPLE |
SYS_LOC_CODE |
DS2 |
DT_SAMPLE |
SAMPLE_DATE |
DS3 |
DT_CHAIN_OF_CUSTODY_MAG_CONT |
NB_OF_CONTAINERS |
DS4 (total # of containers) |
DT_SAMPLE |
MATRIX |
DS5 |
DT_SAMPLE |
START_DEPTH |
D5A |
DT_SAMPLE |
END_DEPTH |
D5B |
DT_SAMPLE |
DEPTH_UNIT |
D5C |
DT_SAMPLE |
SAMPLE_TYPE_CODE |
D5D |
DT_SAMPLE |
SAMPLE_METHOD |
D5E |
DT_SAMPLE |
SAMPLE_NAME |
D5F |
-- |
-- |
D5G (Sequential Number) |
DT_SAMPLE |
CUSTOM_FIELD_4 |
D5H |
DT_SAMPLE_PARAMETER |
PARAM_VALUE |
D5I (For selected Sample Parameter) |
DT_FIELD_SAMPLE |
FILTERED_DATE |
D5J (Yes/No depending if field is populated or not) |
DT_SAMPLE |
SAMPLE_START_DATE |
D5K |
DT_SAMPLE |
SAMPLE_END_DATE |
D5L |
DT_FIELD_SAMPLE |
COMPOSITE_YN |
D5M |
DT_CHAIN_OF_CUSTODY_MAG |
METHOD_ANALYTE_GROUP_CODE |
DS6 |
DT_CHAIN_OF_CUSTODY_MAG |
REMARK |
DS7 |
DT_CHAIN_OF_CUSTODY_MAG_CONT |
CONTAINER_CODE |
DS8 |
DT_CHAIN_OF_CUSTODY_MAG_CONT |
CONTAINER_DESC |
DS9 |
DT_CHAIN_OF_CUSTODY_MAG_CONT |
PRESERVATIVE |
DS10 |
DT_CHAIN_OF_CUSTODY_MAG_CONT |
FILTERED |
DS11 |
DT_CHAIN_OF_CUSTODY_MAG_CONT |
HOLDING_TIME + HOLDING_TIME_UNIT |
DS12 |
DT_CHAIN_OF_CUSTODY_MAG_CONT |
REMARK |
DS13 |
More Collect COC Report Features
The Collect COC report has the capability to include more than one COC. The first report parameter is the “Chain of Custody”. Multiple COCs can be selected or included in this report. When more than one COC is selected, the next COC document will print on a new page. Conveniently, only one run and one PDF document is needed to print multiple COCs.
The DT_CHAIN_OF_CUSTODY table has a batch number assigned to each COC. On Enterprise, instead of selecting the Chain of Custody, one may instead use batch numbers. Do not forget to also set “YES” to the parameter “Print Latest COC Only from Multiple Batches” if only the latest batch number is desired to be included in the report.
Users can sort the samples in the sample analysis table by selecting an option under the “Sort Samples By” report parameter. Available options are: DT_SAMPLE.SYS_SAMPLE_CODE, DT_SAMPLE.SAMPLE_DATE (Default), DT_CHAIN_OF_CUSTODY_MAG.CUSTOM_FIELD_1, DT_CHAIN_OF_CUSTODY_MAG.CUSTOM_FIELD_2, DT_CHAIN_OF_CUSTODY_MAG.CUSTOM_FIELD_3, DT_CHAIN_OF_CUSTODY_MAG.CUSTOM_FIELD_4 and DT_CHAIN_OF_CUSTODY_MAG.CUSTOM_FIELD_5.
Analytes
The intended use case for the Analyte(s) parameter is to select field parameters, allowing field result data (e.g., temperature, pH, DO) to be incorporated into the COC Word Template, however, lab analytes are also supported. To display Analyte header, use field names <<FR1>>, <<FR2>>, and so on. To display their respective values in the sample row, use <<FRV1>>, <<FRV2>>, and so on. The Analyte header will be displayed as Analyte Name (Unit of Measure). The number of Field Results values displayed on the Chain of Custody are limited to the number of available columns in the Word template.
EQuIS Table |
Field |
Word Template Field Name |
|---|---|---|
RT_ANALYTE |
ANL_SHORT_NAME or CHEMICAL_NAME or CAS_RN |
FR (Analyte Name) |
DT_RESULT |
RESULT_UNIT |
FR (Unit of Measure) |
DT_RESULT |
RESULT_TEXT |
FRV |
Note: The Collect - COC report looks for each sample assigned to the selected “Chain of Custody” parameter, finds the associated DT_TEST record (if the sample has multiple DT_TEST records, it finds the most recent DT_TEST.ANALYSIS_DATE record), then pulls the DT_RESULT values for the selected "Analyte(s)" parameter into the <<FRV>> tag in the COC Word template. It returns blank if it does not find the selected analyte(s) in DT_RESULT.CAS_RN. |
Word Template Technical Notes
Mail Merge is the Microsoft Word feature that is used to populate the template with data. Key to moving the correct data to a specific field in the document is the merge field name. It is important to use the merge field names that the current Collect COC report uses. Below is the example “Collect_COC_template” where the field names—colored in RED—matches the Word template field name values from the tables above.
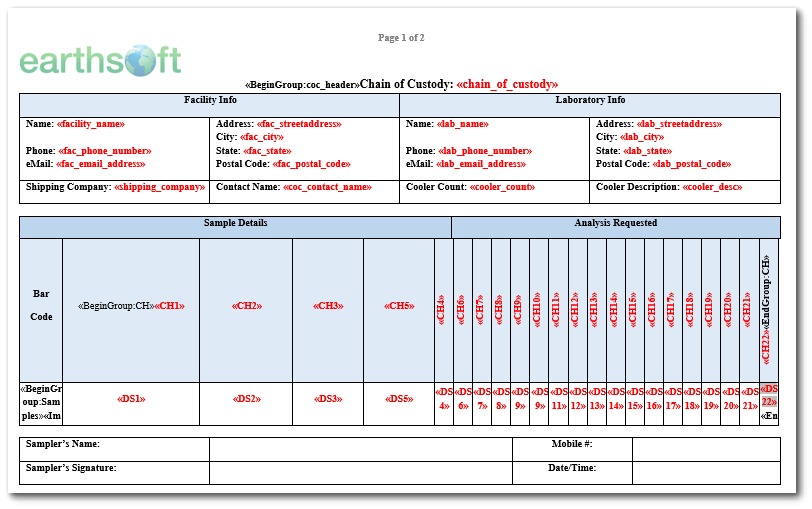
The second section (column headers) and the third section (sample rows) uses a little trickery to be able to print variable length information. For the column header section, field names “CH1” to “CH5” are fixed to print “Sample ID”, “Location”, “Date”, “Matrix”, “Total # of Containers”, “Start Depth”, “End Depth”, “Depth Unit”, “Sample Type”, “Sample Method”, “Sample Name”, “Sample Name”, “Num”, “Sample_Custom_Field_4”, “Sample Parameter”, “Sample_Filtered”, “Sample Start Date”, “Sample End Date”, “Composite_YN”, and “Medium Code”, respectively. Field names "CH6" to "CH22" are set to print the MAG codes sequentially. It is important to leave all 17 fields in the document in case the list of MAG codes reaches that number.
To add a header row in the second section, use merge fields <<BeginGroup:TableName>> and <<EndGroup:TableName>> in the first column and last column. Field Names "CH6" to "CH22" are used to print containers information sequentially with respect to MAG codes. Please refer to the table below for the appropriate TableName of different header rows.
Header Row |
EQuIS Table |
Field |
TableName |
|---|---|---|---|
Sample Analysis |
DT_CHAIN_OF_CUSTODY_MAG |
METHOD_ANALYTE_GROUP_CODE or REMARK1 |
CH |
Container Description |
DT_CHAIN_OF_CUSTODY_MAG_CONT or DT_SPM_SCHEDULED_CONTAINER / RT_SPM_CONTAINER |
CONTAINER_DESC / CONTAINER_CODE2 or REMARK / CONTAINER_CODE |
Containers |
Preservatives |
DT_CHAIN_OF_CUSTODY_MAG_CONT or DT_SPM_CONTRACT_CONTAINER |
PRESERVATIVE |
Preservatives |
Filtered |
DT_CHAIN_OF_CUSTODY_MAG_CONT or AT_SPM_CONTRACT_MTH_CONTAINER |
FILTERED |
Filtered |
Holding Time |
DT_CHAIN_OF_CUSTODY_MAG_CONT or DT_SPM_CONTRACT_CONTAINER |
HOLDING_TIME+ HOLDING_TIME_UNIT or REMARK3 |
HoldingTime |
No. of Containers |
DT_CHAIN_OF_CUSTODY_MAG_CONT or DT_SPM_SCHEDULED_CONTAINER |
NB_OF_CONTAINERS |
Nb_Containers |
Container Type |
DT_CHAIN_OF_CUSTODY_MAG_CONT or DT_SPM_SCHEDULED_CONTAINER |
REMARK3 |
Container_Type |
Container Size or Volume |
DT_CHAIN_OF_CUSTODY_MAG_CONT or DT_SPM_SCHEDULED_CONTAINER |
REMARK3 |
Container_Size |
1Depending on selection of the “Analysis Header” report parameter.
2If first column value is empty, then it will show second column value.
3If remark is used to save Container Type, Container Size and Holding Time separated by “|” in the exact same order.
The sample rows section field names “DS1” to “D5F” are the actual data value corresponding to the column header above. If the column headers “CH1” to CH5” are switched around or excluded, the sample row fields should follow the header changes. The “D5G” column will show sequential number for sample rows. Field names “DS6” to “DS22” should also align with the “CH6” to “CH22” headers.
Note: It is important to leave the <<BeginGroup:CH>> and <<EndGroup:CH>> tags where they are placed in the column headers sections as they control the begin and end of one COC. Thus, if there are multiple COC in the report, the current placement of these controls will force the next COC to print on a new page.
For the sample rows section, it is important to leave the <<BeginGroup:Samples>> and <<EndGroup:Samples>> tags where they are placed as these control where the row of data will print. |
The barcode, the first column in the sample row section, has the field name “image:bc_sys_sample_code”. The barcode header and bar code image can be relocated. EarthSoft recommends to not delete this field since the report parameter has the option to print a bar code and the report will generate an error if the bar code printing option is selected and the bar code field is not in the template.
The COC ID Barcode can be added to the COC Word Template using the field name <<Image:bc_chain_of_custody>>. If the COC Word Template has a repetitive header or footer, then use simple text as bc_chain_of_custody. The COC ID Barcode Type can be selected as "1D" or "QR" using the report parameter.
All other non-merge field items on the document template are free to be modified, deleted, and/or added. Bit mapped images or pictures of company logos can be inserted anywhere in the document.
Note: The date format used on various date/time fields can be customized in the DOTX file. Perform the following steps to customize the date format in the template file: 1.Open the DOTX file. 2.Find the merge field for the date value (e.g., ‹‹DS3›› for the sample date). 3.Right-click it and select Toggle Field Codes. 4.Add a date modifier inside the curly brackets ({}) to set the new date format. The following example sets the date format to MM/dd/yyyy. { MERGEFIELD DS3 \@ "MM/dd/yyyy" \* MERGEFORMAT } 5.Save the template (DOTX). |
The template needs to be loaded to the DT_FILE table (as noted above in this article) before the template is available to be selected in the report’s “COC Word Template” parameter. It is recommended to create a backup of every template used and created.
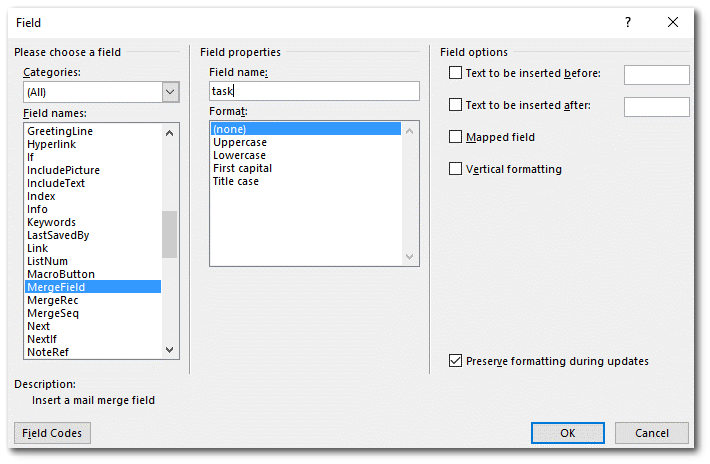
To create a new Word template, it is helpful to start with the example “Collect_COC_template”, save as a new filename, and then modify the template as desired. Lastly, before working on any template changes, familiarity with the Word Field screen (as seen below) is recommended.
Conditional Fields
The COC Word template supports Conditional fields. For example, if Composite_YN field (DT_FIELD_SAMPLE.COMPOSITE_YN) is “Y” then show “Composite” as an output else show “Not composite". Here is an example of the formula for the IF condition:
{ IF { MERGEFIELD X } = "Expression" "If condition met" "If condition not met" }
To setup the IF conditional field code correctly for COMPOSITE_YN for example, follow the instructions below. The steps apply to any IF conditional merge field in the Collect – COC template:
1.In the COC Word template, right-click on the merge field where you want to add the IF condition and select "Edit Field"
2.Under "Field names", select "If".
3.In the "Field codes" enter the conditional formula then click OK.
a.Example syntax: IF MERGEFIELD D5M = "Y" "Composite” "Not composite"
b.This formula checks if the <<D5M>> tag (i.e. COMPOSITE_YN value) = Y, then outputs "Composite", else it outputs "Not composite"
4.Right-click on the tag again and click "Toggle Field Codes" (or use Shift+F9) to display the field code.
5.Within the formula, highlight MERGEFIELD D5M and press Ctrl+F9 to insert field code curly braces { } around MERGEFIELD D5M.
a.The field code should look like this example: { IF { MERGEFIELD D5M } = "Y" "Composite” "Not composite" }
Warning: It is recommended to insert the field code curly braces { } around MERGEFIELD D5M using Ctrl+F9. Do not insert the curly braces using the keyboard. |
6.Save the template as a *.dotx file.