This article describes the process of pre-populating forms with data to be available on the Collect Mobile application. Pre-population of data can be added to any template. Select a data mapping template that will be used to create the data. Link a user report with the desired data to the template and map data to the fields available in the template.
Warnings: •All records in data forms with pre-population enabled must follow the configured data set constraints before being available in Collect Mobile and the Web Forms widget. During pre-population the data set will, in combination with the Key fields in the pre-population mapping, define the record uniqueness. If there are two records with the same Key field values or data set value, only one will appear in the resulting data form during pre-population. •Selecting a different base report for a report that has pre-population configured can result in the pre-population logic being erased from the pre-populated report. |
Tips: Template Pre-population Best Practices •Create a user report in Enterprise or Professional and then select the user report, via the Selected Report interface in the pre-population section of the template, to pre-populate a template. •Refer back to the user report parameters by navigating to the Reports section in Collect Enterprise. •Adjust the user report or report parameters when creating the associated data forms (i.e., make the pre-population report changes at the data form level, rather than at the template level), as needed, to get the desired report output. •Select one SPM Task Code value when configuring the pre-population parameters for the Collect – Field EDD, if the workflow permits. •If large records (i.e., >2000) and/or complex pre-population mappings are configured, or more than one SPM Task Code is to be run, the data form can be generated using a Collect – Form Generator EIA to avoid timeouts. |
|---|
Add Pre-population to a Template
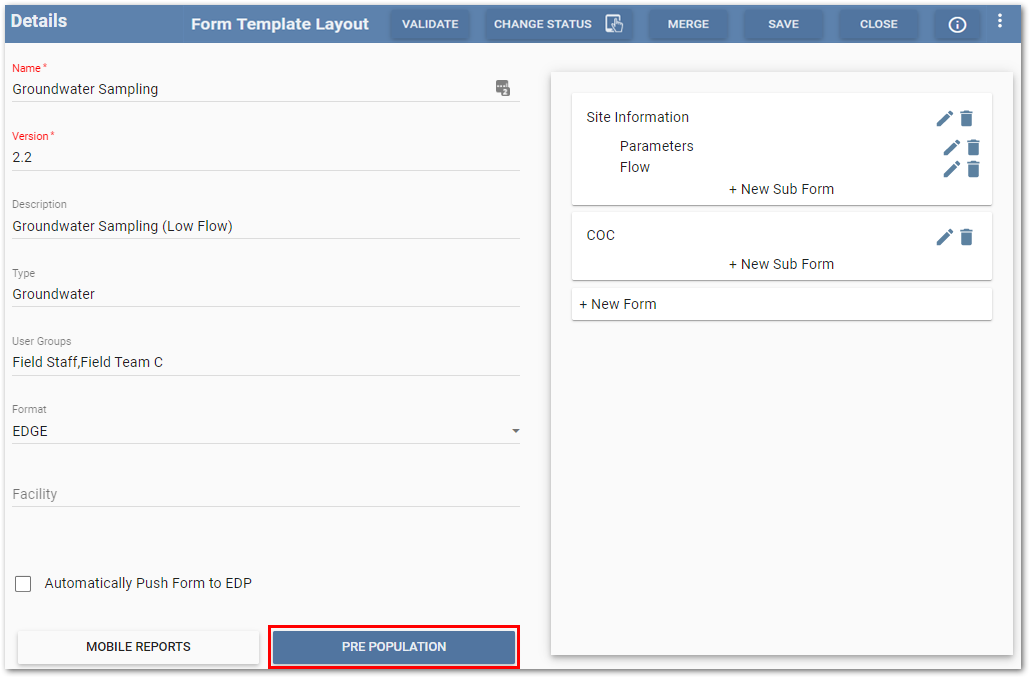
Select the Pre Population button in the Form Template Layout window to open the Pre Population dialog.
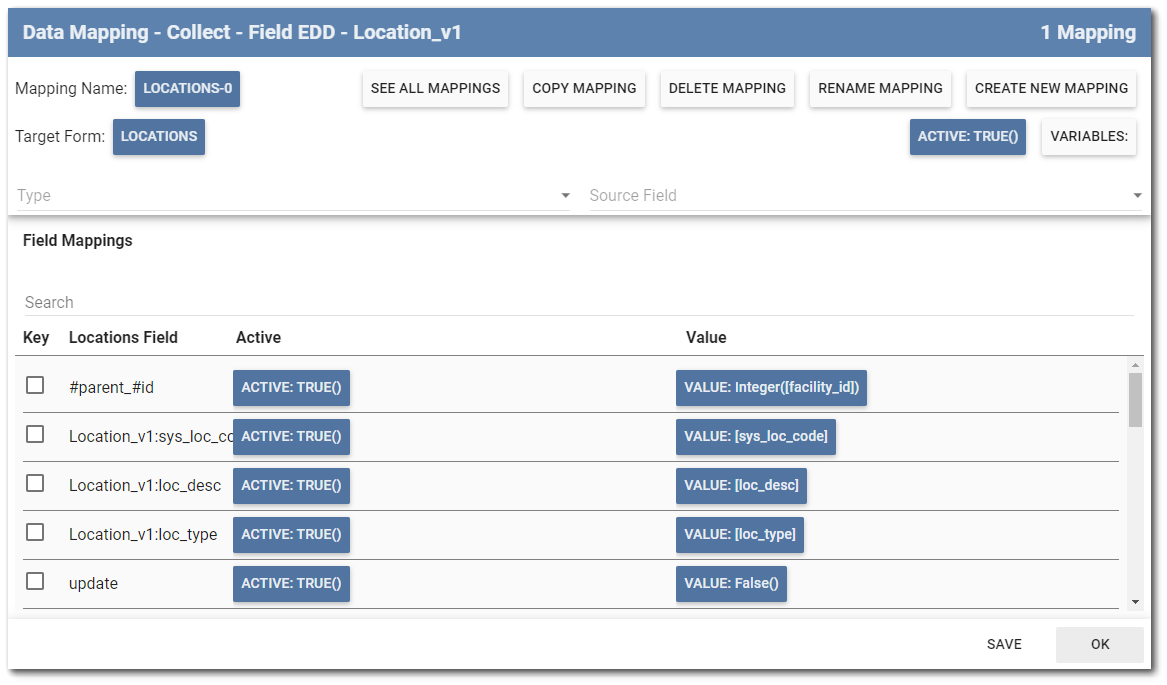
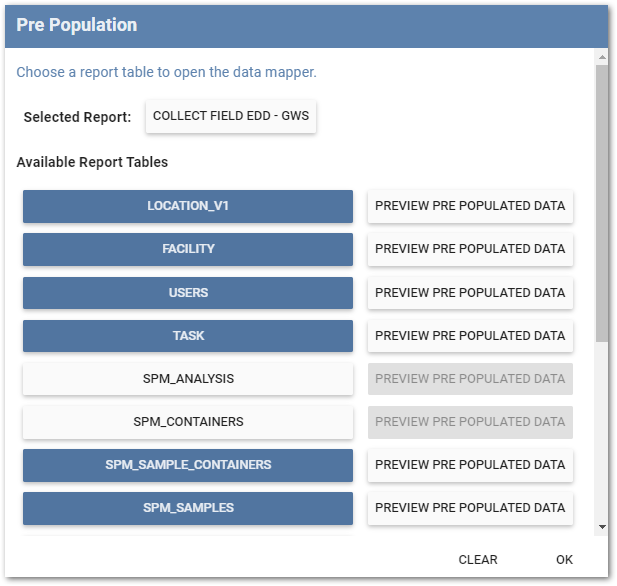
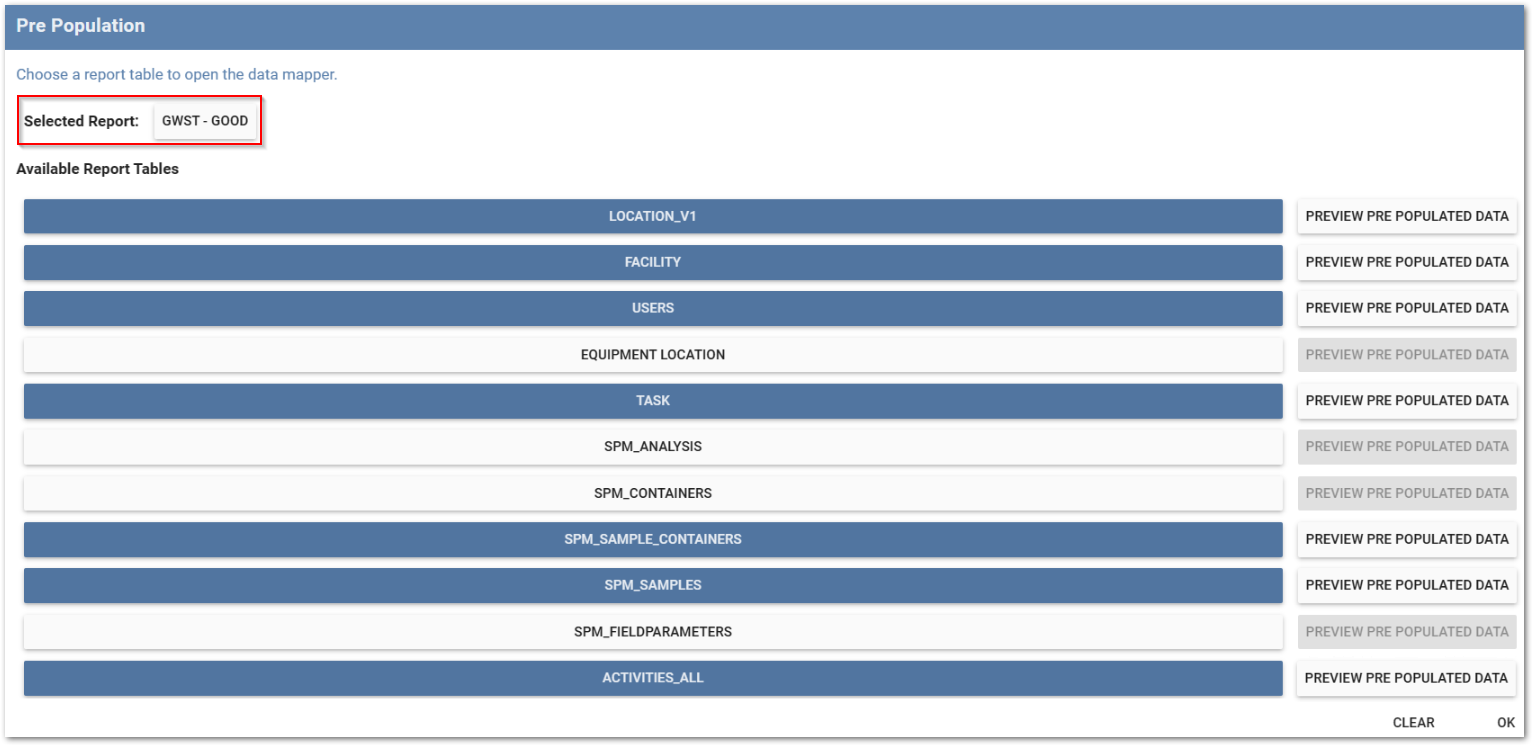
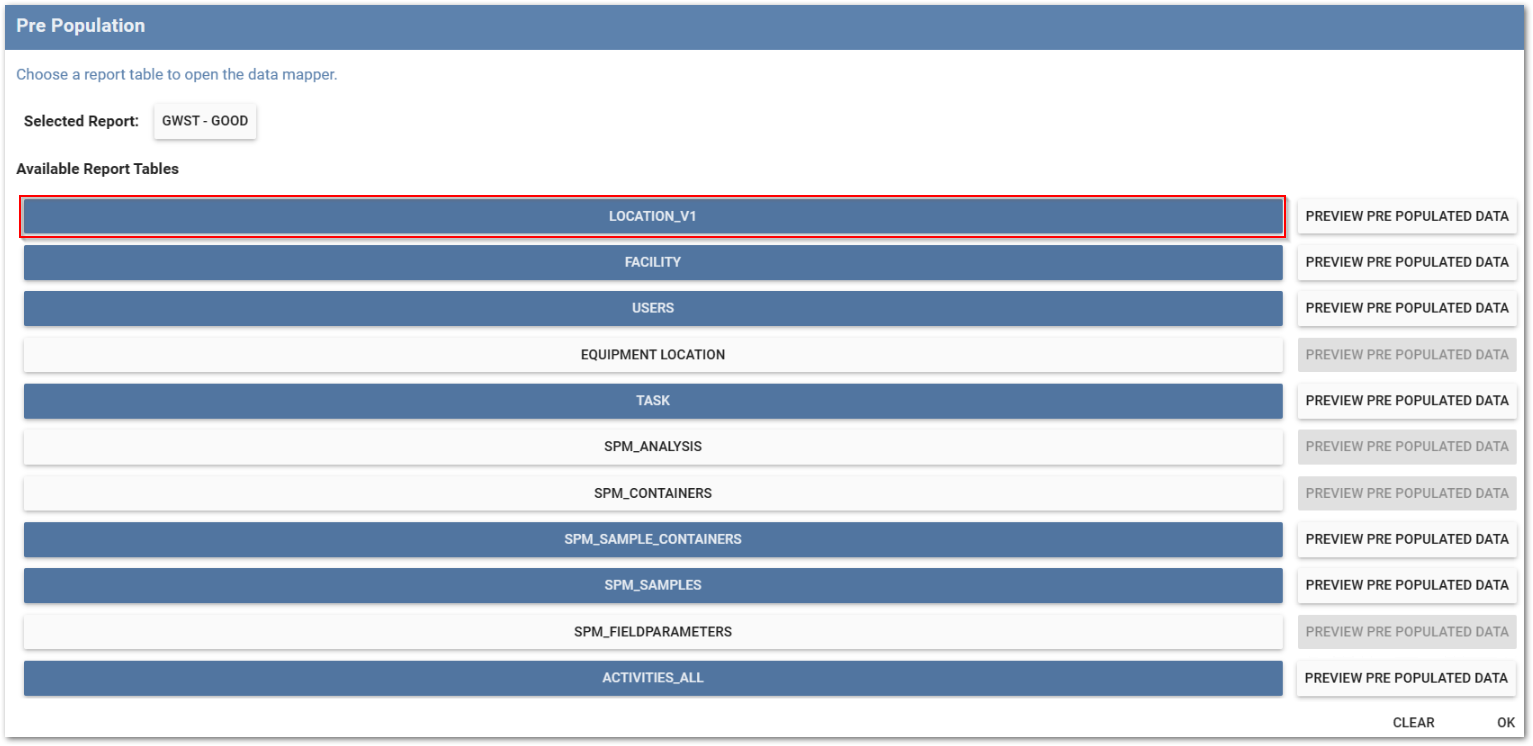
Click the Select Report button to open the Report Chooser and select the desired user report. In the image below, the user report "Collect - Field EDD" was selected. The available report tables are displayed. Select a table to open the Data Mapping window and map data as needed. See the Data Mapping article for details on the data mapping process. Tables that contain pre-population data mappings are highlighted in blue to be easily discernible. Users can easily check for common problems in the pre-population mappings by selecting the Validate button. Any validation errors, if present, will be displayed in an error dialog window.
Clicking the OK button will save and close the dialog window. Clicking the Save button will save the current data entered and keep the dialog window open.
Note: Upon modifying any existing pre-populations, a user will be notified if over-writing existing pre-populations. |
|---|
After adding pre-population tables, users can preview the pre-populated data that has been added. To preview the pre-populated data, select the Pre Population button in the Form Template Layout window, then click the Preview Pre Populated Data button next to a table highlighted blue, signifying the table has pre-population configured. The Clear button can be used to clear all pre-population data mappings.
Note: The data types of target fields can influence how formulas evaluate when previewing pre-population data, which can alert the user to potential issues that might be encountered when pre-populating a Data Form. |
|---|
The Preview Pre Population window opens displaying the data that has been added from the specified tables to the template fields. Within the Preview Pre Population window, a Log button is available when previewing pre-population data for a template.
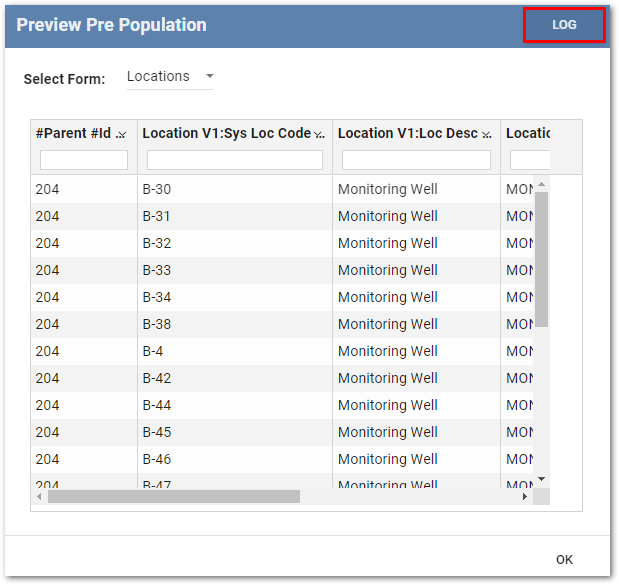
Clicking the Log button displays chronological steps about the pre-population sets being run for the report. The logs contain detailed records, including the number of rows processed, created, modified, skipped, or ignored, which can be helpful for troubleshooting issues.

Note: When populating child form data using the #parent_#id field identifier in a pre-populated mapping, if the parent form does not exist the mapper cannot create the child row.
When creating a pre-population template, be sure to setup child form population as a linked mapping to the parent form population so that the parent form record is created before the child form record. |
|---|
Example
As an example, the following steps demonstrate how to use this feature to pre-populate monitoring locations into a Collect template and form.
1.Create a template. For this example, a Water Level template has been created with the following fields:
•WATERLEVEL_V1:SYS_LOC_CODE
•WATERLEVEL_V1:MEASUREMENT_DATE
•WATERLEVEL_V1:DRY_INDICATOR_YN
•WATERLEVEL_V1:WATER_LEVEL_DEPTH
•WATERLEVEL_V1:DEPTH_UNIT
•WATERLEVEL_V1:TECHNICIAN
•WATERLEVEL_V1:REMARK
•WATERLEVEL_V1:HISTORICAL_RANGE
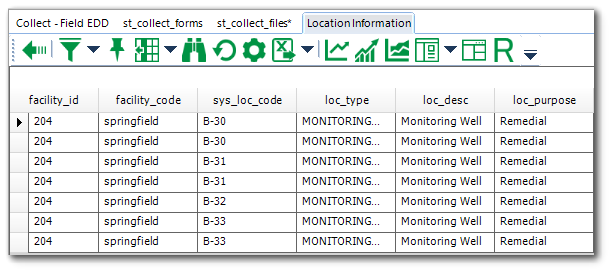
2.Create a user report form using the Location Information report from either EQuIS Professional or Enterprise. In this example, a springfield_locations user report was created in EQuIS Professional.
3.In the Form Template Layout page, click on the Pre Population button to open the Pre Population dialog box.
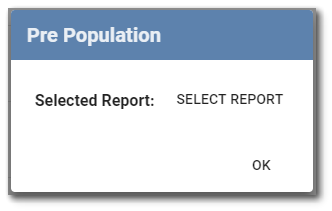
4.Click the Select Report button to open the Report Chooser and select the desired report. In this example, the user report "springfield_locations" is selected. Click OK.
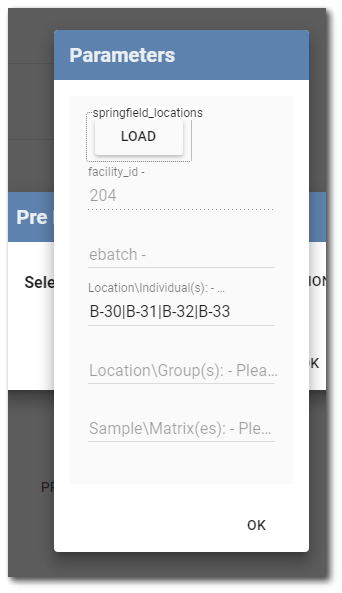
5.On the Parameters dialog box, click the LOAD button to load the report parameters. Click OK.
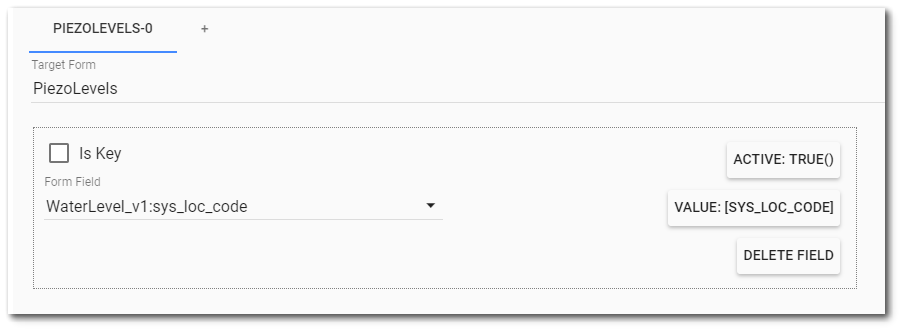
6.The mapping between the report and template can now be performed. Click on the report table to be mapped. In this example, the report table is V54_Location_info. On the mapping form, select the Target Form from the template and click Add Mapping.
7.Click Add Field and select a field from the form and a value from the report. Extra fields can be added, but in this example, only the SYS_LOC_CODE is added. The example data mapping is show below.
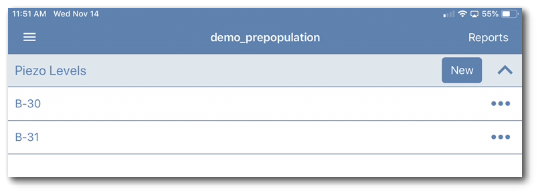
8.On the Forms page, create a new form. In this example, the new form is created using the Water Levels template and titled demo_prepopulation. The User Report button can be used to open a specific user report and add extra filters. In this example, only B-30 and B-31 are selected from the location list. Click OK and Save. Note that the form is now pre-populated with the specific report data.
9.The new form with the pre-populated data will be available for download on a mobile device. In this example, the form demo_prepopulation has two records pre-populated with locations B-30 and B-31.
Note: The following methods can be used to map two pre-population report sections to one pre-population mapping in Collect Mobile: •Use the GET function to pull the value from one pre-population report table to another. •The two pre-population report sections can be mapped to the same pre-population mapping in Collect Mobile if they share matching key field and value pairs. |
|---|
Updating the Selected Report for Existing Pre-population
The Selected Report configured for pre-population may be updated in several scenarios, such as migrating a template from one site to another where the previous Selected Report is not available, or when the previously used User Report has been deleted. When the Selected Report is updated, the following steps will ensure that the pre-population is properly updated:
1.Configure the new user report or report parameters in the Selected Report field in the Pre-population window.
2.Click on one of the highlighted blue report tables to open the pre-population logic.
3.Clicking OK will save and close the dialog window. Clicking Save will save the current data entered and keep the dialog window open.
4.After clicking OK, the user will be prompted to overwrite the pre-population.
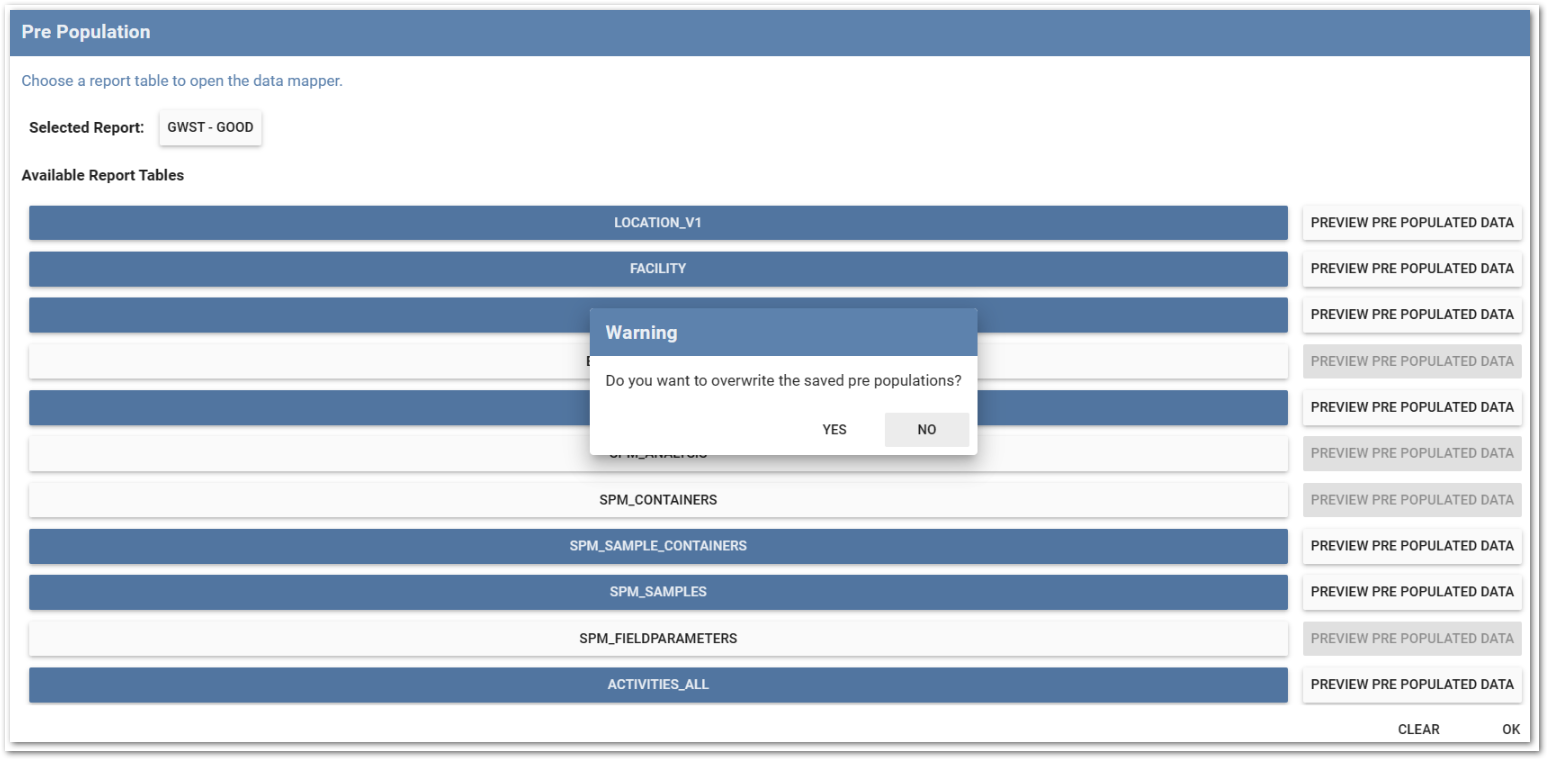
5.Click Yes to overwrite the pre-population.