•Table (all rows in facility) Mode
•Table (all rows in database) Mode
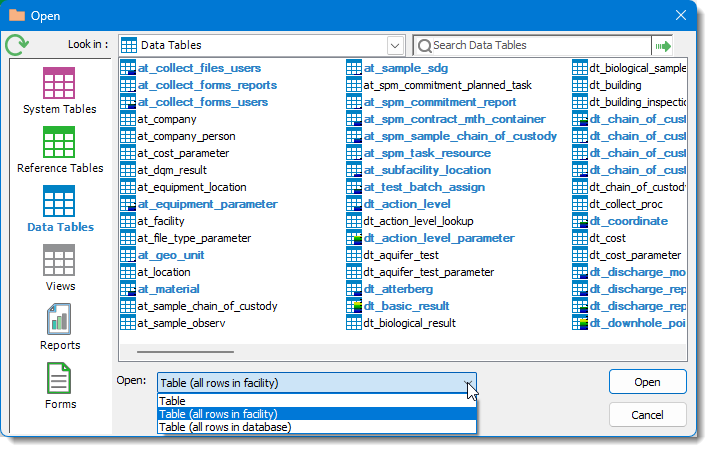
For EQuIS Professional administrators (Application Level Security admin or direct SQL connection), there are three modes for opening a Data Table or View. Access these through the Open drop-down within the Open Window.
Option |
Definition |
Open just the table or view (with no data). Set filters on desired columns, then select the Refresh |
|
Open the table or view with all of the rows for the current facility, excluding records from other facilities. |
|
Open the entire table or view, regardless of which facility the data belong to. Use this option only when necessary, since opening an entire table or view may take a long time and consume a large amount of system resources. RT_* tables do not show this, and ALS users may also see restrictions here. |
To open an already-open table in a different mode, remove the table from the Workspace by right-clicking on the name of the table and selecting Remove item. Simply closing the table and reopening it opens it in the same mode it was originally opened in.
Note: For non-administrator ALS users, table display may be limited based on the Effective Permissions of the user. |
Table (all rows in facility) Mode
The Open drop-down defaults to the Table (all rows in facility) option. When a table is opened in this mode, rows show the data pertinent to that facility (i.e., the FACILITY_ID in that table equals DT_FACILITY.FACILITY_ID for the current facility). For example, if several different facilities exist within a single database and the DT_LOCATION table is opened using the Table (all rows in facility) mode, every location in the current facility will be displayed, but all other locations in the database, from different facilities, will not be shown.
The Table (all rows in facility) option is only available if the table has a FACILITY_ID column. Some tables do not contain a FACILITY_ID column and are potentially large (such as the DT_LOGGER_DATUM table). Open a subset of the table by adding a related child table to a parent table (such as the DT_LOGGER or DT_LOGGER_SERIES table).
Table (all rows in database) Mode
The Table (all rows in database) option opens the selected table without considering facility. The table opened will simply display all rows in the database, regardless of what facility they belong to. This option may take longer to open a table, depending on factors like the number of facilities in the database, the table being opened (e.g., the DT_RESULT table typically contains many more rows than the DT_LOCATION table), and network speed.
Note: When logged in with Application Level Security, Administrators and permissioned Non-Administrators (i.e., Non-Admin users with Viewer permission on all facilities) can see the Table (all rows in database) option. |
Table Mode
Based on the row counts, a user may want to open the table without data so that it loads faster. The Table mode does not show any records upon opening and thus loads quickly compared to a table with many records. Use Table mode as follows:
1.In the Open window, select a data table.
2.Click the Open drop-down under the table listing, then select the Table option.

3.Open the table. The columns will appear, but no records.
4.Add filters to columns as desired.
5.Click Refresh ![]() in the Grid Toolbar to display only the records that meet the criteria.
in the Grid Toolbar to display only the records that meet the criteria.
This mode of operation exists for efficiency. For example, opening over 10,000 records, compared to just a subset of data, could cause performance issues. Users must be familiar with the table’s data to effectively use this mode.
Note: When using the Filter row to filter a data table in Table mode, a user may receive an error if special characters such as "#" or "," are used. As a workaround, please use a custom filter instead, as discussed in the Using Custom Filters on Data Tables page. |
Example
To illustrate the use of this mode, consider reviewing water levels in a specific well, B-34, after 2016. Instead of opening the DT_WATER_LEVEL table and displaying hundreds or thousands of records and narrowing that information down to B-34 and 1997 onwards, first indicate those parameters and then display just the information of interest. Follow the steps below.
1.Open the DT_WATER_LEVEL table with "Table" selected under the "Open:" drop-down under the list of tables.
2.With the filter row turned on, type "B-34" under SYS_LOC_CODE.
3.Click on the '=' sign on the left side of the 'measurement_date' filter cell.
4.Change it to 'Greater than or equal to'.
5.Type in the date for the first day of 2017, formatted to match how dates display in the database based on the regional settings (e.g., '01/01/2017' or '2017-01-01').
6.To display the data, click the Refresh ![]() icon.
icon.
Note: The FACILITY_ID is filtered to the current facility by default. |