The Field Sample Form can be constructed using a variety of data fields, and may be customized further with a client logo. For further information on the logo feature, go to Form Logos. The following table illustrates the types of data available in the form and in which EDGE data tab the corresponding data will be stored:
FieldSampleForm Section Name |
Corresponding EDGE Data Tab |
|---|---|
Location |
Location |
Sample |
Field Samples |
Climate Conditions |
Weather_Conditions |
Water Level Purge |
Water Levels (Note this is for purge data NOT water level collection) |
Volume Purge |
Water Levels/Purge sub-tab |
Activities |
Activities, Activity Form |
Field Analysis* |
Field Results sub-tab |
Lab COC & Analysis* |
COC sub-tab, COC Manager |
*Included in the form by default. |
|
As the form is built using fields from these various data sections, collapsible form sections can be automatically added to or removed from the form.
To build the form and to:
1.Immediately add a default form layout, select "Default Layout" from the toolbar. Various fields from the Location, Sample and Water Level sections are automatically added to the form.
2.Add, remove or edit fields. Example: in the Location section, select the "Setup" menu from the toolbar, then select "Location".

3.A "Data Section" window will appear. All Data Sections available from the "Setup" menu may be edited as follows:
a.Check box - toggle to make a field visible/invisible.
b.Display Text - user friendly name for the selected field.
c.Default - Auto-fill the fields when a new sample record has been made.
To reorder the fields, highlight the required field and click the up/down arrows until desired layout is achieved.
d.Field Size - determine the size of the field box. If you set it to automatic, it will auto-adjust depending of the character limit of the column fields.
e.Spacing - space betewen the fields on different lines
f.Readonly - the field is not editable
g.Editable - allows to edit the read-only drop-down fieldsSpacing- it adds the spacing between fields
h.Alert on Value Change- setting it to true, will alert of any changes made to the specific field.
i.Radio Button - selection for enumerations

Data Section
4.Exit the Data Section window by clicking Save.
a.The edits will now be displayed on the Field Sample Form. The chosen columns appear as members of that section of the form. If no fields are selected in a particular section, that section will not be visible.
5.To reorder the sections of the form, click Order. Select a section from the list and use the up/down arrows to reorder it within the list.
6.To select which parameters appear in the "Field Results" section, use the Analytes drop-down list. This gives options to:
a.Show/Hide all Groups (meaning field Method Analyte Groups)
b.Show/Hide all members of a chosen Group
c.Show/Hide individual analytes within a Group
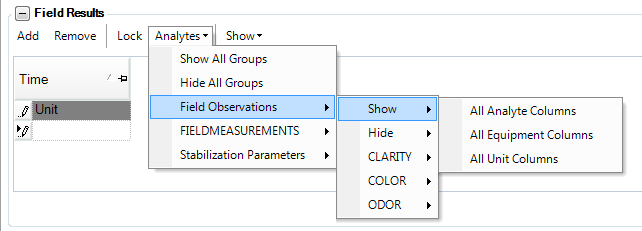
Note: The RT_MTH_ANL_GROUP.GROUP_TYPE value must include "field" for the Method Analyte Group members to be included in the Analytes drop-down. Click on Create Groups for Field Results Tab for more information. |
7.The Lab COC & Analysis section may be used to manage Chains of Custody (COCs), as described in Manage COCs from FieldSampleForm.
8.The Title of the form may be edited as explained in Configuration Plugin Tool.
9.Signature Panes may be added to the FieldSampleForm and Depth Form as described in Signature Panel.