The Activity form in EDGE provides a user-configured custom form for data that would otherwise be collected in the Activity tab. Like the Activity tab, the Activity form is used to populate the LocationParameter_v1 section of the EDGE EDD.
The Activity Form may be made visible using the “Show/Hide Tabs” item on the EDGE Menu as explained in the Data Tab Chooser article. There are several Activity forms that have identical functionality, but may be configured separately to provide different, unique forms.
Configuring Reference Values
The Activity form is comprised of sections. Each section of the Activity Form represents an Activity Group. Activity Groups can be easily added to the database via an EDD using the EDGE_Configuration Format, which is described in the Configuration Format article. Alternatively, they may be added to the database using SPM Activity Tables as described in the Setup Activity Tables article.
Populate groups as follows:
•group_code = name of the section.
•member_code = name of a line item in the section.
•member_desc = user-friendly description of the member.
•default_units = units for this parameter (optional).
•display_order = numeric value to determine the order the parameters appear on the form.
•remark = (1) "yes_no_values" to denote a yes/no line item, (2) the name of a valid enumeration in the EDGE-enum.xml file containing the possible entries for the line item, or (3) an EDGE data type (e.g., EDGE_TEXT or EDGE_DateTime).
The following are examples of valid entries for remark:
•Blank or "EDGE_TEXT" = EDGE will expect text entries (up to 255 characters).
•"EDGE_Integer" = EDGE will expect integer values (e.g., 1,2,3,4,5).
•"EDGE_Date" = EDGE will expect Date values.
•"EDGE_Time" = EDGE will expect time values in 24-hr format.
•"EDGE_DateTime" = EDGE will expect DateTime values.
•"EDGE_Label" = EDGE_Label can be used for a header on the form as a label, with no entry expected. To make it a white space (blank line), enter a space in the description.
•The List Name from the format enumeration (…-enum.xml) file. Uses the named enumeration list as the source of the field's valid values supplied in drop-down list. For example, enter “Colors” for an enumeration list of colors.
The parameters may be edited in EQuIS Professional in the RT_GROUP_MEMBER table.
Setup an Activity Form
Once the necessary Activity Groups are loaded into the EQuIS database, follow these steps to setup an Activity Form:
1.Create a new Reference Value File (RVF) to use in EDGE. Go to Create Reference Value File for more information on this process.
2.Launch EDGE and load the new RVF.
3.Configure the Activity Form caption as in Form Logos (optional).
4.Add sections to the Activity Form.
a.With the Activity Form tab selected, go to the Form ribbon.
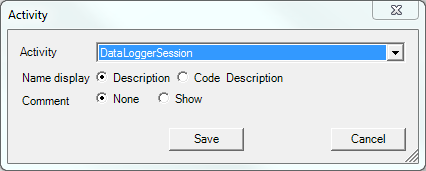
b.Choose the desired Activity Group from the drop-down menu. For example, Activity Sections (Activity Group) and subsequently the Activity Group Member (Surrounding Area).
c.Choose whether to display only the Activity Group Member description or both the code and description.
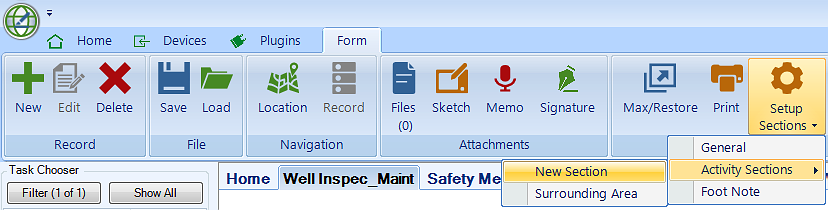
d.Click Save. Sections will be displayed on the form in the order in which they are added to the form or as specified in RT_GROUP_MEMBER.DISPLAY_ORDER.
e.Additional sections may be added to the form in the same way. Each section is collapsible.
5. The Activity Form may be customized with a logo (for further information click on Form Logos).
Using the Activity Form
Once setup is complete, the Activity Form is ready for use as follows:
1.Select the desired Task in the Task Chooser.
2.Select the desired Location in the Location Chooser.
3.Click New to create a new instance of the Activity Form for the selected Location.
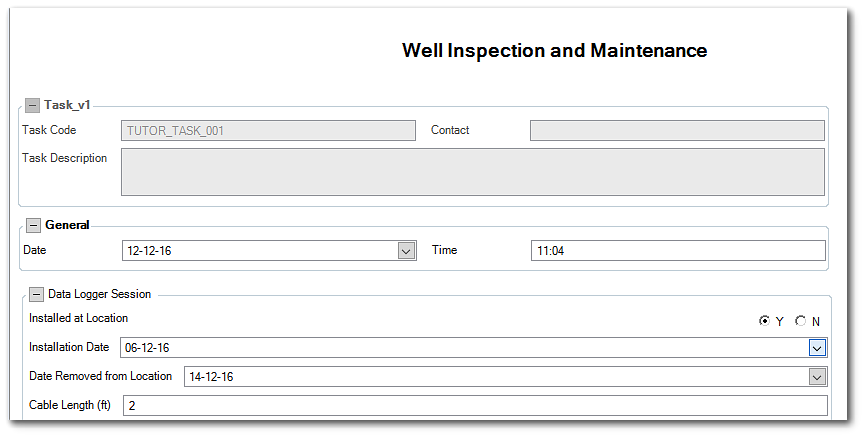
4.Populate the values in each section as appropriate.
5.To create another instance of the form for the same Location, click New again. Note that two instances of the form cannot exist at the same date and time, as these values help differentiate record uniqueness in the LocationParameter_v1 section of the EDGE EDD.
6.To navigate between instances of the form at a particular Location, use the Record Chooser located on the form tab. Note that you can only access to the record chooser if more than one instance of the form exists at the selected Location.
7.To delete an instance of the form, click Delete, then click Yes to confirm.
8.To print an instance of the form, click Print.