EDGE performs calculations during entry of Water Level and Purge data. Auto-population of fields depends on what other data are available in the EDGE EDD. For example, see the Warnings on Historical Water Levels article for information on exporting the historical data needed for certain checks and the Purge Calculations for Probe Data Collection Intervals article to setup the data capture interval for probes using purge data.
The content of the Water Level and Purge sections in the Ground Water (GW) form can be managed from the Setup icon within the View group on the Form ribbon.
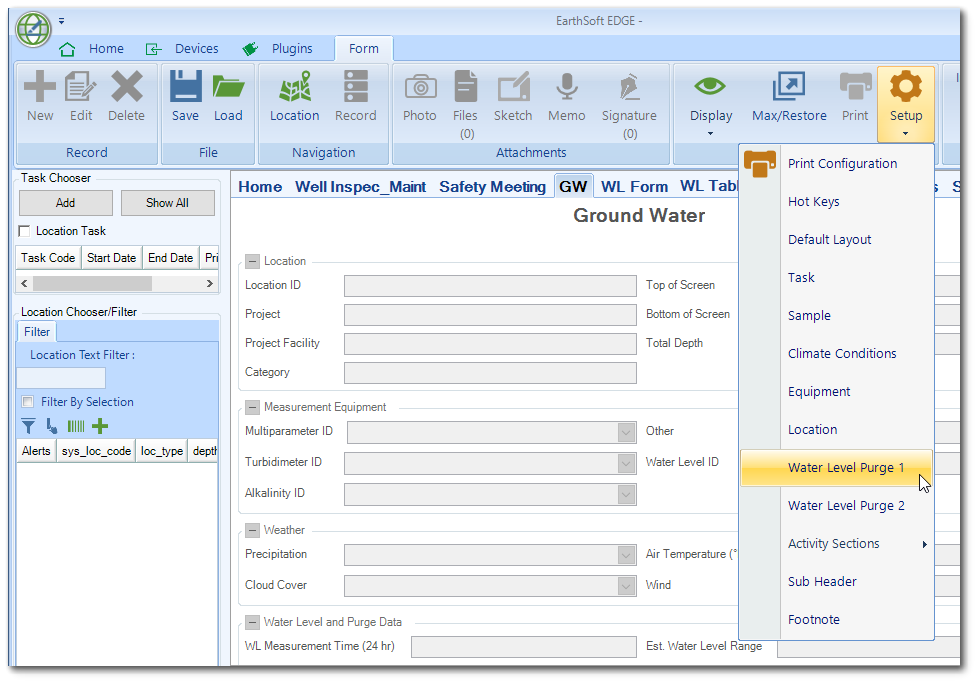
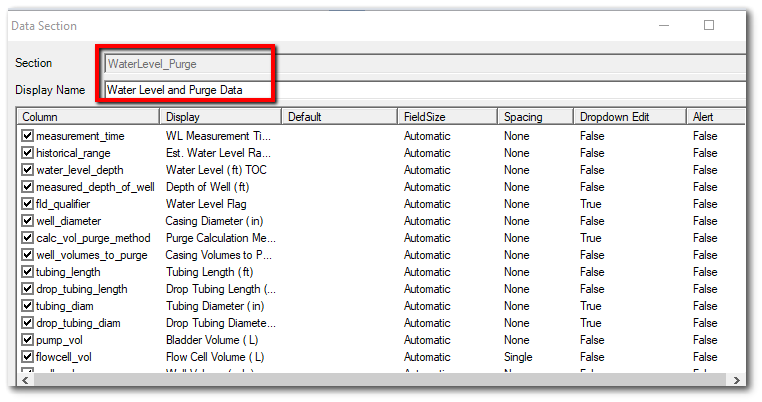
Select Water Level Purge 1 on the Setup menu to modify which parameters from the WaterLevel_Purge section of the EDGE format display in the Water Level and Purge Data section on the GW form. Select Water Level Purge 2 on the Setup menu to modify which parameters from the WaterLevel_Purge section of the EDGE format display in the Purge Information section on the GW form. All checked columns will appear on the form.
To enter data in the Water Level and Purge Data and Purge Information sections on the GW form, perform the steps below.
Note: The GW form is a customized version of the FieldSampleForm that is provided with EDGE. |
1.Create a new record.
a.GW Form (FieldSampleForm) – Click New on the Form ribbon to create a sample record.
b.Field Samples Tab – Select a sample record, click the Initial Water Level & Purge Data sub-tab, and then click Add.
2.Enter the Measurement Time (required field). Note that some data will be automatically populated at this stage.
a.Historical Reference Elevation (from Location data; Location_v1.RefElev)
b.Total Depth of Well (from Location data)
c.Well diameter (from well data; requires selection in the EDGE Field EDD)
3.Enter the Depth to Water and Total Depth of Well (as measured in the field during this event). The Length of Water Column and Water Level Elevation will be calculated automatically. A warning will show if the depth to water is outside of a historical range or is below the bottom of the screen.
4.Enter Depth to LNAPL and/or Depth to DNAPL, if appropriate.
a.Values will be compared to a historical LNAPL range, if available.
b.LNAPL depth will be compared to Depth to Water to calculate the thickness of the LNAPL layer. If LNAPL depth > Depth to Water, warning highlighting will appear on both fields.
5.Select the Depth Unit from the drop-down list.
6.Enter the Diameter of the Well (if not already populated) and select the Diameter Unit from the drop-down list. The Well Volume will be calculated and the Volume Unit will be selected, based on the Depth and Diameter Units. The Volume Unit can be changed with the drop-down list and the Well Volume will be re-calculated.
7.To determine the Calculated Purge Volume, enter the Wells Volumes to Purge. Alternatively, choose other methods to calculate the required purge volume in the Purge Calculation Method field:
a.Casing Volume – Described above, uses well data to calculate purge volume.
b.Equipment Volume – Populate tubing length and diameter, Drop tubing length and diameter.
c.Well_l/f – The purge volume is calculated using (depth of well-depth to water)*0.03 L/ft.
Some of the same procedures, checks and calculations apply to the Water Level tab.
Water Levels
Populate data available from the Location_v1 section of the EDD:
•Location_v1.RefElev > historical_reference_elev
•total_depth_readonly
•top_of_screen_readonly
Purge (Initial Water Level & Purge Data Sub-Tab)
1.Populate data if it exists for the sample's location:
a.inner_diameter from historical data
b.depth of well
c.reference elevation
d.CAS RN for LNAPL present (from historical records)