•Copy Published Crosstab to Another Database
Any standard EQuIS report that produces a tabular output can have an associated Crosstab Report published to the database. Crosstab Reports cannot be published to the database if the associated parent report .dll file has not been published to the database or if the associated report is a function or stored procedure. After configuring the Column Header(s), Row Headers(s), Tabbed Data, and Options, publish the Crosstab Report.
Watch the Office Hour video on Saving EQuIS Reports and Crosstabs to learn more.
Note: The Creator permission on the Reports Object Type (in addition to access permissions) is required to be able to open the Crosstab Publisher Wizard and to be able to publish Crosstab reports. The user who publishes a crosstab report will automatically be granted Owner permission on that report. |
Publish Crosstab Report
1.Check to make sure the Crosstab Report is configured as expected. Click Go ![]() on the toolbar to run the report.
on the toolbar to run the report.
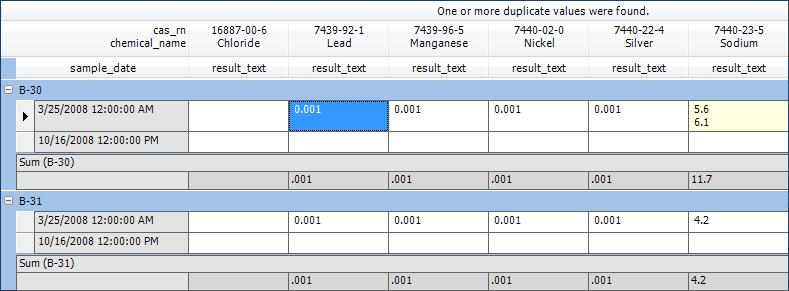
The Crosstab Report will be displayed in grid format.
2.Click Publish, and the Publish Report window will display.
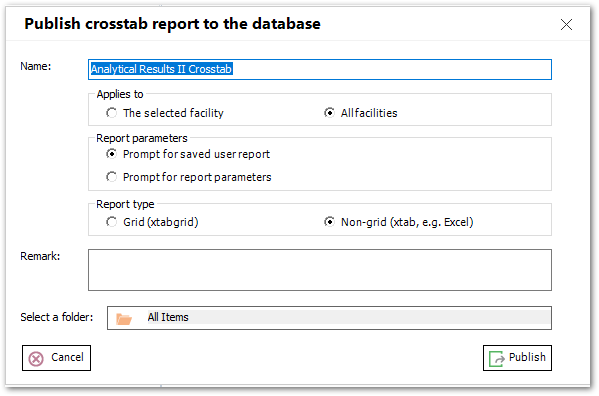
The input parameters of the crosstab report publisher map to the following fields:
Crosstab Report Publisher |
ST_REPORT |
|---|---|
Name |
REPORT_NAME |
Applies to |
FACILITY_ID |
Report type |
REPORT_TYPE |
Remark |
REMARK |
3.Enter the appropriate information as shown below.
•Name – Title the report. This will be the name of the report as seen in the Professional report list.
Note: The Name field defaults to unique text based on the underlying report name. If the text is altered so that it is the same as an existing published crosstab report, the application checks whether the user has at least Editor permission on the already published crosstab.
If the user has Edit permission on the existing published crosstab report, a prompt asks whether they want to update the existing crosstab report.
If not, the user is notified they do not have permission to overwrite the existing report and to use a different name. |
•Applies to – Radio button selection that determines from which EQuIS facilities this report may be run.
oAll facilities – Enables this report to be run from any facility within the current database.
oThe selected facility – Makes the report available in any facility only if user has access to the facility where the report was created.
•Report parameters – Radio button selection that decides how report parameters will be chosen.
oPrompt for saved user report (Default) – Asks user to select a saved User Report of the same type on which the crosstab was built.
oPrompt for report parameters – Allows users to reenter the report parameters (from original report used to create crosstab). This option does not require the User Report to be saved first.
Note: When running a published Action Level Exceedance Crosstab, take care that the same Action Levels that were used in the published crosstab configuration are used in either the chosen User Report or selected parameters. Also, when the published Crosstab of an ALE report has two or more action levels included, either: 1.Select the same action levels used to create the crosstab or 2.Select the same number but completely different action levels.
Selecting one of the original action levels combined with a different action level(s) generates a “Report did not return any output.” error. |
•Report Type – Select the radio button to choose grid output for use in Enterprise. Select "non-grid" for Excel output.
•Remark – Enter an optional remark about the report. This remark will appear in the tooltip that displays when hovering the cursor over this published report in the Reports list.
The Crosstab Grid is a report type and is used to denote a published crosstab that exports to a grid in Professional, instead of straight to Excel. When this box is checked, the ST_REPORT.REPORT_TYPE will be xtabgrid and selecting this report to run will show the data as a grid in Professional (instead of exporting to Excel like a normal published crosstab report). The published crosstab is a grid report, and it can be used in widgets that require grid reports (e.g., Traffic Light, Traffic Light Map, Time Series Chart, etc.). This allows users to define the crosstab logic (particularly useful with aggregates), and use that output as a grid report elsewhere in EQuIS.
•Select a folder – Select a folder defined in the RT_GROUP table. The default is "All Items". The folder listing displays RT_GROUP.GROUP_DESC if populated, or otherwise RT_GROUP.GROUP_CODE. When users do not select a folder (retaining that default), the publisher does not add the published report to a folder of the database. Otherwise, the publisher saves a record into the RT_GROUP_MEMBER table where:
•GROUP_CODE = RT_GROUP.CODE, determined by the selected folder name
•MEMBER_CODE = ST_REPORT.REPORT_ID of the published crosstab report
•MEMBER_TYPE = 'report_id'
4.Click Publish to publish the Crosstab report or update an existing report (in the ST_REPORT table), and save the report to a database folder when a folder other than "All Items" is selected.
Run Newly Published Report
1.Reconnect to the database or restart EQuIS Professional.
2.Click on Reports.
3.Locate the report by name (same as that assigned when published).
4.Open the report.
5.Select the appropriate parameters or saved User Report.
6.Choose an output type from the following available options:
*.xls
*.csv
When crosstabs are published as a non-grid report, the report parameters will include the @open_export report parameter in the ST_REPORT_PARAMETER table. This will be displayed as "Open on Export?" option in the report parameter selector when running the report. If this option is set to "True", the report will automatically open in a third party application (typically Excel) upon completion. If the parameter is set to "False", the report output will be created in the selected format and it will be saved in the Working Folder for the current facility. The Working Folder can be set by clicking the EQuIS globe (top left), then selecting "Options". This parameter controls export behavior in EQuIS Professional but is ignored in Enterprise.
Tips: •Some users encounter OutOfMemory exceptions when trying to export large Crosstab reports to Excel. An option is available to reduce memory usage (and increase speed) when exporting. •When using Excel templates to export a Crosstab report, the selected ColumnHeaders can be used as template codes. |
Copy Published Crosstab to Another Database
1.In the source database, open the ST_REPORT table and note the REPORT_ID of the published crosstab report in question.
2.Open the Blobber Form in the source database and select ST_REPORT from the Blob Table drop-down, and enter the REPORT_ID field corresponding to the published crosstab in the Key Value field. Select Download and save as an .xml file.
3.In the target database, run the base report (e.g., Analytical Results II) making sure to select expected fields, such as Location Group, Analyte Group or Action Levels to create the Available Fields for the crosstab configuration.
4.Open the Crosstab Configuration form and open the saved .xml file from Step 2 (if the old .xml file does not exist, it may be necessary to recreate the crosstab from scratch). Run the crosstab and export to Excel in Professional to ensure it is correct. It may be necessary to reselect or upload an Excel template if one is included.
5.Once the crosstab is configured and the configuration is saved again, publish to the target database using the Crosstab Publisher Wizard.
6.To allow Excel templates to show in Enterprise, open the Docs & Photos Form in Professional. Select the template on the left, and select the database or facility to upload it to on the right. Select Upload.
7.Open the DT_FILE table and note the FILE_ID of the new file. Check the FACILITY_ID to make sure it is correct. A null value will make it available to all facilities in the database.
8.Open the ST_REPORT table and enter the FILE_ID from Step 7 in the XLS column of the new published crosstab row.