Report Name: Collect – Form Generator
File Name: EarthSoft.Reports.Library.174498.dll
Dependencies: Licensed Collect Module, EarthSoft.API.Collect.dll, EarthSoft.API.Core.dll, and System.Web.Http.dll
Software: EQuIS Collect, EQuIS Enterprise
Source: EQuIS Collect install
Language: English
Output Type: Collect Data Form
Description: The Collect - Form Generator Report creates Collect forms in a manner similar to creating forms from the Data Form page in Collect Enterprise. The purpose of the report is to provide an automated way to repeatedly plan forms. The Collect - Form Generator Report is designed to run in Collect Enterprise using the EZView widget.
Installation Instructions: This report requires a licensed EQuIS Collect module and the Collect Schema applied to the database. For use, this report should be published to the database. Download the EQuIS Collect xcopy zip from the community center, unblock the *.zip file, and extract the EarthSoft.Reports.Library.174498.dll file to the EQuIS Professional installation directory. To be able to correctly publish the Form Generator report, the EarthSoft.API.Collect.dll, EarthSoft.API.Core.dll, and System.Web.Http.dll files must also be in the EQuIS Professional installation directory. For default installations, this directory is C:\Program Files\EarthSoft\EQuIS. The report will be available for selection once it has been published.
Overview:
The report can plan forms using Pre-Population (e.g., to be used in conjunction with SPM for scheduled tasks). An EIA can be setup to generate a new report (i.e., data form) on a specified schedule.
An example application of this report would be to collect weekly water samples, where a new data form is required for each week. An EIA can be setup to run the report at the beginning of each week to generate a new data form that would then be available for download to the Collect Mobile app.
Input Parameters: The Collect - Form Generator Report has the following input parameters:
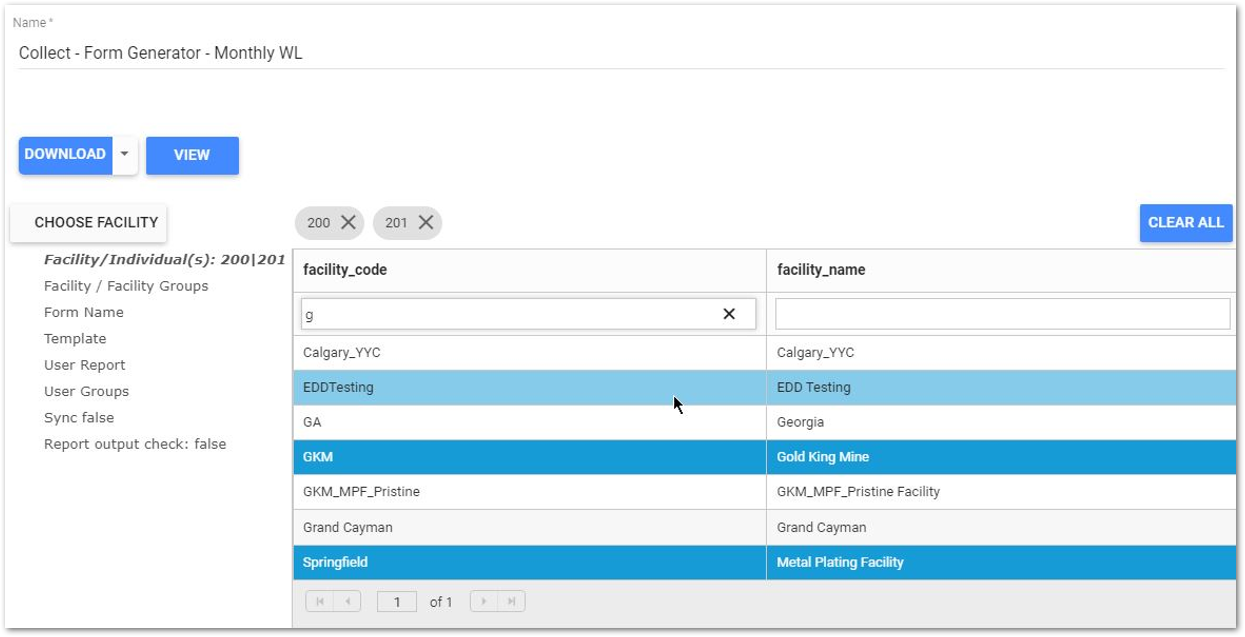
Facility/Individual(s) – The individual facility, or facilities, that data forms will be generated for based on the @facilityids report parameter value(s). Multiple values can be selected for the @facilityids parameter.
Facility/Facility Groups – The facility group(s), consisting of all individual facilities contained within the facility group(s), that data forms will be generated for based on the @facility_groups report parameter value.
Notes: •If both individual facilities and facility groups are populated as report parameters, the facility groups will take precedence over the individual facilities. •A facility or facility group configured in the Facility Chooser is not associated with the Collect - Form Generator Report. If a facility or facility group is not configured as a report parameter, data forms will be generated for all facilities. |
Form Name – This is the name of the generated Data Form. The report will add a time stamp (i.e., yyyyMMdd_HHmm format) when creating the form, and the facility code the form is associated with, to make sure the Form Name is unique. The name of the generated Data Form can contain a maximum of 60 characters.
Note: If the total number of characters is greater than 60, the date time and facility code take precedence, resulting in the user provided name being truncated so the name of the generated Data Form fits within the character limit. Example: •User Provided Name = This User Provided Name Is Too Long And Will Be Truncated •Date Time = 20230228_1008 •Facility Code = Springfield •Name of Generated Data Form = This User Provided Name Is Too Long And Will Be Truncated_20230228_1008_Springfield
In the example above, the complete Form Name is 83 characters long including spaces and underscores, so the final Form Name will be truncated to: This User Provided Name Is Too Lon_20230228_1008_Springfield. |
Template – The template that will be used for the Data Form. Only templates in Published mode will be listed for selection.
User Report – If the template should use pre-population, then select the user report to use. This does not filter the user report list to the report that was defined in the template; use the filter bar to locate the correct report.
Note: Selecting the incorrect user report (e.g., a self-referencing Collect – Form Generator user report) may cause any scheduled EIA task(s) to be obstructed (i.e., remain unprocessed) so the data form will not be generated as expected. |
User Groups – Select the user group(s) that will have access to the new Data Form when it is created. The user group list is based on the user groups assigned to the template that was selected in the "Template" parameter.
Sync – Set to TRUE if the new Data Form will have sync enabled.
Report Output Check – When set to TRUE, a data form will only be created only if the report generates an output. Default is FALSE.
Example Workflow
Scenario: Water levels are measured each month at the facility. SPM is used to plan and schedule the water level monitoring task. The data will be captured using Collect. Using an EZView widget in EQuIS Enterprise, an EIA is setup to automatically send the data form created by the Collect - Form Generator report, which uses the Collect Water Level template and the Collect - Field EDD report for pre-population of SPM tasks and monitoring well locations.
SPM
1.Create a plan that includes the water level monitoring activities. In this example the Task Type has been set to GW Quantity.

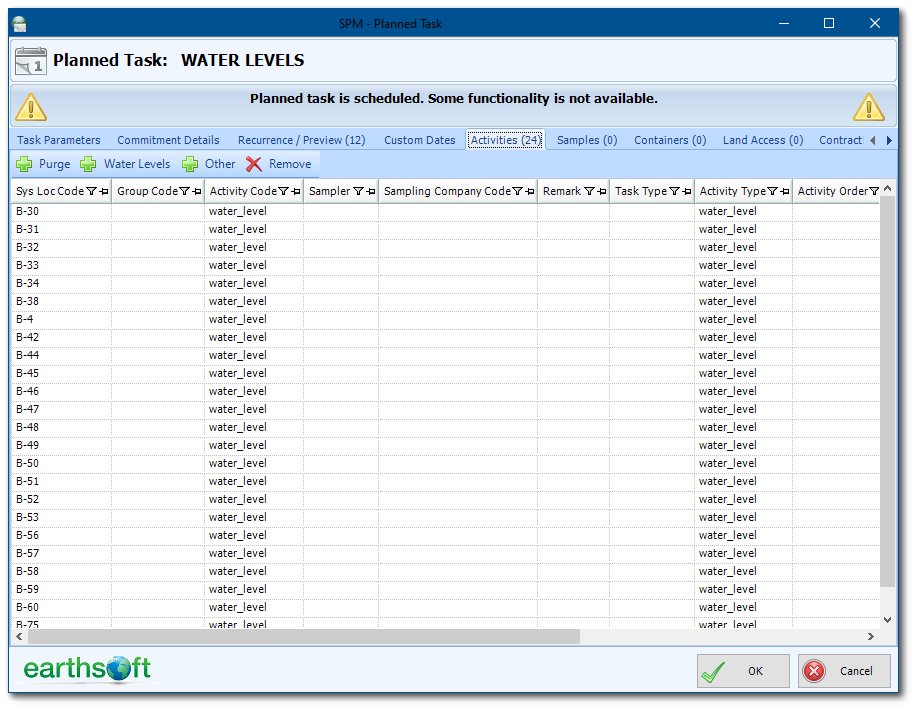
2.Create activities for all the monitoring well locations that will be part of the monthly water level measuring event. The locations are associated with GW Quantity task type.

Enterprise
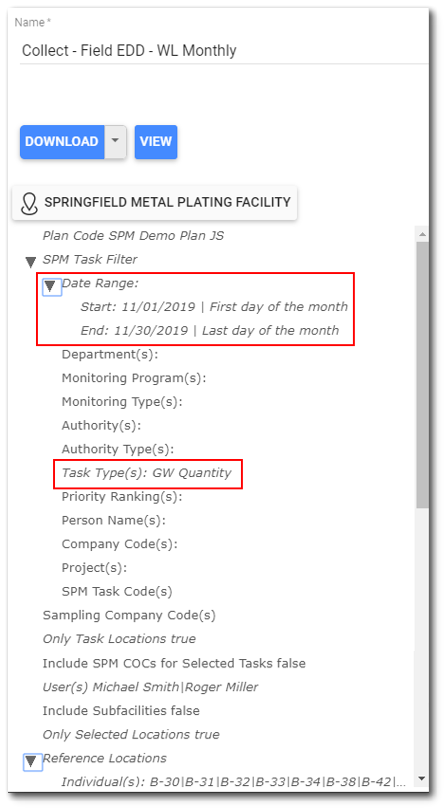
1.Create an EZView widget and choose the Collect Field EDD report. Set the report parameters as needed. Select the correct facility and the SPM plan created in the SPM Step above.
2.In the SPM Task Filter, select the Task Type for the monthly water level monitoring event to ensure all the monitoring well locations are available in the report for pre-population in the Collect form.
Note: In the Date Range, use dynamic dates (e.g., first day of the month) rather than a static date range to allow the dates to change each month. Since this is a monthly task, select the first and last day of the month. |
3.Create another EZView widget and choose the Collect - Form Generator report.
4.Set the report parameters as needed. Select the desired facility in Facility/Individual(s). Multiple facilities can be selected. If necessary, select the desired facility group in Facility/Facility Groups.

5.Enter a name for the form in Form Name (e.g., Monthly WL). When the data form is created, the date will be appended to the form name. This will distinguish the monthly data forms even though the form name is the same in the report.
6.Select the Collect Template that will be used for the data form. This template must already be appropriately setup for the water level monitoring activities and published to the database.
7.Since pre-population is being used, select the appropriate User Report. This is the Collect - Field EDD report created in the first EZView widget in Step 1 above.
8.Select the User Groups. The user groups displayed are assigned from the selected Collect template.
9.If the field teams will be syncing data from the forms, check the Sync box.
10.If desired, check the Report output check box to only create a data form if the report generates an output.
11.Save the report.
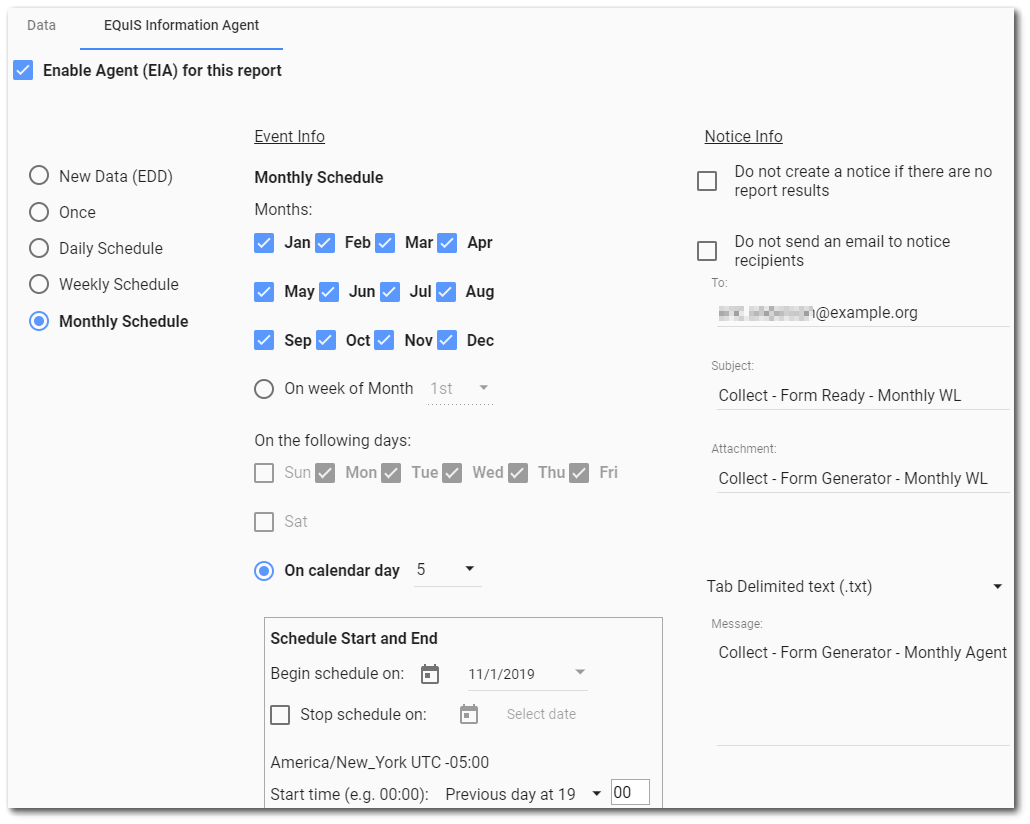
12.Click the EIA button to create the EIA to automatically run the report monthly and generate the data form.
13.Click the Create new EIA agent button to enable the EQuIS Information Agent tab (see Configuring EIAs Using EZView Widget for more information). Set the EIA properties as needed in the EQuIS Information Agent tab and save the changes.

The new form generated by the report will be on the Data Form page in Collect Enterprise and will be available on the Collect Mobile app to users assigned to the form.
