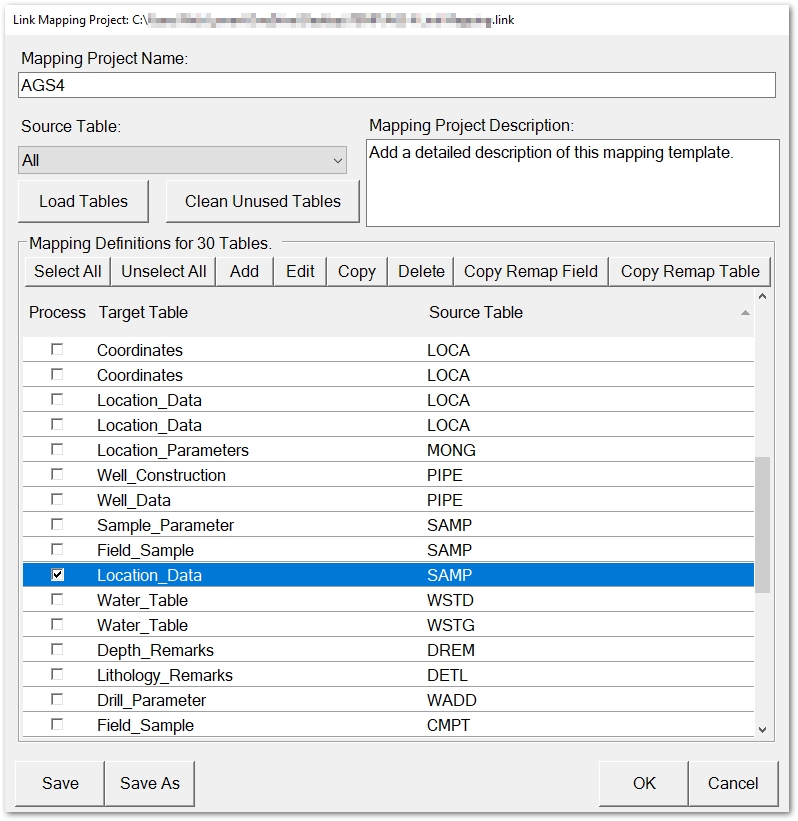
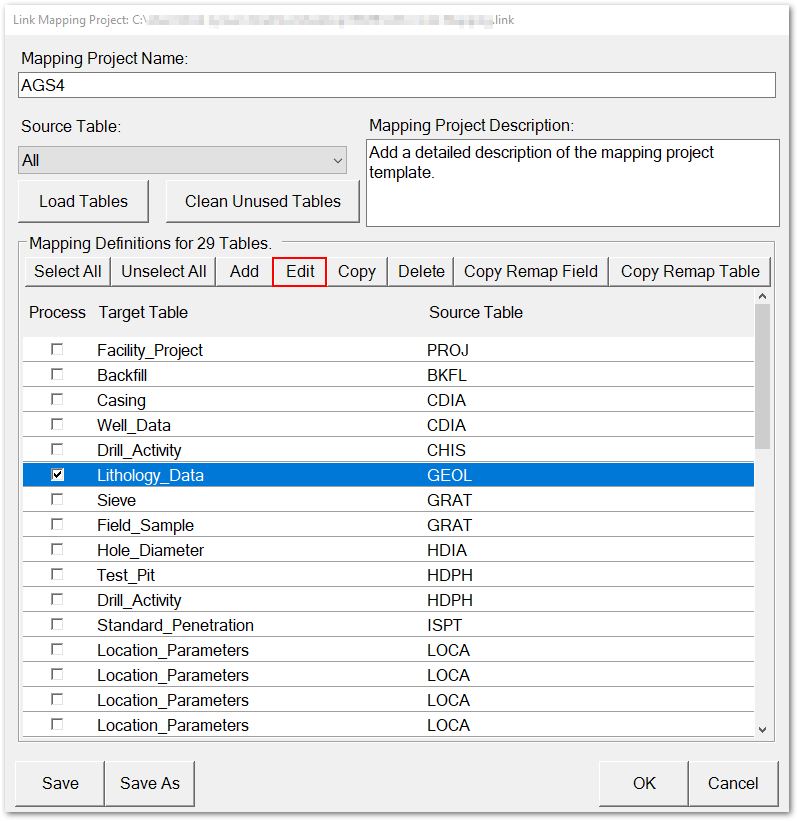
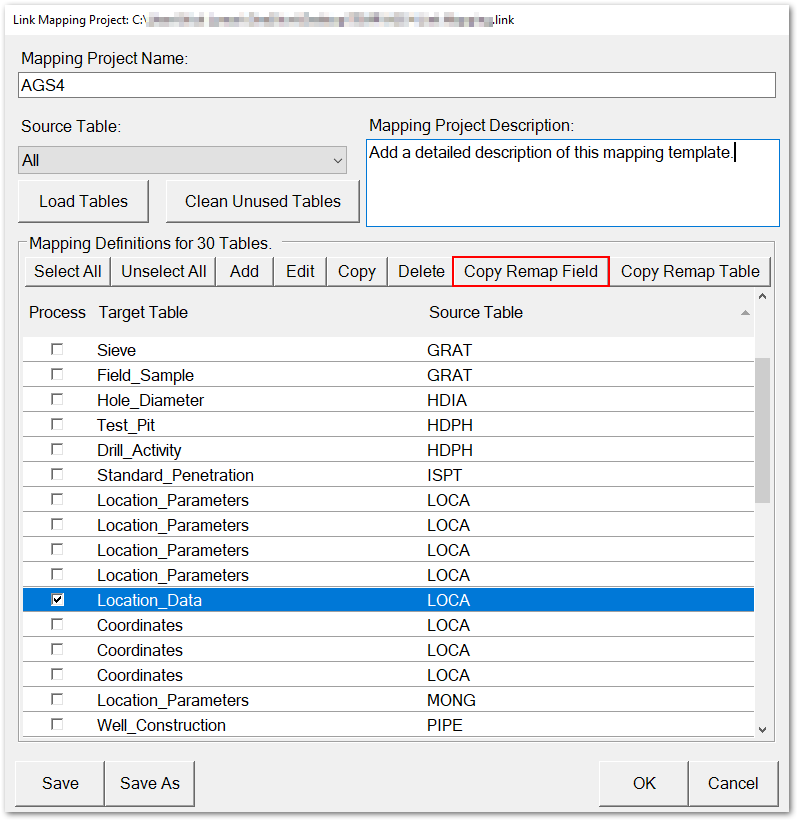
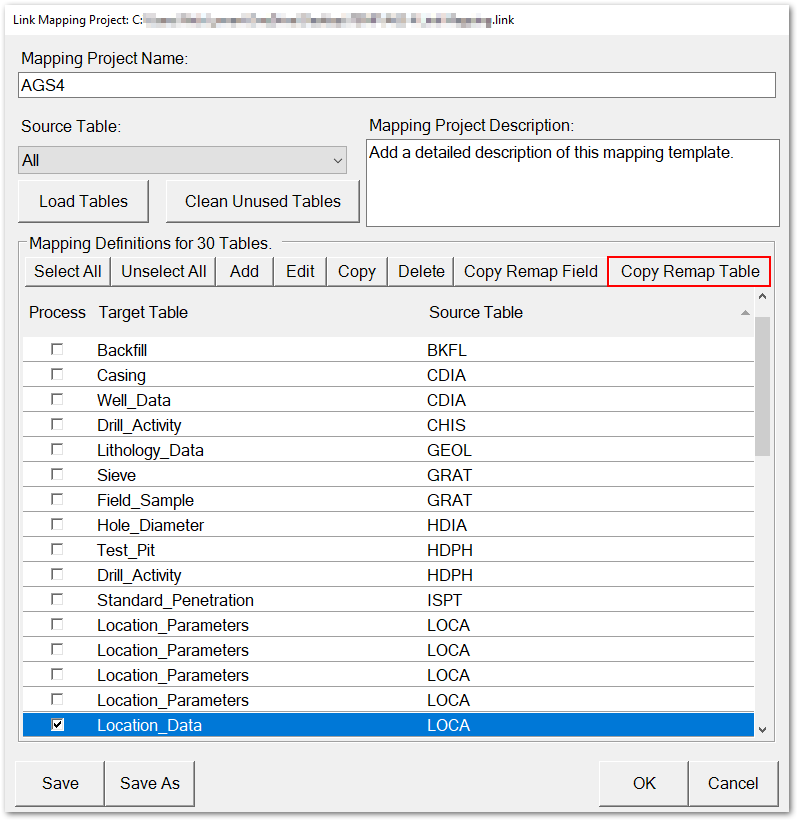
The Mapping Project window allows users to load source tables and create data mappings from the source data tables to sections and fields in the desired format file (e.g., Geotechnical). Multiple options exist to provide mapping definitions:
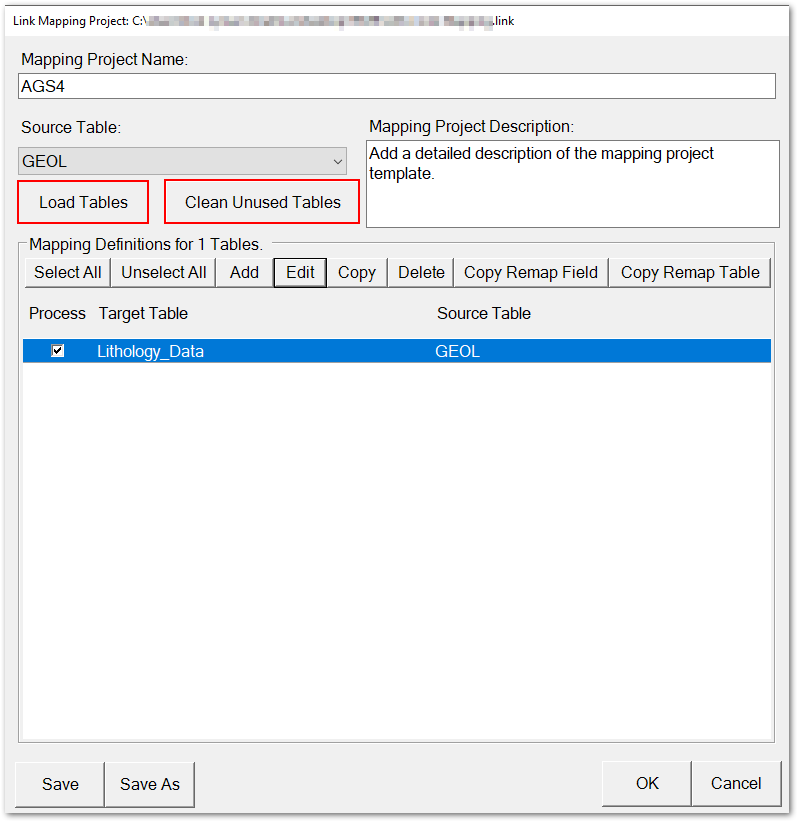
•Select All – Select all tables for data mapping. Selected tables will have a checked box displayed to the left of the table name. Individually selecting or deselecting tables is also possible.
•Unselect All – Clear all check marks so that no tables are selected for data mapping. Deselected tables will have an empty check box displayed to the left of the table name. Individually selecting or deselecting tables is also possible.
Note: When a table is deselected, the AND(FALSE()...) formula is added to that table mapping Active attribute. If a formula already exists for the table mapping Active attribute, the AND(FALSE()...) is added to the beginning of that formula, keeping the remainder of the formula intact. If that table is selected again, the AND(FALSE()...) prefix is removed and the attribute is restored to what it was previously (e.g., formula, empty, etc.). The AND(FALSE()...) prefix is used when a table is deselected to ensure that the table's mappings are not activated when the data is loaded and processed. Example: A selected table is configured with the table Active attribute defined with the following formula: NOT(ISEMPTY([FIELD_A])). If the table becomes deselected, the table Active attribute formula is updated to: AND(FALSE(),NOT(ISEMPTY([FIELD_A]))). If the table become reselected, the AND(FALSE()...) is removed and the formula is restored to the original, NOT(ISEMPTY([FIELD_A])). |
|---|
•Add – Add new table mapping definitions. Many target fields can be added for the selected source table. The new mapping definition(s) are added to the Mapping Definition pane and are available for editing.
•Edit – Edit an existing table mapping definition.
•Copy – Copy an existing mapping definition. The duplicate mapping definition is added to the Mapping Definition pane and is available for editing.
•Copy Remap Field – Copy an existing table mapping definition, but select new field(s) to replace field(s) in the existing mapping. The new mapping definition is added to the Mapping Definition pane and is available for editing.
•Copy Remap Table – Copy an existing table mapping definition, but select new table(s) to replace table(s) in the existing mapping. The new mapping definition is added to the Mapping Definition pane and is available for editing.
Notes: •If data mapping targets non-existent tables, the data mapping(s) errors are ignored and output to the log file. Users should review the mapper log file to verify correct data mapping(s). •If a mapped table is missing one or more fields, the missing field(s) will be skipped and the remainder of the table containing mapped fields and data will be processed. •The names of data mappings, displayed in the Mapping Name column, must be unique. By default, subsequent data mappings that use the same target and source tables will be appended with an underscore and number (e.g., Mapping Name, Mapping Name_2, Mapping Name_3, etc.). |
|---|
Add Data Mapping
1.After loading an existing EQuIS Link project template or creating a new project template, a new data mapping can be added to the template. Select the desired Source Table from the drop-down menu and click the Add button.
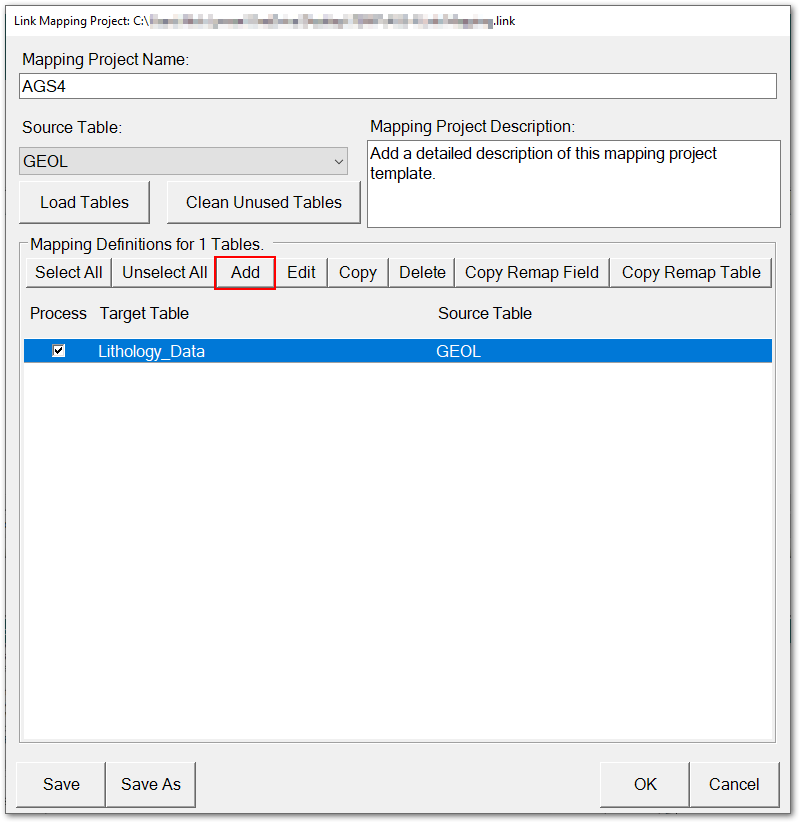
Note: Any table(s) selected for data mapping, denoted with a checked box, will remain selected at the Link Mapping Project level. The selections will persist after moving to a different Link window or after Link is closed. |
|---|
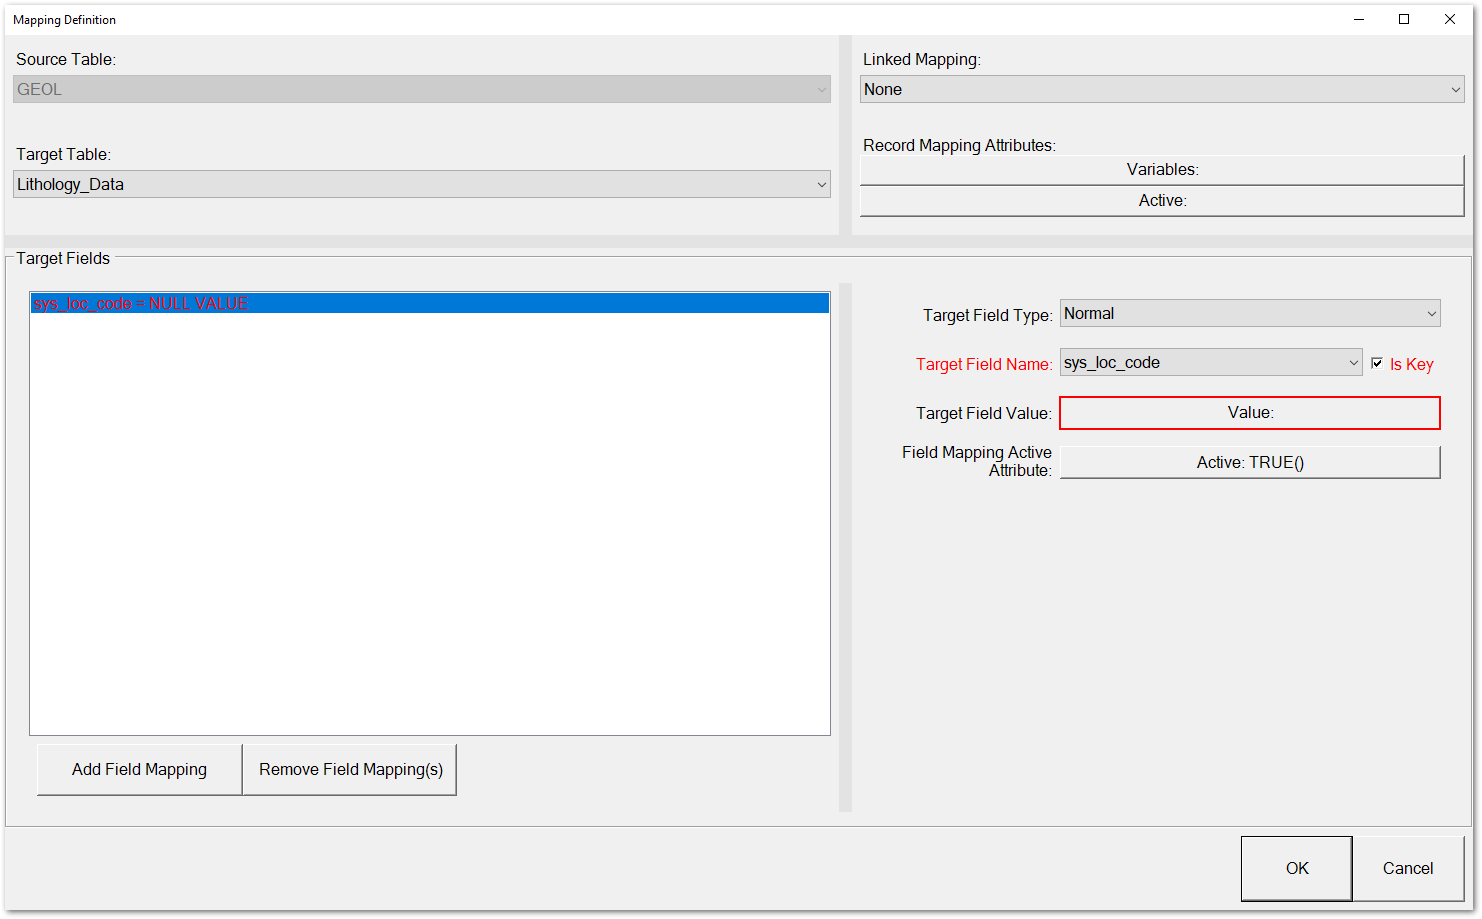
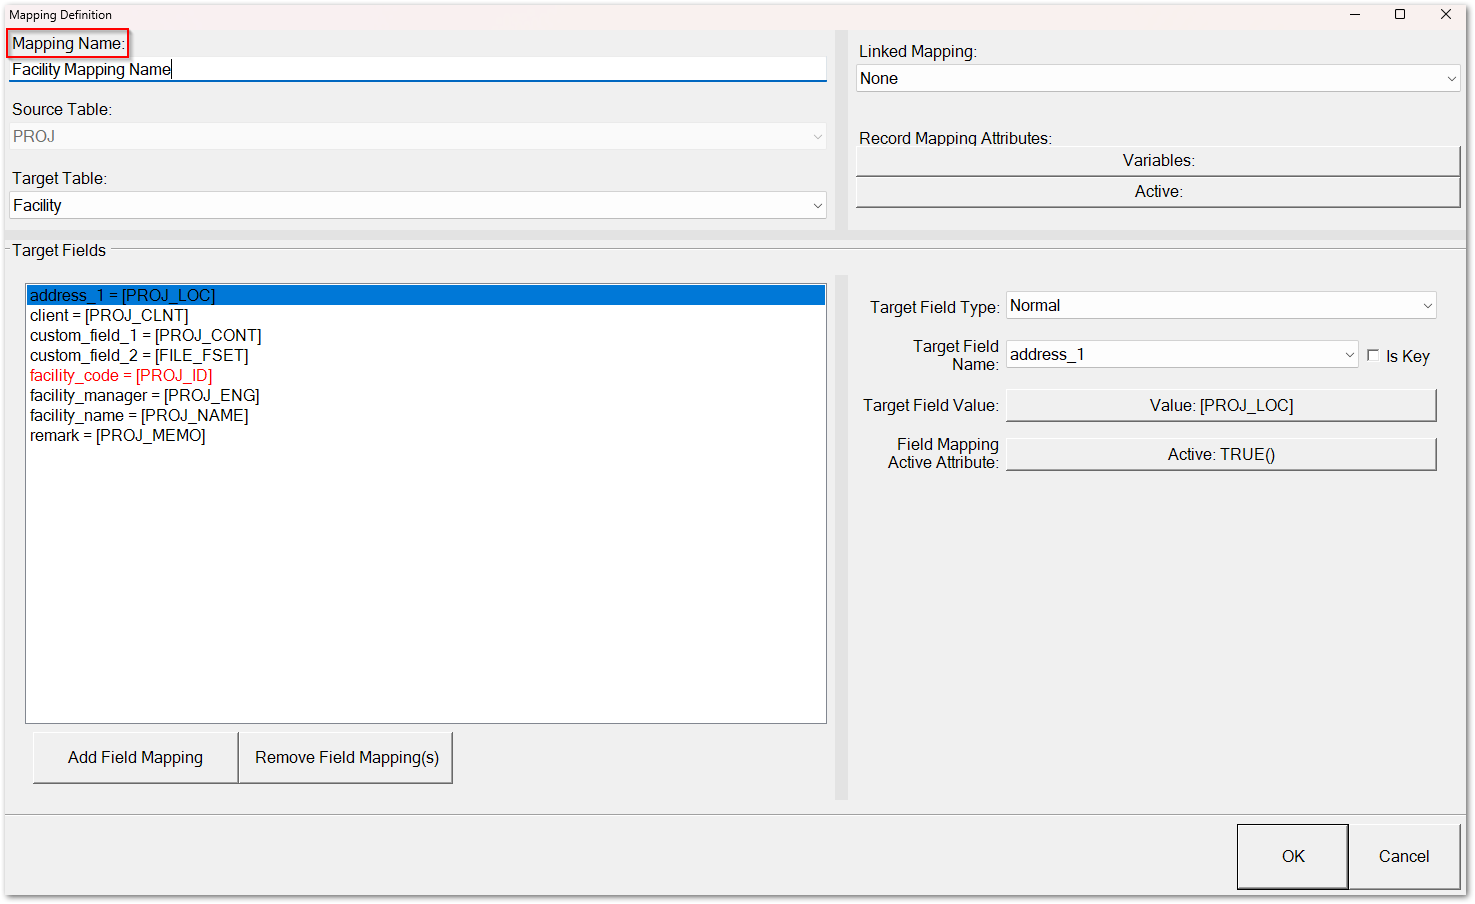
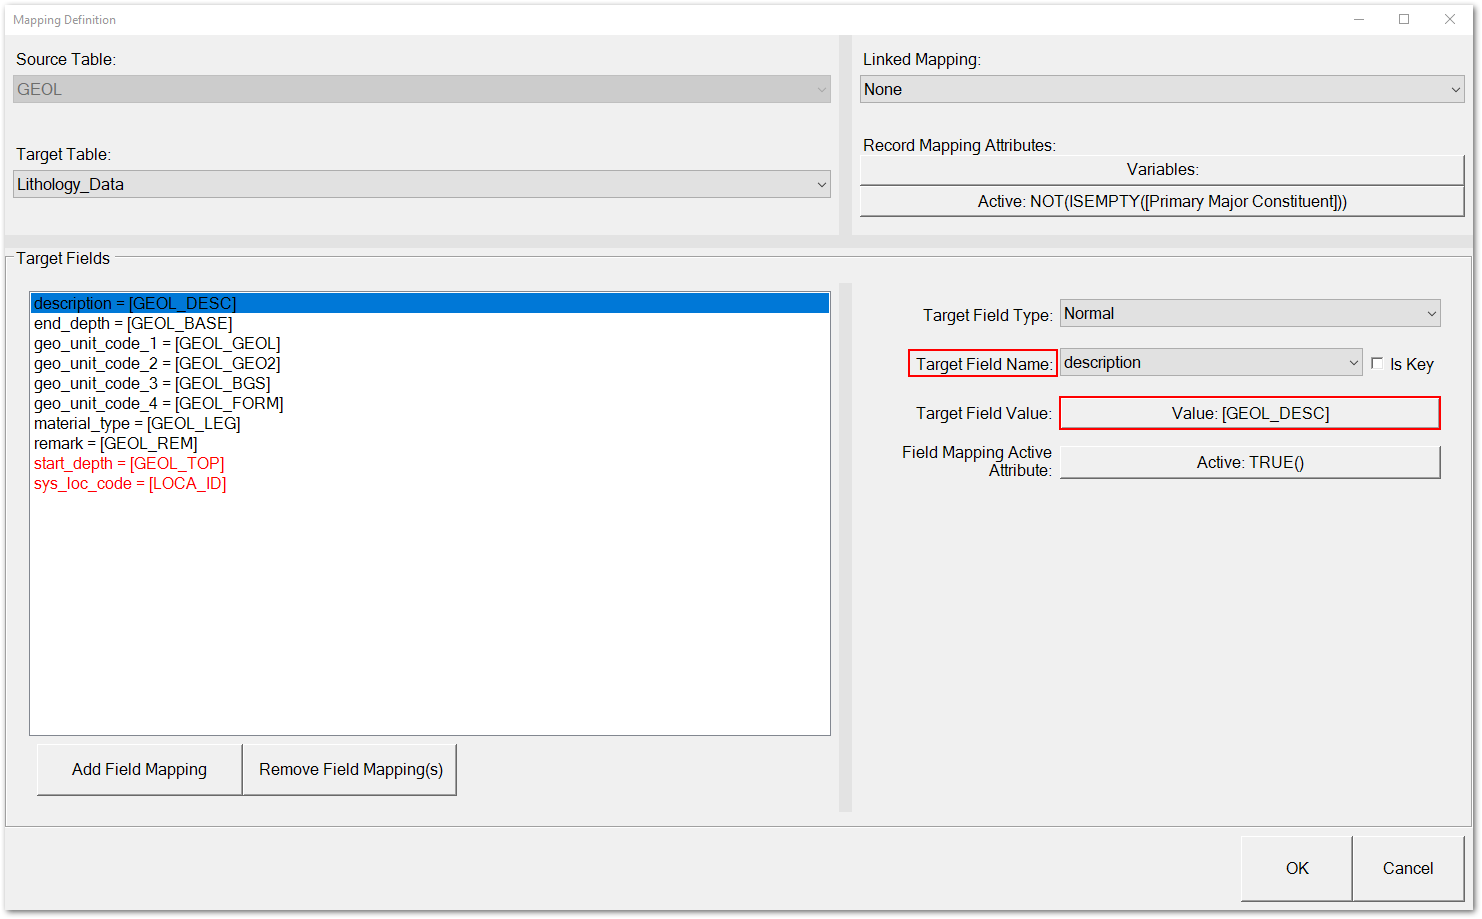
2.The Mapping Definition window opens. Select the Target Table from the drop-down menu and click the Add Field Mapping button. A default data mapping formula will appear in the Target Fields pane.
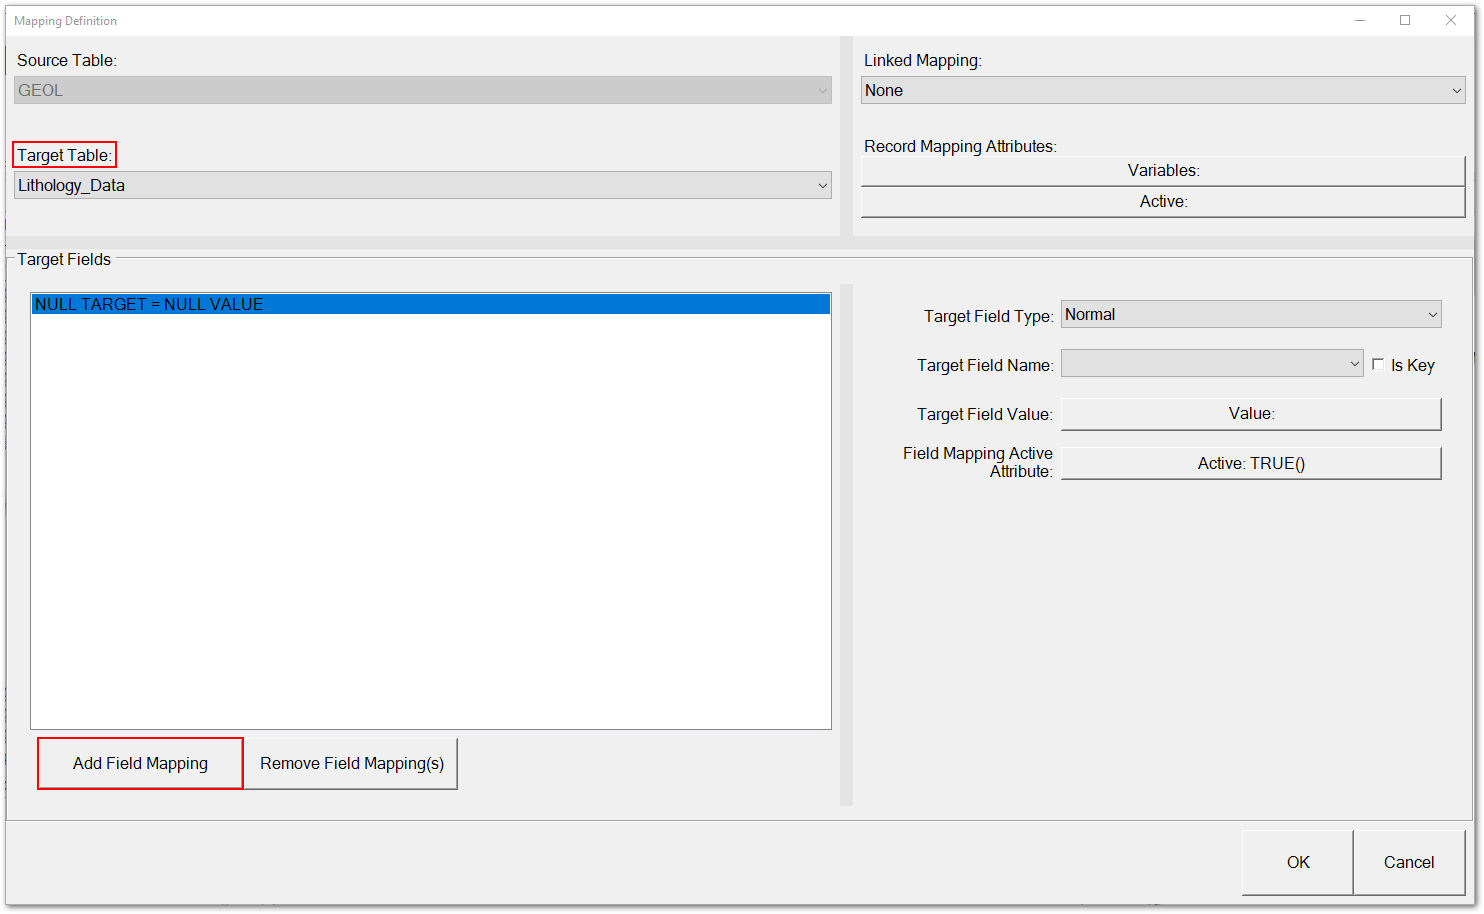
Note: Link has a feature that allows users to create a mapping for "Any" source table found in the selected source. This feature can be extremely useful since it allows users to define a single mapping that can run on any table that contains the fields used in its formulas. For example, users may have Microsoft Excel files with a common structure (the same fields) but different worksheet names (#tablename), which may or may not be known prior to processing.
Files loaded as Reference Data will not be used with the "Any" selection. To create rows in the EDD from the reference data, create mappings that explicitly use the tables in the reference source. |
|---|
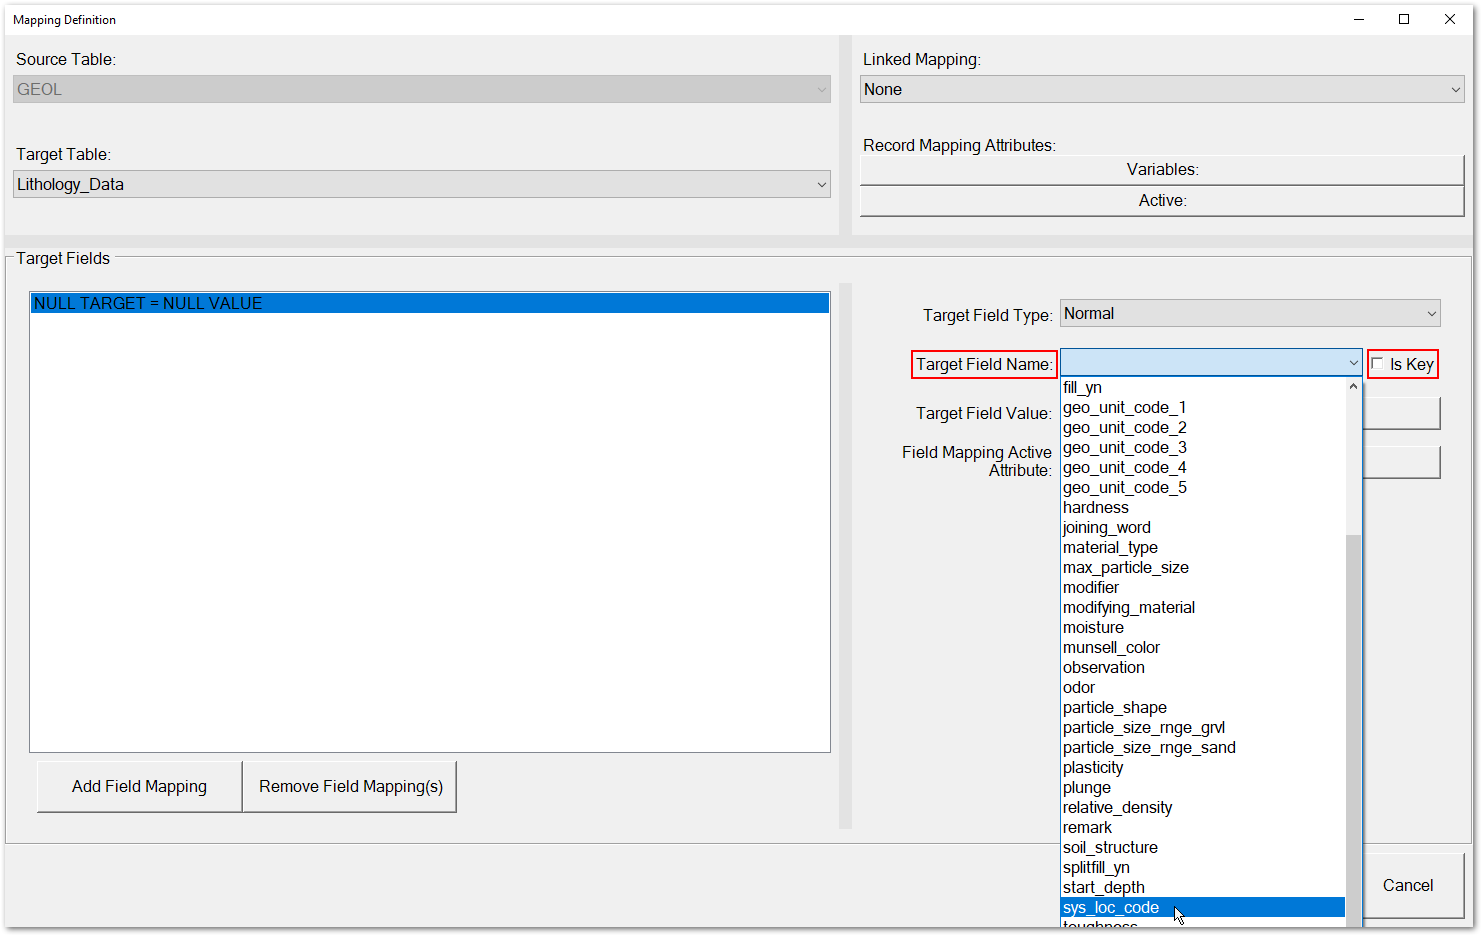
3.Select the Target Field Name from the drop-down menu. If this field will be a primary key, check the Is Key box. Primary key fields are displayed in red.
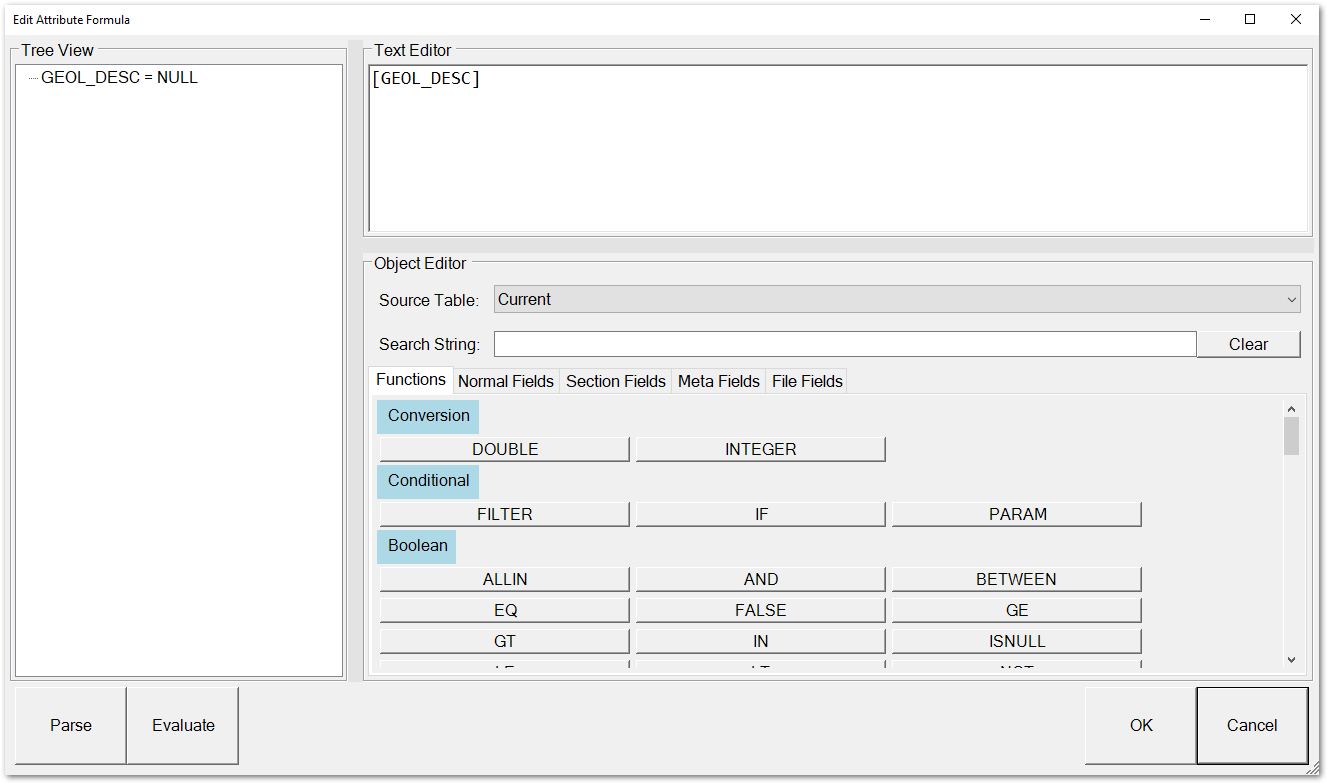
4.To open the Edit Attribute Formula window and create the data mapping, click the Value button for the Target Field.
5.In the Edit Attribute Formula window, create the desired data mapping. See the EQuIS Link Formula Building and Functions articles for details regarding the formula building process.
6.In this simple example, the database field of LOCA_ID is mapped to the EQuIS field SYS_LOC_CODE. Select the Normal Fields tab in the Object Editor pane and click the desired field in the data source. The field name will appear in the Text Editor pane. By default, the field value will be Null. Click on the Parse button to see the formula in the Tree View pane.
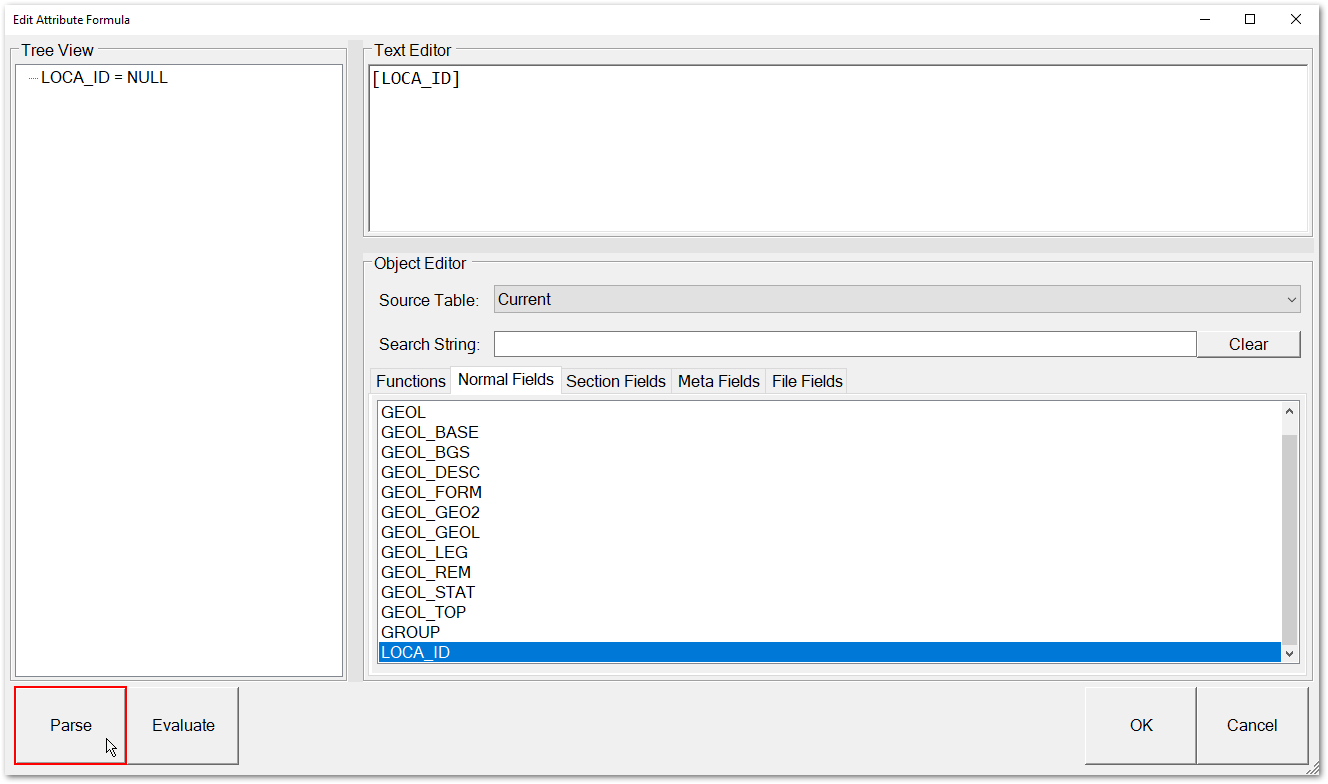
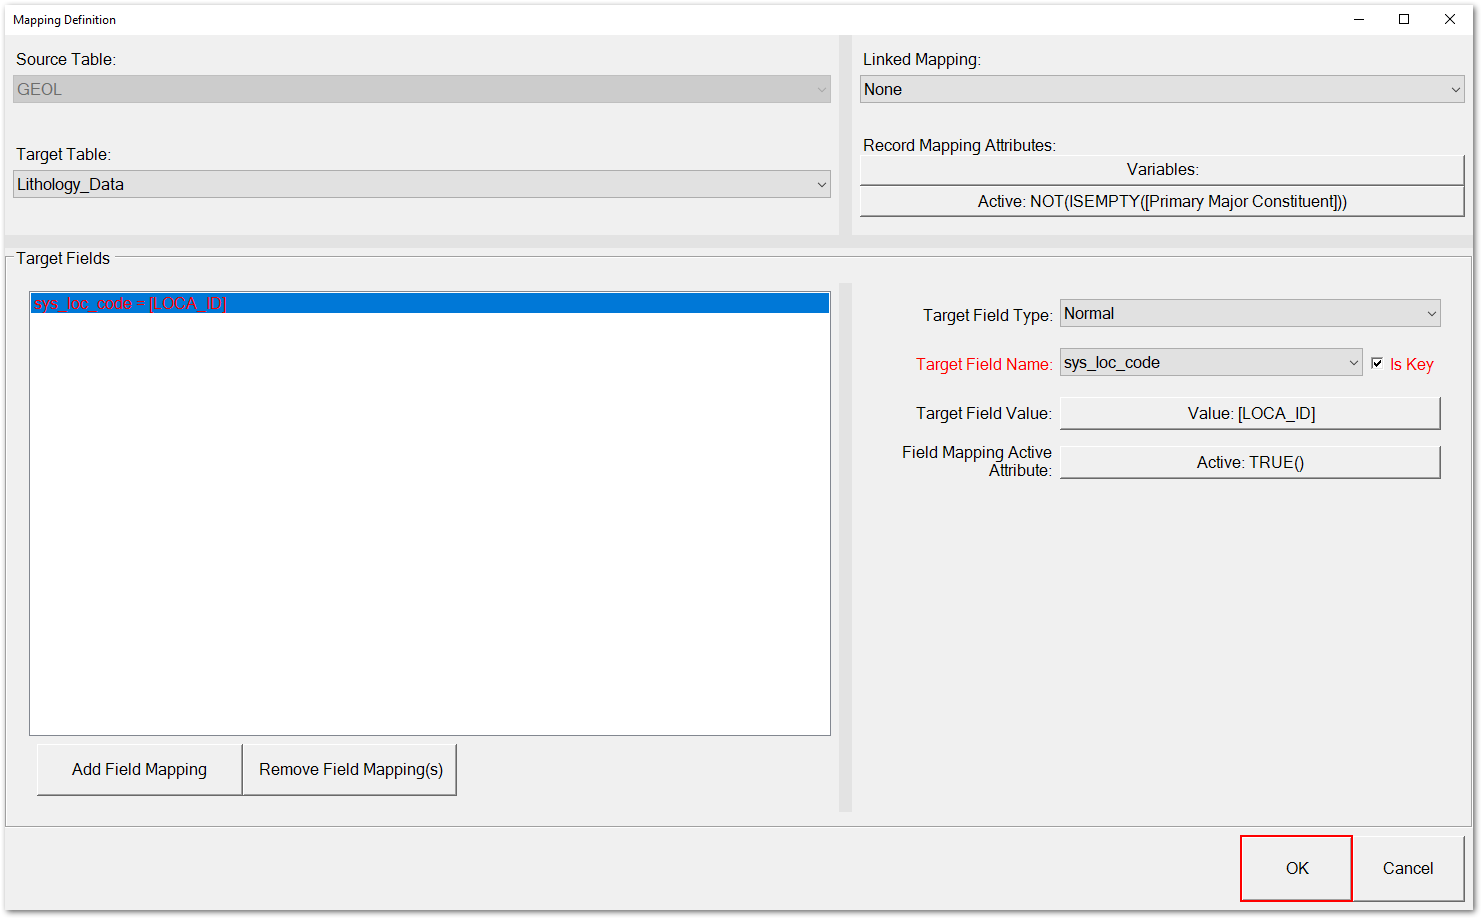
7.Click the OK button to save the attribute formula and close the Edit Attribute Formula window. The formula value for the field is displayed on the Target Field Value button and in the Target Fields pane. By default, the field mapping will be active.

8.Repeat the above steps to add data mappings for other Target Fields.
9.Use the Remove Field Mapping(s) button to remove unwanted data mappings. Any data mapping can be changed by selecting the mapping in the Target Fields pane and clicking the Value button.
10.In addition to assigning attributes to individual fields, mapping attributes can be assigned to entire data records. Two options are available in the Record Mapping Attributes section of the upper right pane: Variables and Active. The Variables button allows users to specify variable replacements in their mappings. When this attribute is set, the mapper will iterate over each of the JSON (JavaScript Object Notation) objects in the attribute and replace each of the fields specified by the keys of the object with the corresponding value. The Active button is especially useful to ensure that records with null values are not mapped. If desired, select one the Record Mapping Attribute buttons to open the Edit Attribute Formula window and assign a formula to the record attribute. Click the OK button to save the record attribute formula and close the Edit Attribute Formula window. The formula will display on the Record Mapping Attribute button.
Note: The table level Variables attribute feature is executed prior to the table level Active attribute. |
Note: A Linked Mapping sets the object EUID of the created row to the EUID of the row created by the linked mapping. Do not use a linked mapping with a previously created mapping that uses the table level Variables attribute feature. This will cause an error to be logged and the linked mapping will be ignored. Since the variables attribute generates a set of mappings, it does not have a single object EUID, and thus, cannot be used by the linked mapping, which needs a single object EUID to correctly link. |
11.When finished, click the OK button to save the data mappings for the selected source table and close the Mapping Definition window. The mapping definitions will be displayed in the Mapping Definitions pane of the Mapping Project window.
•Two options are also available: Load Tables and Clean Unused Tables buttons. These buttons modify the structure of the source tables in the link project. The Load Tables button adds any tables and fields from the selected source of data to the tables and fields of the Link project. If a table already exists then any new fields will be added. If no new tables or fields are found, then nothing is added. The Clean Unused Tables button removes any unused tables or fields from the available tables and fields in the source data structure. This is useful when the Load Source Tables functionality has been repeatedly used and a user wants to clean out unused tables or fields so that the Link project is lighter and cleaner.
12.Repeat the above steps to add data mappings for other source tables.
13.When finished, click the Save button to save the data mappings and the OK button to close the Mapping Project window.
Edit Data Mapping
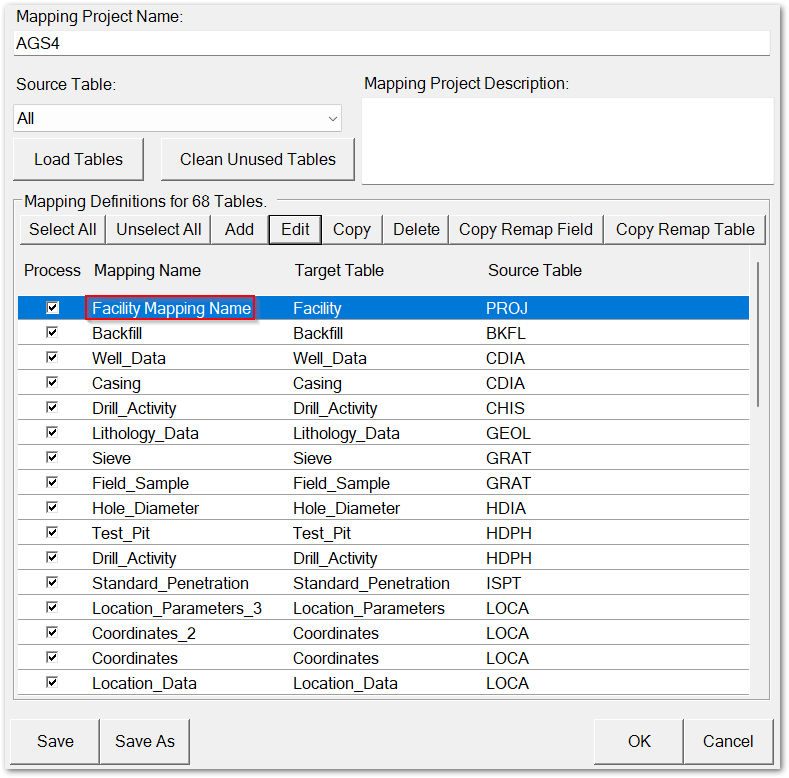
1.After loading an existing EQuIS Link project template or creating a new project template, an existing mapping definition can be edited. Select the desired mapping definition and click the Edit button.
2.(Optional) – The Mapping Name column displays each mapping name, which must be unique. The following scenarios are used to ensure the names are unique:
•The ability to create unique mapping names can be useful when there are multiple mappings with the same source and target table associations.
oTo edit the name of a mapping, select the desired mapping record and click Edit.
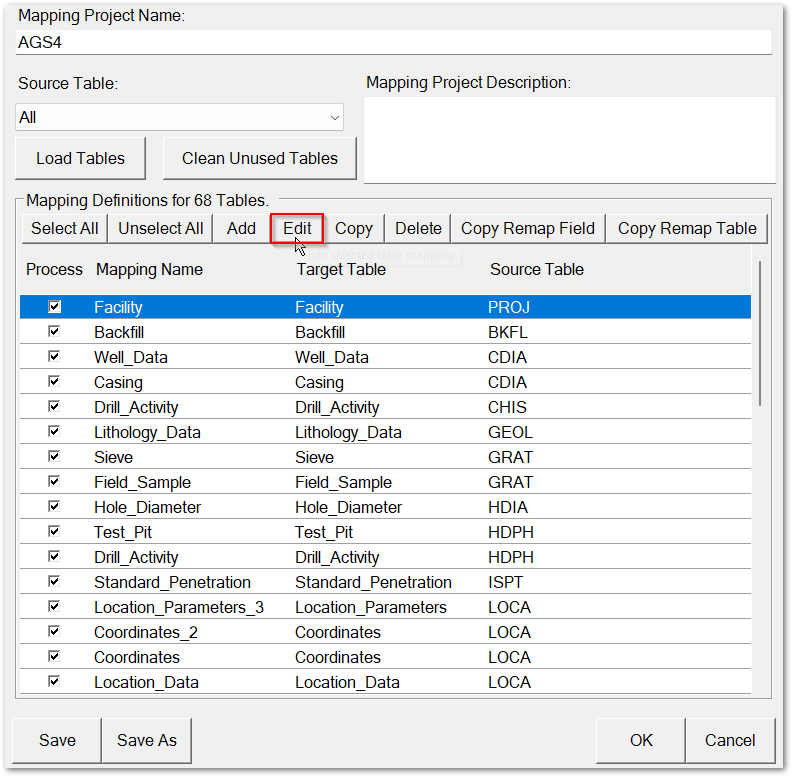
oA dialog will open that includes a text field called "Mapping Name" where the user can edit the mapping name.
oClick OK to close the dialog and the updated mapping name will be displayed.
•If a user removes the mapping name, the name of the target table will be assigned as the mapping name.
Note: Link projects that previously included multiple mappings with the same mapping name will automatically be updated when the project is reopened. Now, subsequent mapping names will be appended with an underscore and number (e.g., Facility Mapping Name_2, Facility Mapping Name_3, etc.). |
|---|
3.The Mapping Definition window opens. Select the Target Field to edit and click the Value button for the Target Field.
4.In the Edit Attribute Formula window, edit the data mapping as desired. See the EQuIS Link Formula Building and Functions articles for details regarding the formula building process.
5.Click the OK button to save the attribute formula and close the Edit Attribute Formula window.
6.In addition to assigning attributes to individual fields, mapping attributes can be assigned to entire data records. This feature especially useful to ensure that records with null values are not mapped. If desired, click the Record Mapping Active Attribute button to open the Edit Attribute Formula window and assign a formula to the record attribute. Click the OK button to save the record attribute formula and close the Edit Attribute Formula window. The formula will display on the Record Mapping Active Attribute button.
7.When finished, click the Save button to save the mapping definition changes and the OK button to close the Mapping Project window
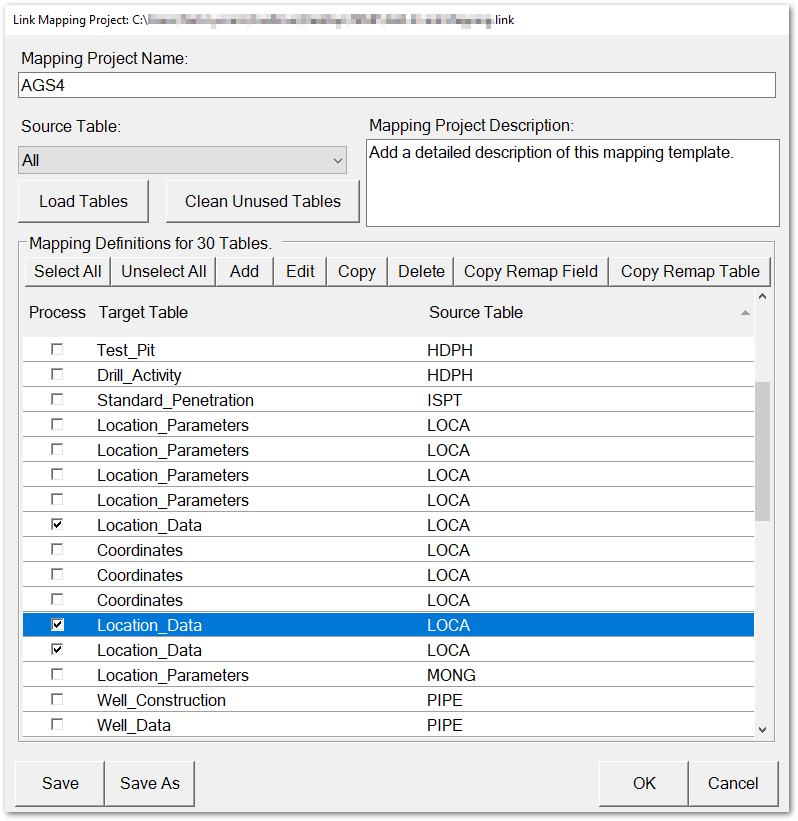
Copy Remap Field
1.After loading an existing EQuIS Link project template or creating a new project template, an existing mapping definition can be copied with substituting new field(s) for the existing field(s). Select the desired mapping definition and click the Copy Remap Field button.
2.Within the dialog window, select the used field and then the select new field(s) to replace the used field in the existing mapping. A description of the field remapping is displayed in the dialog window.

3.Select the OK button to save the field remapping and add the new mapping definition to the Mapping Definition pane of the Mapping Project window.
Copy Remap Table
1.After loading an existing EQuIS Link project template or creating a new project template, an existing mapping definition can be copied with substituting new tables(s) for the existing tables(s). Select the desired mapping definition and click the Copy Remap Table button.
2.Within the dialog window, select the used table and then the select new tables(s) to replace the used table in the existing mapping. A description of the table remapping is displayed in the dialog window.
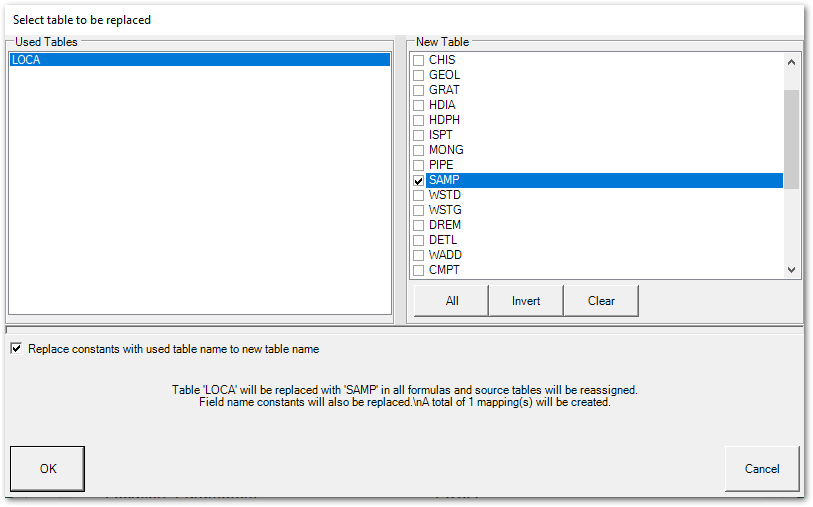
3.Select the OK button to save the table remapping and add the new mapping definition to the Mapping Definition pane of the Mapping Project window.