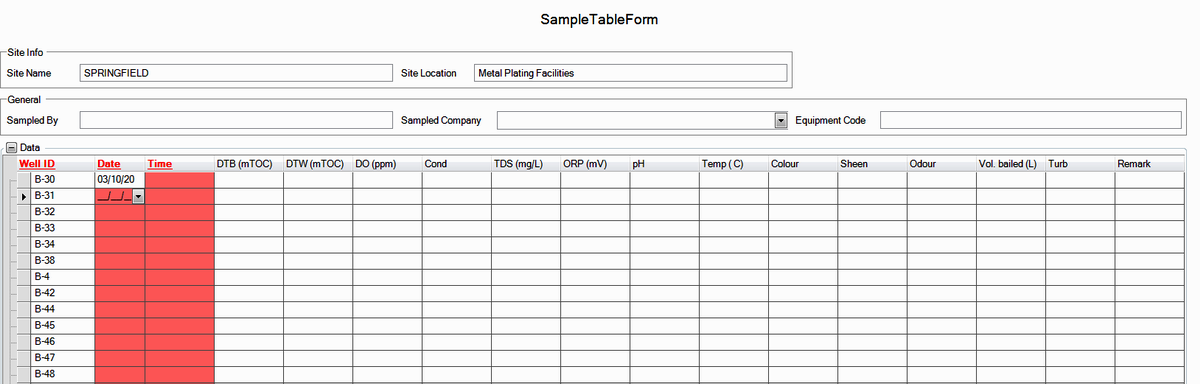
The Sample Table Form can be used to enter field sample data for multiple locations in a single form. The form can record common field sample measurements (e.g. pH, ORP, Conductivity, etc.) as well as some custom parameters which may be added by the user.
This form saves data to the FieldSample_MultiLocation section of the EDGE format.
Setup
EDGE Field and Unit Remapping
In order to use this form, remap records must be created for CAS_RN and unit values. The attached EDD example remap records needed to use this form. Replace the INTERNAL_VALUE column to match existing CAS_RN and unit values used in RT_ANALYTE and RT_UNIT, then upload to EQuIS using the EDGE Configuration format. Some unit values, noted in the table below, must be configured in the EDGE Configuration Plugin in the FieldSample_MultiLocation format section.
Custom Parameters
To define parameters not found in the FieldSample_MultiLocation section, configure the "cas_otherX" fields in the remapping EDD and "cas_otherX_unit" in the Configuration Plugin.
The table below defines the EDGE field parameters for the Sample Table Form and where to configure their remapping and units.
Parameter |
Configure Remap |
Configure Units |
|---|---|---|
field_temp |
set in RT_REMAP_DETAIL |
set in RT_REMAP_DETAIL |
field_do |
set in RT_REMAP_DETAIL |
field_do_units: set in Configuration Plugin |
field_ph |
set in RT_REMAP_DETAIL |
set in RT_REMAP_DETAIL |
field_orp |
set in RT_REMAP_DETAIL |
set in RT_REMAP_DETAIL |
field_cond |
set in RT_REMAP_DETAIL |
field_cond_units: set in Configuration Plugin |
field_color |
set in RT_REMAP_DETAIL |
set in RT_REMAP_DETAIL |
field_odor |
set in RT_REMAP_DETAIL |
set in RT_REMAP_DETAIL |
field_sheen |
set in RT_REMAP_DETAIL |
set in RT_REMAP_DETAIL |
vol_bailed |
set in RT_REMAP_DETAIL |
set in RT_REMAP_DETAIL |
recharge |
set in RT_REMAP_DETAIL |
set in RT_REMAP_DETAIL |
cas_other1 |
set in RT_REMAP_DETAIL |
cas_other1_unit: set in Configuration Plugin |
cas_other2 |
set in RT_REMAP_DETAIL |
cas_other2_unit: set in Configuration Plugin |
cas_other3 |
set in RT_REMAP_DETAIL |
cas_other3_unit: set in Configuration Plugin |
cas_other4 |
set in RT_REMAP_DETAIL |
cas_other4_unit: set in Configuration Plugin |
cas_other5 |
set in RT_REMAP_DETAIL |
cas_other5_unit: set in Configuration Plugin |
Create an EDGE RVF with the updated remapping records.
Setup Data Sections in EDGE
On the Form ribbon, click Setup, then choose one of the following sections to configure:
•Facility General: opens Facility_ReadOnly data fields.
•Sample General: opens FieldSample_MultiLocation data fields. Data added in this section will apply to all samples collected in the form.
•Sample Data: opens FieldSample_MultiLocation data fields, these will appear in the form as a list of columns in a table structure.
After choosing a section to configure, a dialog appears with options to show or hide fields, re-caption the section or the field names, and set default values.
Note: The EDGE Sample ID Builder may be used to automatically create sys_sample_codes. If done so, make sure to include all data fields on the form which are required to generate the sys_sample_code. |
Also in Setup, click Task Dependent to filter the rows visible in the table's grid based on the task selected in the Task Chooser. When enabled, only samples belonging to that task (ad hoc or from SPM information) will display. Header (general) data will also change based on the selected task.
The Display menu on the Form ribbon allows users to:
•Vertical (or Horizontal) Headers - Change the column headers in the form's table to read vertically or horizontally; this setting can help manage the size of the data table
•General - Collapse or show the Facility General and Sample General sections
•Show Table Only - Hides all data sections, window ribbons and the Task and Location choosers, maximizing the view of the table itself
When more rows of data are added than will fit in the screen, a scroll bar will appear. The header row will remain in place at the top of the table when scrolling down through the table records.
Note: the Max Sample Table Form Rows feature in EDGE Options can control how many rows of data will display in the table at any given time. The table height will increase until the user has added the number of rows defined. |
Enter Data
1.Select a Task from the Task Chooser
2.If desired, select a location in the Location Chooser
3.In the Record section on Form tab of the Ribbon, click New
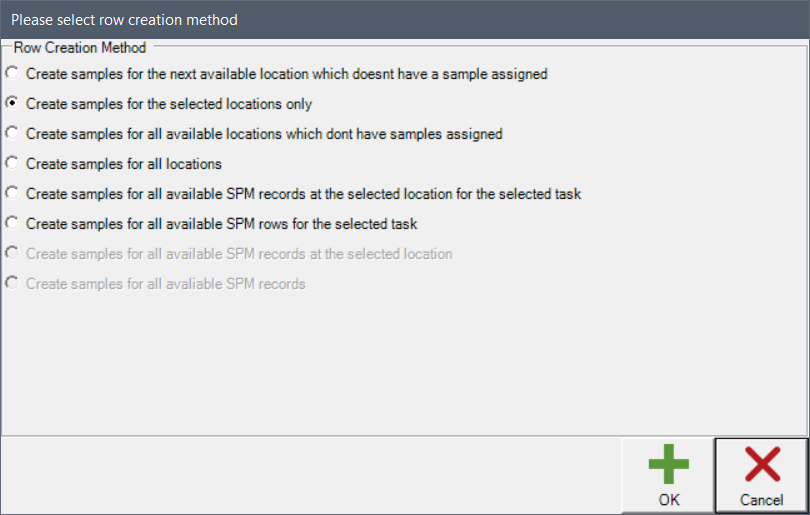
4.A prompt will appear with a number of options for creating new sample records based on locations selected in the Location Chooser, which don't have samples assigned yet, for SPM records, etc.
5.Enter data on the form
The image below shows data created using all locations without data.