To change the properties of the Map widget, open the Widget Editor by selecting the More Options ![]() icon in the upper right corner of the widget to display the drop-down menu and then select the Edit menu option. The Map widget properties are divided into six tabs in the Widget Editor. Changes made on any tab will not be preserved until the user clicks Save on the Widget Editor header.
icon in the upper right corner of the widget to display the drop-down menu and then select the Edit menu option. The Map widget properties are divided into six tabs in the Widget Editor. Changes made on any tab will not be preserved until the user clicks Save on the Widget Editor header.
The Labels tab is enabled when the Show Facility Layer box is checked on the General tab.
Note: Location labeling uses the Esri LabelClass (https://developers.arcgis.com/javascript/latest/api-reference/esri-layers-support-LabelClass.html) for labeling, which adds some new functionality but may introduce breaking changes for some users who are accustomed to the older label templates. For users who only display a single column as a label, nothing has changed—the Map widget has been updated to convert simple widget configurations to the new syntax (https://developers.arcgis.com/javascript/latest/api-reference/esri-layers-support-LabelClass.html#labelExpressionInfo). More complex configurations will need to be updated manually.
Essentially, the label template is no longer just a template for a text symbol but is an Arcade expression (https://developers.arcgis.com/arcade/). Instead of using curly braces to reference fields, it is now necessary to reference the feature that the fields belong to with "$feature.", and then the name of the field. Also, concatenation is no longer implied and has to be explicit. So, the previous example in the documentation "{sys_loc_code} - {loc_type}" would look like this in Arcade: "$feature.code + ' - ' + $feature.type". |
|---|
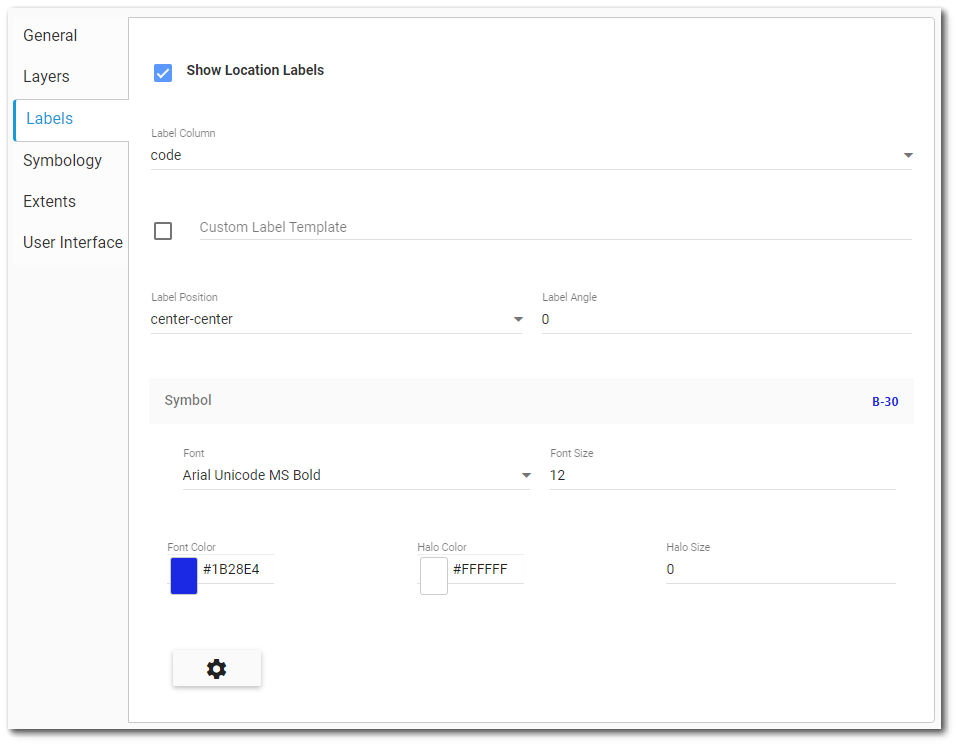
•Show Location Labels – Check this box to display location labels for selected facility.
•Label Column – Select the Column to be displayed for the labels (e.g., select "code" to display SYS_LOC_CODE).
•Custom Label Template – Check this box to enable use of a custom label template. The label template must be written in Esri Arcade script and is structured as $feature.XXX, where XXX is a field name or combinations of fields (e.g., "$feature.type + ' - ' + $feature.code"). If the label template is not properly formatted (e.g., does not begin with "$feature."), the labels will not render on the widget.
•Label Position – Controls the placement of the labels relative to the symbol. Select placement options using the drop-down menu. Options include left, center, and right that are above, below, or on the symbol.
•Label Angle – Controls the rotation of the labels within the range -360 to 360 degrees. The center point for the rotation is the lower-left corner of the label. For example, a value of -30 would rotate the labels 30-degrees counter-clockwise.
•Label Preview – Generated display that will reflect the selected font properties.
•Font – Select the drop-down menu to display available font types. Scroll to and select the desired font type. Font types include options for bold and italics.
•Font Size – Set the font size for the labels.
•Font Color – Set the font color for the labels. Click on the color selector to choose a color.
•Halo Color – If a halo is desired, set the halo color for the labels. Click on the color selector to choose a color.
•Halo Size – If a halo is desired, set the size for the labels.