•Import Template into EQuIS Professional
Excel templates can apply different designs, macros, and/or layouts for many reports in EQuIS. To apply a template to non-crosstab EQuIS reports, see the Export Results of Grid Report to Excel page.
For Crosstab reports, Excel templates can apply different formats to the tabbed data, column header, and row header sections. In addition, headers and footers can display information for the EQuIS facility where the report ran.
The template Excel file may contain one or more worksheets. Starting in the EQuIS 7.22.1 Build, with more than one worksheet, the crosstab export will do the following:
•Apply the first template worksheet to each tab of the crosstab output. All crosstab output will apply this portion of the template.
•Preserve and append any additional template worksheets to the crosstab Excel output. This means that users can place notes in those worksheets that will persist in any exported outputs.
Note: When a crosstab configuration includes an invalid template reference, the report will run with no template applied. |
Watch the Office Hour video on Configuring Crosstab Templates to learn more.
Create Template in Excel
Steps in this section will demonstrate how to design a crosstab report template.
Open a new workbook in Excel and save a template, such as Crosstab-Template-All_Locations.xlt.
Header Design
Headers and footers may be customized to include additional information using field name codes. The field names available for use are listed below. For additional guidance, see Guidelines for Header and Footer Syntax.
•Any field included in the Row Headers of the Crosstab Configuration.
•Any field from the DT_FACILITY table. These codes correspond to row headers that have been defined in the Crosstab Configuration.
1.Insert a logo or other image file into cell $A$1 to $B$3.
Tip: The file exported from EQuIS Professional may show a distorted logo image when copied across multiple sheets. This is a direct result of copying an Excel worksheet. Minimize the distortion by inserting the image across multiple columns with defined column widths or into a single column. |
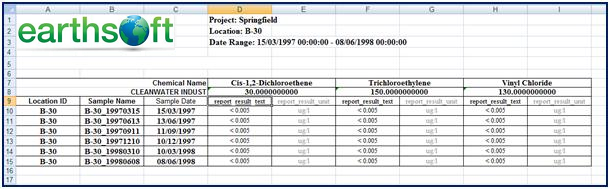
2.In cells D1 to D3, enter the following values to export the FACILITY_NAME, SYS_LOC_CODE and SAMPLE_DATE as header information.
Cell |
Value |
Explanation |
|---|---|---|
D1 |
Project: {dt_facility.facility_name} |
DT_FACILITY has been included, because this field was not a part of the Crosstab's Row Headers. |
D2 |
Location: {SYS_LOC_CODE} |
In the crosstab design for this exercise, each location has been separated into an individual worksheet. By entering just SYS_LOC_CODE, the report will enter only the individual SYS_LOC_CODE for each worksheet.
Tip: If multiple locations are on one worksheet, and if it is desired that each location be listed in the header, SYS_LOC_CODE may be used. This would be extremely useful for Location Group Codes (e.g., Shallow Aquifer and Deep Aquifer). |
D3 |
Date Range: {sample_date:min} - {sample_date:max} |
This entry will show the minimum and maximum dates found in the output of the worksheet and include it in the header information. |
The template field name codes must first exist in the Row Headers of the Crosstab Configuration or in the DT_FACILITY table.
For example, if SYS_LOC_CODE is not populated in the Crosstab Configuration Row Header, it will not populate in the template field. However, this can be added as a row header and the Display value can be set to "None" to hide it in the output, and the template field will populate.
The placement of these fields is the key to getting them to populate. They do not necessarily need to be placed inside the page footer or header; however, they must be placed above the row header columns.
The template fields do not use the standard Excel language. For example, the date value, Date: {sample_date:min:$YYYY-MM-dd}, will not populate the year. Removing the ‘$’ symbol allows the complete date to populate.
Table Body Design
1.Place the cursor and select cell A7. Right-click and select 'Define Name'. This is the location in the worksheet where the top-left cell of the exported table will appear.
2.Name cell A7, Data, then immediately click OK (required in order for the name to be applied to the cell).
3.Format the rows and columns with borders and shading as desired. To apply a certain style, highlight the target cells with the cursor and choose the style from Cell Styles in the Styles section of the Home toolbar.
4.For Crosstab reports, the following styles will be used for that area of the Crosstab report output:
Crosstab Configuration Element |
Style Name |
|---|---|
First Column Header |
ColumnHeader0 |
Second Column Header |
ColumnHeader1 |
First Row Header |
RowHeader0 |
Second Row Header |
RowHeader1 |
First Tabbed Data Field |
GroupColumn0 |
Second Tabbed Data Field |
GroupColumn1 |
Note: When the new iterated styles are created and applied to previous Excel templates that only defined the ColumnHeader and RowHeader styles compatible with the new iterated header styles (ColumnHeader0, ColumnHeader1, etc. and RowHeader0, RowHeader1, etc.), the formatting from the ColumnHeader and RowHeader styles will be copied to these new styles, respectively. |
5.Create these styles in the template:
•From the Style section of the Home toolbar in Excel, select Cell Styles > New Cell Style or select one of the existing styles, right-click and select Duplicate.

•Define the Style as one of the Crosstab Configuration elements listed above. This will define the format of the Column Headers from the Crosstab Configuration.
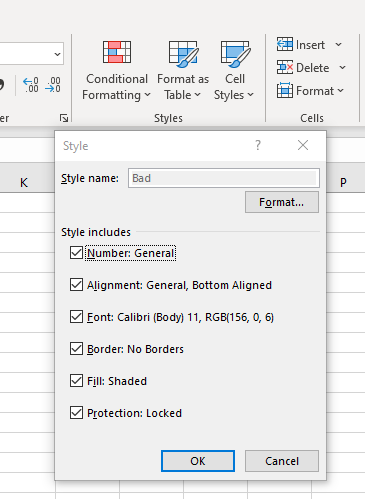
•Using the format button and the check boxes, define the style as shown in the following figure.
Page Layout Design
1.To automatically copy the template headers to each page in the Excel workbook, define Print Titles. In Excel, go to the Sheet tab and select Print Titles.
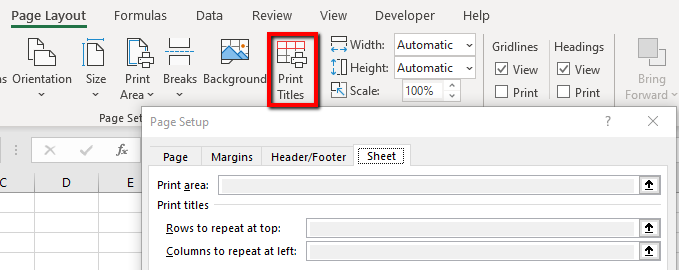
2.For the entire template design to apply to multiple pages in the output file, delete any additional sheets in the workbook (e.g., Sheet2 and Sheet3). On the Sheet tab, define the Rows to Repeat: $1:$5 as these contain the rows where the log and title information have been inserted. Select OK.
Footer Design
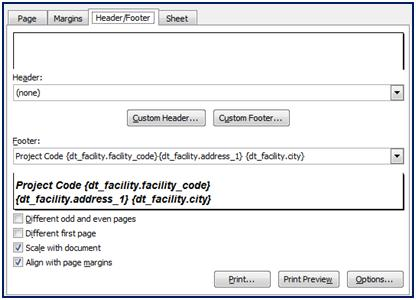
1.Define the Footer information by following the instructions below.
a.In Excel, go to the Page Layout tab and select Print Titles.
b.On the Header/Footer tab, define the Custom Footer by selecting Custom Footer and the site address, using the codes shown in the image below.
2.Save the template again. At this point, the template should resemble the image below.
3.Close Excel.
Note: To force the use of a style in an Excel file, add an appSetting to the EQuIS.exe.config file. For more information on the options available, see XlsForceStyle.
<add key="XlsForceStyle" value="True" /> |
Import Template into EQuIS Professional
1.Open EQuIS Professional.
2.Open and run any report, and then click the Crosstab button to configure a Crosstab Report.
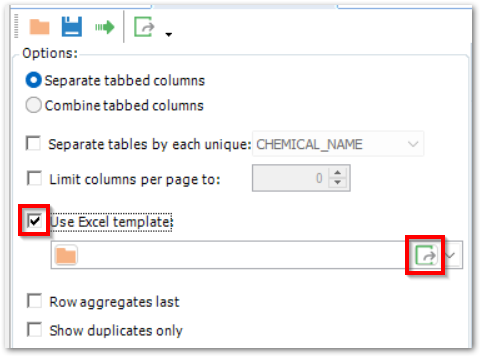
3.In the Crosstab Configuration form, check Use Excel Template. The associated drop-down is activated.
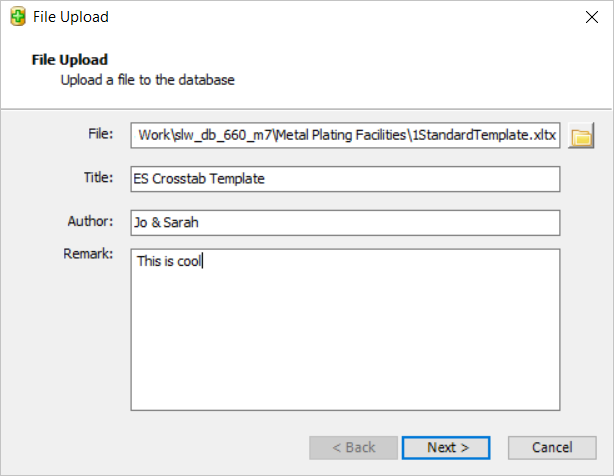
4.Click Add Template ![]() , and a File Upload box will open.
, and a File Upload box will open.
5.In the File section, browse to select the saved Excel template file. Add a title and other information, and select Next.*
*The file is uploaded to the database and is now available from the Excel template drop-down menu for future use by all users. Any .xlt files added in this way will appear in the drop-down.
6.In the Crosstab configuration form, click Go to run the report. The Crosstab Report produced in EQuIS Professional will not contain any evidence of the Excel template at this stage.
7.Export the report to Excel by clicking the Excel icon.
8.Excel will automatically open and display the report within the template.
9.To view the footer layout, see the Print Preview.
Notes: •When using Excel templates to export a Crosstab, users can use the selected ColumnHeaders as template codes. •Two new Crosstab templates are now available. These templates allow users to tile the crosstab horizontally or vertically when using the separate tables by each unique feature. When exporting the crosstab to Excel, you must change the file type to Macro-Enabled Excel spreadsheets from the Save File dialog window. |