•Formatting Column or Row Header Dates
Conditional formatting can be used to enhance the Excel template and format row header data. It does, however, require a knowledge of which report will be using the template and how the data will be displayed.
Formatting Row Header Data
Click here for a tutorial on setting up a standard template.
The Row Header style will only format the header section of the table, and not the actual row header data. Using conditional formatting, this can be fixed.
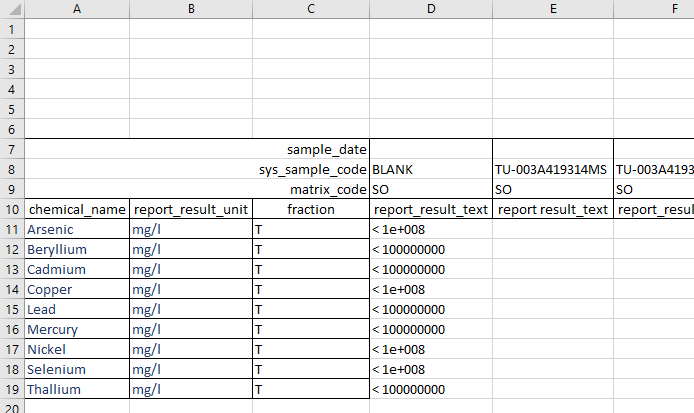
1.Start at the named "Data" cell, count down the number of column headers the export will have when this template is used. For example, if the "Data" cell is A7 and the table is going to have three column headers, count A8 as one, A9 as two, and A10 as three. This is where the table headers will end; meaning the next row down is where the actual table data will start being filled in. Next, select A11 and then drag the mouse over, selecting as many columns as there are row headers. This table will have three row headers; the selection now includes A11, B11, and C11.
2.Now drag down, selecting several rows down. It can be easy to determine how many rows down to select if, for example, the row header lists chemical names and the table only includes a certain number of analytes. This table has nine analytes, so drag down to row 19. The selection is now A11:C19. If the number of rows the table will have is unknown, simply drag down several rows.
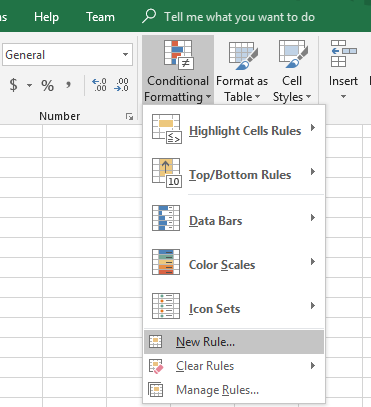
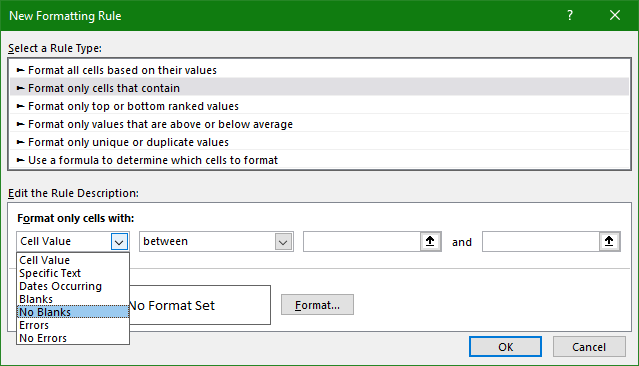
3.Click Conditional Formatting in the Styles section of the Home ribbon. A menu will appear, click New Rule and the New Formatting Rule dialog will open. There are several options, but click Format only cells that contain. Then, in the first drop-down labeled "Format only cells with," select No Blanks. Then click the Format button, and set up the formatting. The options are a bit limited, but the font can be bolded, italicized or underlined, the font color can be changed, a fill can be applied, and a border can be added.
4.When finished, click OK, and then OK again. Check that the format is working by typing any text into one of the cells. Delete the text and Save the template.
Formatting Column or Row Header Dates
Click here for a tutorial on setting up a standard template.
Again, using conditional formatting requires prior knowledge about the report output to be used effectively. For this specific example, it is necessary to know which position the formatted date header will take. In this example (Column Header Dates), assume that the sample_date will be the top column header.
1.Select the entire first row (or the row starting the named Data range). If placing sample_date in the row header section, and it was the first row header, then select the entire column A.
2.Click on Conditional Formatting in the Styles section of the Home ribbon. A menu will appear. Click on New Rule and the New Formatting Rule dialog will open. There are several options, click on Format only cells that contain. Then, in the first drop-down labeled "Format only cells with," select No Blanks. Then click on the Format button and go to the Number tab. Here, choose the desired date format.
3.Finish creating the template and Save as *.xltx.
Formatting Data
Click here for a tutorial on setting up a standard template.
This requires an even more extensive knowledge of the expected output, and some careful planning.
Note: If the report output is configured to have multiple tabs, users will need to copy the Conditional Formatting to each of those sheets in the template. Additionally, Conditional Formatting will be modified if/when the number of sheets in the Excel template do not match that of the report output. If unsure of how many sheets the report will have, users can have more sheets than the export, as long as the Conditional Formatting is applied to each of those sheets. |