After completing the appropriate setup, the ArcEQuIS ribbon will be available in ArcGIS Pro Desktop.
1.Start ArcGIS Professional Desktop.
2.Create a new Map Project.
Note: Starting without a template or using other project types may cause errors. |
|---|
3.Click the Add Site button on the ArcEQuIS ribbon. This will open the Add EQuIS Enterprise Site window for connecting to an EQuIS Enterprise site. Until a site is added, the Add Site and Refresh Site are the only buttons on the ArcEQuIS ribbon that are enabled.
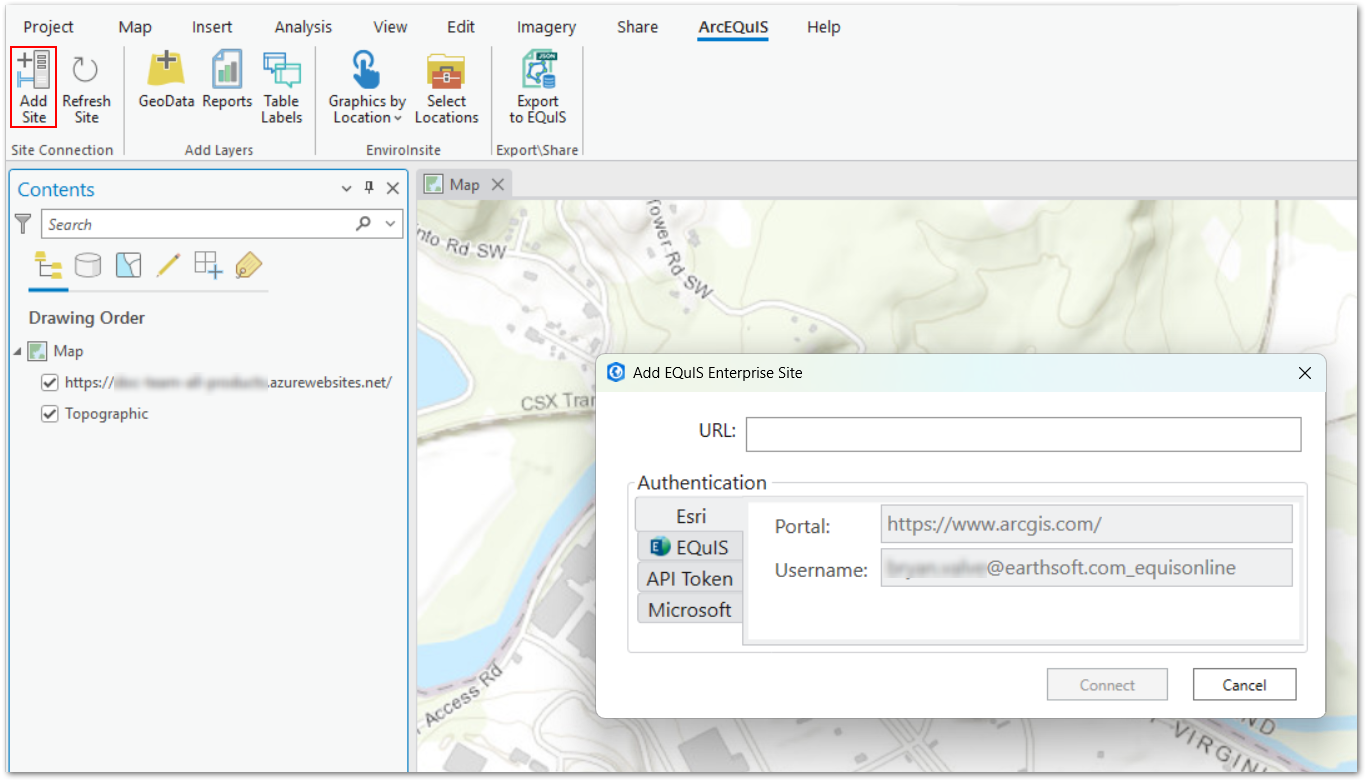
4.Enter the target EQuIS Enterprise URL.
5.Enter user Authentication details. Four methods of user authentication to the EQuIS Enterprise site are supported: (1) Esri, (2) EQuIS, (3) API Token, and (4) Microsoft.
Esri – Single Sign On (SSO) authentication based on the Esri-authenticated user also being an EQuIS user. To setup SSO authentication, follow the Esri-authentication instructions in the ArcEQuIS Requirements and Setup article. The Esri user's email must match the email of a valid EQuIS user for the Enterprise site entered.
EQuIS – Enter your EQuIS username and password for the EQuIS Enterprise site.
API Token – EQuIS Enterprise includes a REST API endpoint for generating JSON Web Tokens for authentication. A Token can be generated on the Security tab of the User Profile Editor in Enterprise.
Microsoft – Sign in with Microsoft Credentials. If the Enterprise site is appropriately configured (see Login – Microsoft Entra ID), users may be authenticated with Entra ID (or what is known as your Microsoft 365 organizational account).
EQuIS users must be assigned to the REST API role (in Enterprise) for any authentication mechanism to succeed. Assigning users to the REST API role must be done by an EQuIS Enterprise Administrator (a user assigned to the Admin role). The Admin user will need to login to EQuIS Enterprise, navigate to the Administration Dashboard, and then use the Roles tab of the User Profile Editor to assign the REST API role to each user they want to be able to use the ArcEQuIS Interface.
6.Click OK. When the EQuIS Enterprise site connects, a group layer named with the connected URL is added to the map.
Note: When created, EQuIS site layers store a keyword, "equissitelayer-usedforsiterefresh", in the site layer metadata under the 'Use limitations' section that will be used to determine whether a group layer is an EQuIS site layer or other geospatial layer or feature class. ArcEQuIS searches for this term to determine what needs to be refreshed. Do not delete this keyword. |
|---|
Note: When opening a saved project, Add Site and Refresh Site will be the only buttons on the ArcEQuIS ribbon that are enabled. |
|---|
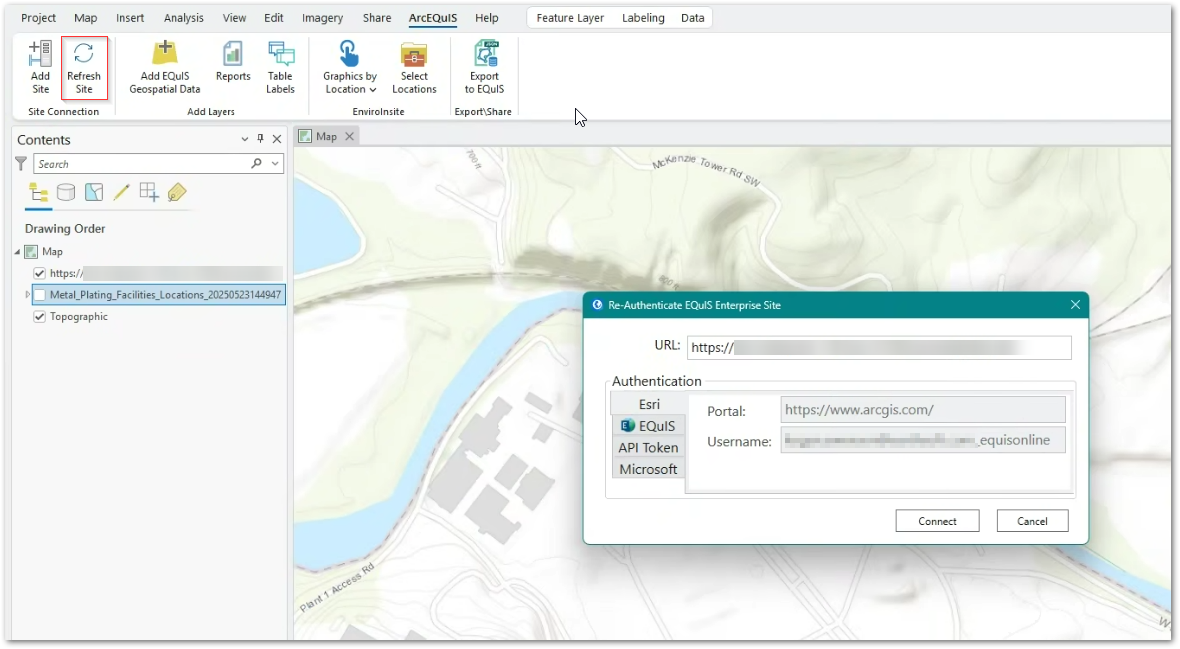
Refresh Connection to a Layer
The connection to a layer must be refreshed by clicking the Refresh Site button if the token used to authenticate the user has expired. A red exclamation point (!) next to the layer name, in the Contents pane, indicates when an authentication token is expired.
1.Open the saved project that contains an ArcEQuIS layer.
2.Select Refresh Site to reconnect any linked database layers.
3.For each Enterprise site, re-authenticate.
4.The token for each layer will be refreshed. The connection will also be added to the Add EQuIS Data window so that additional layers may be added.
Site Connectivity Scenarios and Add Data/Refresh Site Button Behavior
•Project has no site saved when opened:
▪Add EQuIS Geospatial Data button is disabled because no site is present.
▪Refresh Site button does nothing.
•Project has one site but no linked layer (e.g., report layer):
▪Add EQuIS Geospatial Data button is disabled because no linked layer is present.
▪Refresh Site button does nothing.
•Project has one site and a linked layer with an expired token:
▪Add EQuIS Geospatial Data button is disabled because the linked layer does not have a valid token.
▪Refresh Site button prompts the user to login with valid credentials.
•Project has one site and a linked layer with a valid token:
▪Add EQuIS Geospatial Data button is enabled.
▪Refresh Site button refreshes Linked Layer data.
•Project has one or more sites but no linked layer:
▪Add EQuIS Geospatial Data button is disabled because no linked layer is present.
▪Refresh Site button does nothing.
•Project has one or more sites and one or more linked layers with expired tokens:
▪Add EQuIS Geospatial Data button is disabled because no linked layers have valid tokens.
▪Refresh Site button prompts the user to login with valid credentials.
•Project has one or more sites, one or more linked layers with expired tokens, and one or more linked layers with valid tokens:
▪Add EQuIS Geospatial Data button is enabled because at least one site has valid credentials, but only the authenticated site is displayed in the site drop down.
▪Refresh Data button prompts the user to login to provide valid credentials for the expired linked layer(s).
Notes: •All buttons will be enabled after refreshing an existing project that includes an authenticated site and data. •All active buttons will remain active if a site is removed. |
|---|