•Configuring the Field Array Columns
•Configuring the Operation Object
The Data Grid widget allows users to edit values in the grid and send OData requests when the edits are saved. This functionality allows users to update existing database records via the data grid. OData requests are configured using JavaScript Object Notation (JSON) in the Advanced tab of the Widget Editor.
When properly configured, users can select a row in the data grid and edit the values, and then the OData requests will execute when the user saves the edit. This article explains how to configure the Advanced tab to allow for OData requests. See the OData Tutorial article for detailed examples of sending OData requests from the Data Grid widget.
Note: To implement OData functionality in the Data Grid widget, users will need editor permission to the facility they are trying to update. |
Warnings: •Any fields (aka columns) targeted in an OData request must be visible columns in the data grid, or the request will throw an error. •When using a language that uses a "," (comma) for the decimal place separator, behavior diverges between Google Chrome and Firefox: oChrome users can edit a number as a number or a string. If used inside a string, any decimal separator is accepted (e.g., 4.5, "4.5", and "4,5" are all valid) oFirefox users can only edit a number using the correct decimal separator as a string (e.g., only "4,5" is valid in a language with the comma decimal separator). Using 4.5 or "4.5" in a numeric field will evaluate to "45" in the row and commit 45 to the database. |
Configuration
Open the Widget Editor by selecting the More Options ![]() icon in the upper right corner of the widget to display the drop-down menu and then select the Edit menu option. Select the Advanced tab.
icon in the upper right corner of the widget to display the drop-down menu and then select the Edit menu option. Select the Advanced tab.
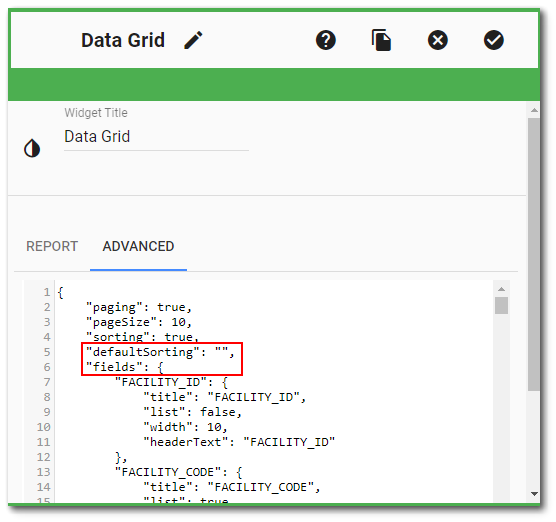
To configure OData functionality, add the rowEdit object in the main JSON object on the same level as the defaultSorting or fields properties:
"rowEdit": {
"fields": [],
"operation": {}
},
This rowEdit object consists of two properties: a fields array and the operation object. The fields array is an array of objects informing the Data Grid which fields are editable. The operation object is the OData operation(s) that will be executed when the edits are saved in the Data Grid.
Note: Saving the edits will run every request defined in the operation object no matter if the values have been updated. |
Configuring the Field Array Columns
The fields array signals which fields are editable in the data grid and consists of field objects. Determine which columns in the data grid will be editable and add them to the field array to make them editable. There are three "Edit Types" for editing a column: Numeric, List, and Text. Details are provided on how to configure a column to be one of the three edit types.
Numeric Column Edit Type
To make a column a numeric edit type, create an object in the columns array with the following properties: field, editType, and decimalPlaces.
The field property defines which column (aka "field") in the data grid should be a numerical edit type. The editType property should be set to "Numeric". The decimalPlaces property is the number of decimal places to be displayed in the column and rounded to in the database.
The following JSON is an example of a column, CUSTOM_FIELD_1, that is a numerical edit type and displays numbers to the hundredth decimal place in the data grid:
{
"field": "CUSTOM_FIELD_1",
"editType": "Numeric",
"decimalPlaces": 2
}
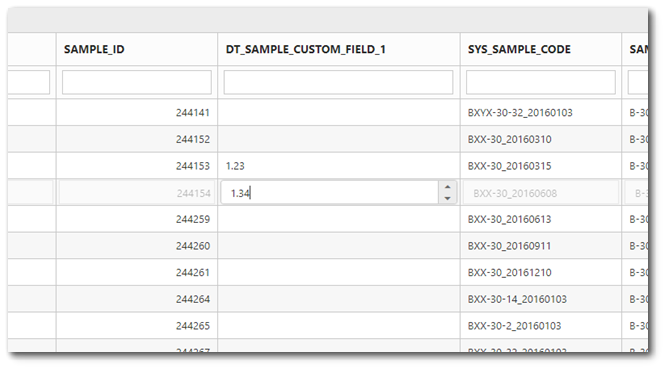
Notes: •The value can exceed the specified number of decimal places while the user is editing, however upon saving, the value will be rounded to the decimal place defined in the OData request. •If the decimal places property is not specified, the default value of 0 (zero) will be used. |
List Column Edit Type
To make a column a list edit type, create an object in the columns array with the following properties: field, editType, and listValues. The field property defines which column (aka "field") in the data grid should be a list edit type. The editType property should be set to "List". The listValues property will display as a drop-down list in the data grid row cell and should be an array of objects with two keys: “value” and “text”. The value for the “value” property is applied when the option is selected and saved to the database. The value for the “text” property is used to display the option in the drop-down list in the data grid.
The following JSON is an example of a column, CUSTOM_FIELD_2, that is a list edit type that displays two options (“Yes” and “No”) for the user to select in a data grid row cell:
{
"field": "CUSTOM_FIELD_2",
"editType": "List",
"listValues": [
{
"value": "Y",
"text": "Yes"
},
{
"value": "N",
"text": "No"
}
]
}
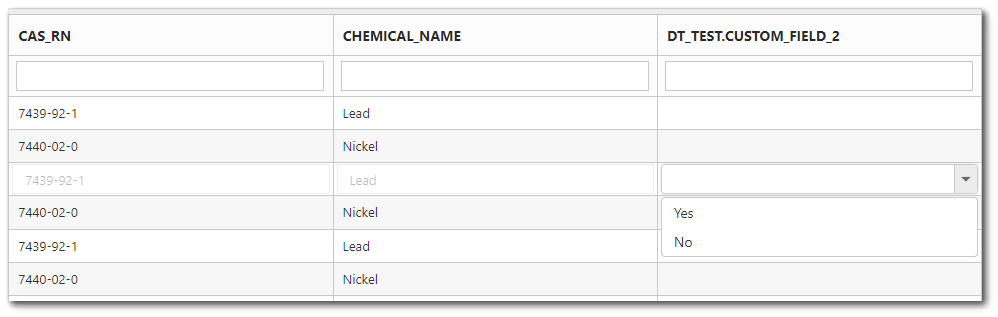
Note: Selecting either value will set the value for CUSTOM_FIELD_2 to the corresponding option selected for the currently edited row. |
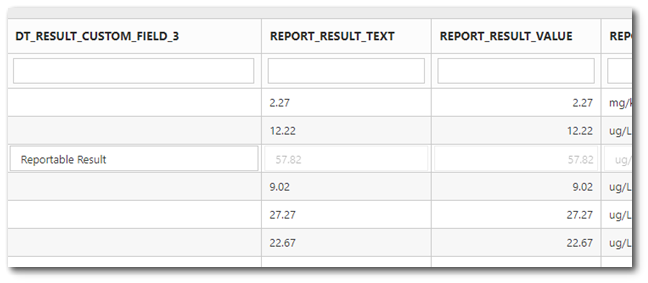
Text Column Edit Type
To make a field a text edit type, create an object in the columns array with the following properties: field and editType. The field property defines which column (aka "field") in the data grid should be a text edit type. The editType property should be set to "Text".
The following JSON is an example of a column, CUSTOM_FIELD_3, that is a text edit type:
{
"field": "CUSTOM_FIELD_3",
"editType": "Text"
}
Configuring the Operation Object
The operation object is where the OData request(s) are defined. These OData requests can use values in the current edited row by wrapping the desired column field in %% (e.g., %FACILITY_ID% would replace the current edited row’s FACILITY_ID with the placeholder). There are also four macros that can be used in the same way: %user_id%, %username%, %now%, and %utc_now%. These macros will replace the placeholders with the corresponding values: user_id is the current logged in user’s user_id, username is the current logged in username, now is the date and time when the request was sent, and utc_now is the date time when the request was sent in UTC.
Three properties are required for the operation object: method, uri, and body. There are also two optional properties: success and error. Both the column fields and macros placeholders can be used in the uri and body properties. Below are examples of how to configure each property of the operation object.
Note: If a configured request within the operation object contains a key that is present in the grid data, the corresponding column will need to be configured to be displayed in the grid. If the column is not present in the grid, the request will not succeed. If the column that is needed is not desired to be displayed, the width value can be set to 0 to “hide” the column in the data grid. |
Method Property
The method property, either PUT or POST, identifies what type of OData request is going to be sent.
URI Property
The uri property, either relative or absolute, identifies where to send the OData request. A relative URI points to an endpoint or somewhere locally (e.g., api/odata/DT….). An absolute URI points to a location on the internet that might not be local (e.g., https://.... or a logic app).
Warning: •The uri/body properties in the Advanced tab in the data grid widget need to match the case for the column in the report output for the values (between the wildcards '%'). Table and column names inside the uri/body keys must be uppercase, however values must be cased the same as the column in the output of the data grid. |
If a table value needs to be used in the URI, there are two different ways to do it based on whether it is a single or multi key URI. If the URI contains a single key, simply wrapping the value in %% will be sufficient [e.g., DT_SAMPLE(%sample_id%)]. If the URI contains multiple keys, the column values will need to be prefaced with the column being used and split the columns by commas [e.g., DT_RESULT(FACILITY_ID=%facility_id%,TEST_ID=%test_id%....)]. If the value of the key needs to be a string, wrap the key in single quotes [e.g., RT_ANALYTE(‘%cas_rn%’)].
Note: If the URI is an absolute URI, the web.config file will need to be updated to allow for requests to be sent to the provided URI. |
Body Property
The body property is an object consisting of key value pairs to be sent as the body of the OData request. These key value pairs do not have to come from the grid data and can be hardcoded values. Multiple placeholder values can be used within the body besides the value of the column being updated (see example below).
“body”: {
“CUSTOM_FIELD_1”: “%custom_field_1% - %username%”
}
In this example, the value of CUSTOM_FIELD_1 is updated in the database with the value of CUSTOM_FIELD_1 and the username of the user who updated the value.
Success Property
The success property is an operation object like the parent operation that will be executed if the parent operation ends successfully. This operation object has the same required properties of the parent operation (method, uri, and body) as well as the optional properties success and error. This allows users to chain multiple OData requests if they all succeed.
Error Property
The error property is an operation object like the parent operation or the success property, and will be executed if the parent operation ends in an error. This operation object has the same required properties of the parent or success operation (method, uri, and body) as well as the optional properties success and error. This allows users to catch when an operation ends in an error and send off a replacement request.
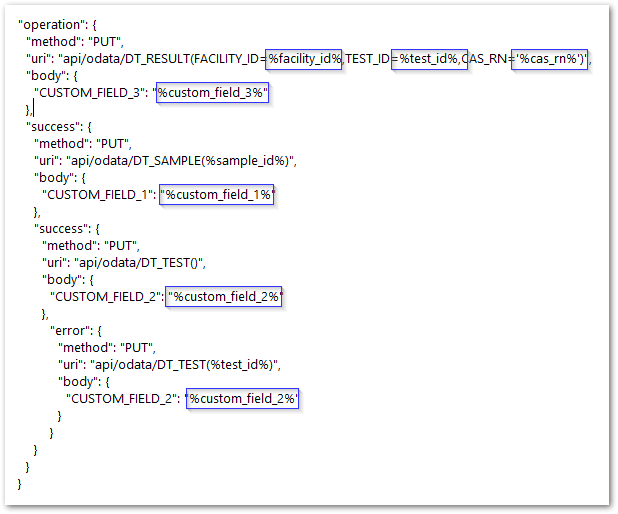
Example of a Configured Operation Object
In this example, the top-level request is a PUT request to the DT_RESULT table using the expected keys for updating the table being populated from the grid data and updating CUSTOM_FIELD_3 for the selected row. If that request ends successfully, the next request will be a PUT request to the DT_SAMPLE table using the SAMPLE_ID from the selected row and updating CUSTOM_FIELD_1 for the given row. If that request ends successfully, a PUT request to the DT_TEST table will be sent. This request will not be successful intentionally because it does not have the expected key used to identify the row to be updated. The error operation will then be executed, which contains the expected key and will update CUSTOM_FIELD_2.
"operation": {
"method": "PUT",
"uri": "api/odata/DT_RESULT(FACILITY_ID=%facility_id%,TEST_ID=%test_id%,CAS_RN='%cas_rn%')",
"body": {
"CUSTOM_FIELD_3": "%custom_field_3%"
},
"success": {
"method": "PUT",
"uri": "api/odata/DT_SAMPLE(%sample_id%)",
"body": {
"CUSTOM_FIELD_1": "%custom_field_1%"
},
"success": {
"method": "PUT",
"uri": "api/odata/DT_TEST()",
"body": {
"CUSTOM_FIELD_2": "%custom_field_2%"
},
"error": {
"method": "PUT",
"uri": "api/odata/DT_TEST(%test_id%)",
"body": {
"CUSTOM_FIELD_2": "%custom_field_2%"
}
}
}
}
}
Note: If the request being sent does not have an error operation defined, a pop-up will be displayed informing the user of the requests sent and their status. |
Sending OData Requests
Once the rowEdit object is configured with a populated fields array and operations are defined in the operation object, the Data Grid will have a toolbar to enable editing. The toolbar has three options: Edit (![]() ), Update (
), Update (![]() ), and Cancel (
), and Cancel (![]() ). The Update and Cancel icons are enabled after an edit has been made.
). The Update and Cancel icons are enabled after an edit has been made.
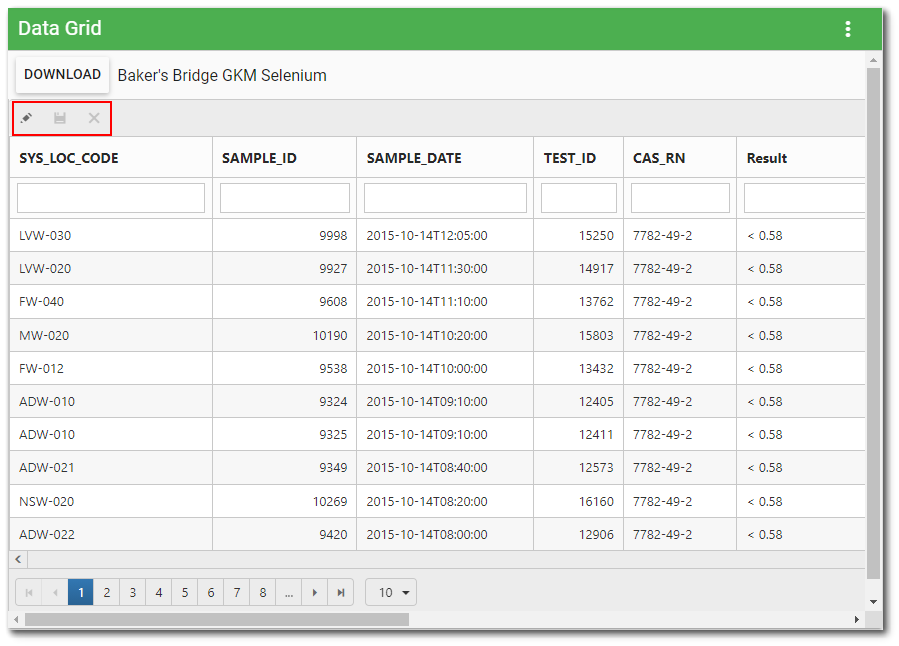
To begin an edit, select a row to edit and click on the Edit ![]() icon in the toolbar. This will allow editing in the selected row only for values in the columns defined as editable. Edits can be canceled by clicking the Cancel
icon in the toolbar. This will allow editing in the selected row only for values in the columns defined as editable. Edits can be canceled by clicking the Cancel ![]() icon in the toolbar or pressing the Esc key. Edits can be saved by clicking the Update
icon in the toolbar or pressing the Esc key. Edits can be saved by clicking the Update ![]() icon in the toolbar or pressing the Enter key. When an edit is saved, the requests defined in the operation object will be executed. A loading indicator will be displayed while the requests are being sent. If the requests end successfully, the edited data will persist and the grid will return to the state before editing began. If a request failed, the data corresponding to the request will be reverted.
icon in the toolbar or pressing the Enter key. When an edit is saved, the requests defined in the operation object will be executed. A loading indicator will be displayed while the requests are being sent. If the requests end successfully, the edited data will persist and the grid will return to the state before editing began. If a request failed, the data corresponding to the request will be reverted.
Note: Editing a single field will not show the update in other rows that include that same value. Refresh the grid to see the update reflected in those rows. |