This article explains how to import loggers that use the Live Logger section, more in-depth information may be found in each of the logger articles.
Live Logger Devices
The following devices must be imported using the Live Logger method. The table below shows the relationship between the devices, remap codes and extensions.
Device/Model |
Remap Code |
Extension(s) |
|---|---|---|
CSI: TOA5 |
CSI_TOA5 |
.dat, .txt |
In-Situ: Level 500 (or 100,300,700) |
In-Situ_Level500 |
.csv, .cdf |
In-Situ: Troll 200 |
In-Situ_Troll200 |
.csv, .cdf |
Solinst: Levelogger Gold |
Solinst_Levelogger_Gold |
.csv, .cdf |
Solinst: Barologger |
Solinst_Barologger |
.csv, .cdf |
VanEssen: Mini Diver |
Van-Essen_Mini_Diver |
.csv, .cdf |
Setup EDGE to Import Live Data Logger Data
1.Confirm that the Live sections of the EDGE format have been enabled. See Turn On/Off Live Sections in EDGE Format for detailed steps. This will need to be done for the EDGE format used by Professional or Enterprise EDP, whichever is used to upload data from EDGE.
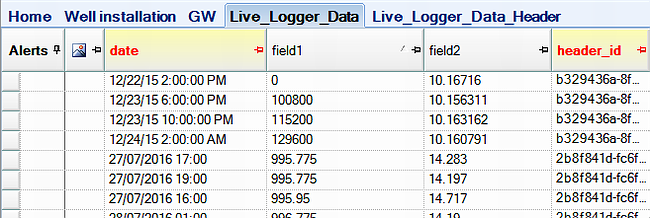
2.Logger data are imported into two tabs: "Live_Logger_Data_Header" for the headers and "Live_Logger_Data" for the data. To make these sections present as a tabs within EDGE:
a.Select the Show/Hide Tabs menu option.
b.Select the "Live_Logger_Data" and the "Live_Logger_Data_Header" check boxes.
c.Close the dialogue. The tabs should now be visible within EDGE.
Importing Logger Data to EDGE
1.To import data into the section, select the Devices tab on the ribbon toolbar.
a.Select the relevant device and navigate to the import file.
b.A successful data load message will provide information on the number of rows that were imported, and the time taken.
2.The header data and unit data is imported into the "Live_Logger_Data_Header" section, while the logger data into the "Live_logger_data" section and they are connected with the "Header_ID" field which is automatically set during an import.


3.The EDD may then be exported from EDGE as explained in Export to EDP (Sign and Submit).
4.Users can import as many loggers as necessary in one session.
Setting up Remap on EDP Import
It is essential to ensure that the correct analytes and units for the datalogger parameters are present in the RT_ANALYTE and RT_UNIT tables, respectively. Remaps can also be used to change the external unit/cas_rn to another more desirable unit/cas_rn.
1.In the RT_REMAP table, create a new row that contains the remap_code of the desired logger (See Table 1 for remap Codes).
a.Supply an accurate description.
b.The example below has a remap_code of "Mini_Diver".

2.In the RT_REMAP_DETAIL table, create a row for each remap.
a.remap_code – The remap_code for the desired logger that's already present in the RT_REMAP table.
b.external_field – cas_rn if analyte; unit if unit.
c.external_value – Value present in the logger being imported (e.g., Temp).
d.internal_value – Value one wants the field to be remapped to (e.g., Temp =>Temperature).

3. Once correctly setup, the remapping will occur during the create step in EDP.
Importing Into EDP
For guidance in loading data to the database, please go to Importing Logger Data to the Database.
Device Specific Differences
Solinst
Both Solinst loggers can be Imported with Calibration/Calculation, as explained in the article titled Solinst.
CSI:TOA5
EDGE will import the raw data file that is produced from a CSI data logger in the TOA5 format (file extension *.dat). The following list shows what headers are supported with the import (the header name must start with the text shown):
Data logger code
•Sys_loc_code – Determined from the second value within the .dat file
•Date and Time
•Depth
•Up to 30 different field readings
•Units for each field data series
The headers can be in any order for the import to work, but 'datalogger_code' and 'Date and Time' values must be present for each line of data.
In-Situ Level 500
The following data and its units must be present in the In-Situ Level 500 (100,300,700) files for EDGE to import them correctly:
•Temperature
•Pressure
•Level Depth to Water