•Add or Remove Users from Roles
The Role Manager widget is located on the Administration dashboard. Administrators may use this widget to view, modify, or create application roles. Clicking on a role in this widget launches the Role Profile Editor for that role.
Note: EarthSoft strongly recommends not adding the Role Manager widget to any other dashboard apart from the Administration dashboard, as it may cause permission issues. |
|---|
Enterprise 7 introduces license-based roles. License roles appear at the top of the list in the Role Manager widget. New users are created with the Status Flag set to 'R'. Assigning a user to an EQuIS Enterprise license role activates the user, setting their STATUS_FLAG to 'A' and consuming an EQuIS Enterprise License upon logging in. Removing a user from an EQuIS Enterprise license role deactivates the user, setting their STATUS_FLAG is set to 'R' and releasing an EQuIS Enterprise License.
Administrators cannot add more users to the licensed role than the number of licenses.
Deploying or redeploying an EQuIS Enterprise site for a licensed database creates a new role for the EQuIS Enterprise license, listing the license type and count. Each active user who was consuming a license is added to the created role.
When viewing other users' User Profiles, administrators can disable users via the Disable menu option. After being disabled, the user's STATUS_FLAG is set to 'D'. The user no longer appears in the User Manager and cannot log in to EQuIS Enterprise. Users cannot disable themselves.
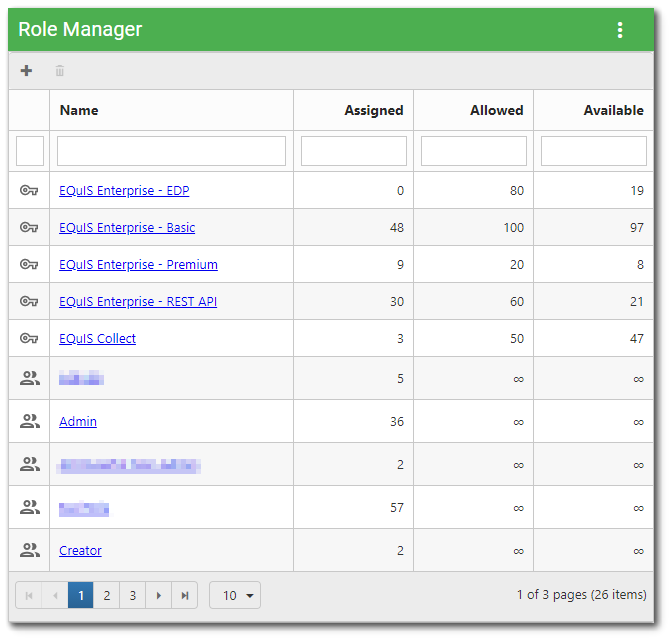
The Role Manager widget displays a grid that lists roles in the system (aka the ST_ROLE table) and contains attributes of the role. The widget has the following five columns:
•Role Icon – Denotes either a standard permissions role ![]() , a license role
, a license role ![]() , or an Application Level Security (ALS) role
, or an Application Level Security (ALS) role ![]() for EQuIS Professional access.
for EQuIS Professional access.
•Name – The name of the role. This value must be unique (within the ST_ROLE table). Click the role name to open the Role Profile Editor window for that role.
Note: Due to dependencies in the Workflow widget, the "Admin" role should NOT be renamed. |
•Assigned – The number of users assigned to the corresponding role.
•Allowed – The maximum number of users allowed to be assigned to this role. This is particularly useful for license roles.
•Available – The slots available to assign further users (for license roles).
Administrators can filter or sort the grid columns of the Role Manager widget based on these properties:
•Sorting – To sort, click the column header (click again to reverse the sort). Sorting does not change the current page, and the first or last values of the sorted column may not be displayed, unless on the first or last page of the list.
•Filtering – To filter the roles, enter a search term (one or more characters) in the appropriate search box beneath the column header. Only roles that contain the search term (name, description) will be displayed.
The bottom of the grid contains paging controls for displaying a limited number of roles at a time, as described below:
•Arrows – Use the left/right arrows to navigate through pages.
•Go to Page List – Select a specific page to navigate directly to that page.
•Rows per Page – Change the number of roles to be displayed per page by using the drop-down menu.
•Count of Pages and Total Items – This control indicates the total number of items available in the grid, how many pages to display the items, and which page is currently selected.
The paging controls are specific to the current search. For example, if there are 15 roles, but only four roles match the current search term, then the paging controls will apply only to the four matching roles.
Create or Delete Roles
The grid header contains the following items:
•New Role – To create a new role, click the New Role ![]() button. The button opens the Role Profile Editor window to enter the attributes of the role and assign role members.
button. The button opens the Role Profile Editor window to enter the attributes of the role and assign role members.
•Delete Role – Select a role. Once the role is highlighted, click the Delete Role ![]() icon to delete the selected role.
icon to delete the selected role.
As of EQuIS build 7.22.3, Administrators can create a role in the Role Profile Editor that allows users with the required permissions the ability to download commit and error logs in the EDP EDD Status widget (without the need to be an Administrator or the Data Submitter).
The minimum permissions required for a user in the "Data Manager" user to have permission are:
•Editor permission to the Facility
•Viewer permission to the EDD object type
Note: the role does not need to be named "Data Manager" as the ROLE_ID will be used to configure the setting in the ST_CONFIG table.
Add or Remove Users from Roles
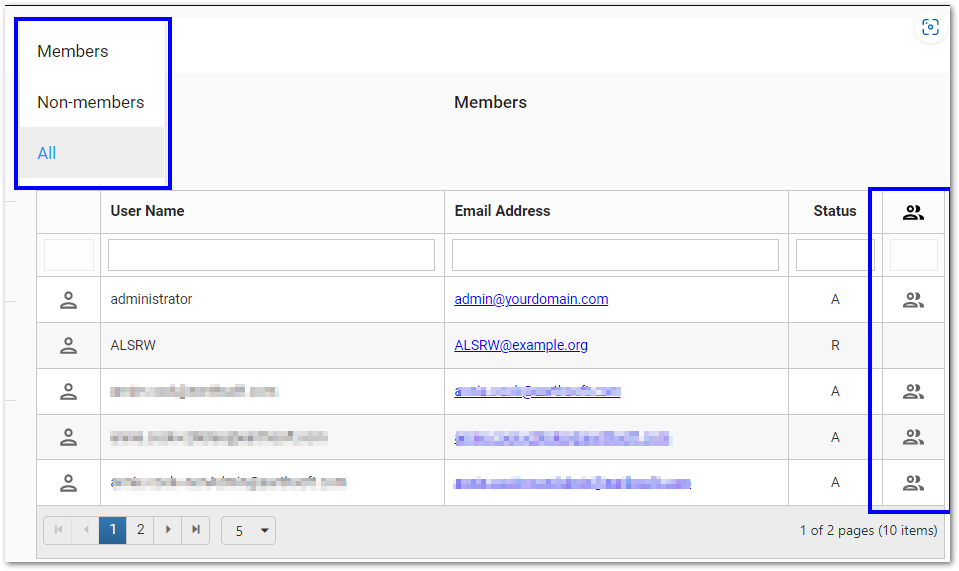
Administrators can add or remove users from roles by selecting the role and opening the Edit Role window.
On the right side of the Edit Role window, in the Members section, users can be added to or removed from the role by clicking in the last column (which will either add or remove the member "tag"). Filtering by Members, Non-members, or All will display the associated members for that role.
The member tag column can be sorted by clicking the column header. When filtering by All, sorting by member tag will sort by member or non-member.
Widget Properties
The Role Manager widget has no specific properties. To change the title or color of this widget, open the Widget Editor by selecting More Options ![]() > Edit in the Widget Header.
> Edit in the Widget Header.
For information on these general options, see the Widget Editor article:
•Widget Title •Widget Theme •Object Editor |
•Help •Copy Settings •Close without Saving |
•Save |